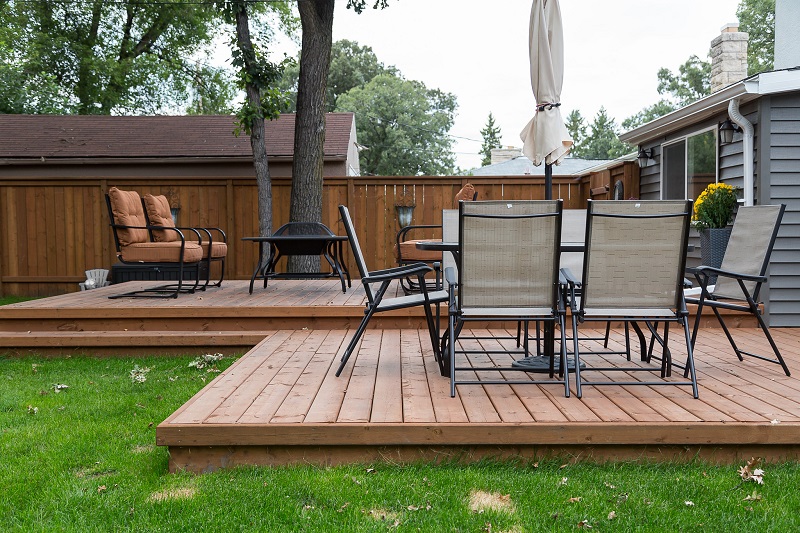
Building a floating deck on uneven ground is one great way to gain versatility out of your outdoor living space. While there are many good reasons for starting from scratch, most decks can be renovated to support a floating deck. By taking this new approach, you reclaim the space below your deck, add value to your home and get a fresh new look.
There are several reasons to build a floating deck including creating a new space on your property and improving your garden. Floors made from light materials such as lumber can cost less and they won’t sink into the soil when you add a load-bearing wall or structure. Before you get started, you can build the joists to match the height of the existing house floor level and frame them in with 2 x 4s for support.
How to build a deck level with ground
Building a deck is a great way to add value to your property and make your outdoor living space more enjoyable. If you want to take advantage of the view from the back patio or build that dream deck, but don’t want to spend a fortune on building materials, there are ways to do it yourself.
Building a floating deck on uneven ground is one of these options. The process involves using deck blocks instead of traditional support posts. These blocks allow you to build an elevated deck level with ground that looks like a floating deck.
Materials Needed For Floating Deck
The materials needed for this project are not expensive and can be purchased at most home improvement stores:
Deck blocks – You will need enough 2x6x8′ pressure-treated lumber to cover the area where you plan on building your floating deck (the width will depend on how wide you want it). For example, if your yard is 65 feet long and 30 feet wide, then you would need 49 total boards (65/30=2.5; 2 times 2.5 equals 5). Each board is 8 feet long so multiply 65 by 8 equals 520 inches; divide 520 inches by 12 inches equals 40 boards needed for this project).
Screws – You will
Floating decks are a great way to add extra space to your home without having to worry about digging into the ground. This type of deck is really easy to build and doesn’t require any heavy equipment or special tools.
A floating deck is built using pressure-treated wood deck blocks that sit directly on the ground or on a concrete pad. The blocks are typically spaced no more than 12 inches apart and each block has predrilled holes where the screws go in.
The first step in building your own floating deck is measuring out your area and marking off where your deck blocks will go. You should also take into account how much room you’ll need for walking around the outside of the deck and make sure there’s enough room between each block for people to walk by safely.
Once you’ve got your measurements down, it’s time to start installing those deck blocks! Start by putting down a layer of sand or gravel over the ground where you want your deck to be built. Then put down some weed barrier fabric over top of this layer before installing all of your deck blocks in place.
After all of your deck blocks are securely fastened together, it’s time for staining them! Use a paintbrush or roller if you want an even coat over
You can build a floating deck on uneven ground by using either self-leveling concrete or water. Self-leveling concrete requires no mixing and is available at home centers. Water works with any type of lumber, but it’s not as durable as concrete.
Self-Leveling Concrete
1 Cut the plywood sheets to fit the area you want to cover with the deck. Leave a 1/4 inch of overhang beyond the edges of the deck’s joists. If you’re using 2-by-6 joists spaced 16 inches on center, cut four sheets of 3/4-inch exterior plywood into four pieces 21 inches wide by 30 inches long (each sheet will yield two pieces).
2 Place the first sheet of plywood in position on top of your subflooring, with its edge flush against an inner joist. Screw it into place through the outer layer only, using 1 5/8-inch exterior screws every 6 inches along each edge and every 12 inches in between (or as directed by your chosen method for attaching deck boards). If you’re working on an unpainted surface, prime and paint all exposed wood before continuing; this eliminates splinters that can occur when you attach boards over bare wood.
3 Place another
The first step in building a floating deck is to level and square the area. This is done by using 2x4s or 2x6s to mark the location of your joists. Once the joist locations are marked, dig holes for the deck blocks. The holes should be 18 inches deep and 12 inches wide. This will allow the blocks to sit flush with the ground when filled with sand or gravel.
Once you have dug your holes, place a block into each hole and fill them with gravel or sand until they are level with the ground surface. Next, place joist hangers on top of each block, making sure they are level with each other and even with the existing house structure if possible.
Install your decking boards on top of these hangers starting at one end of your deck and working toward the other end where you started. Once all of your decking boards are installed, you can add railings if desired
A floating deck is a great option for building an outdoor living space on uneven ground. It can also be used for creating a level surface over concrete, asphalt or even dirt. The process of building a floating deck is similar to building any other deck.
Here are some tips for building a floating deck:
Use treated lumber that’s rated for ground contact. If you’re using pressure-treated lumber, make sure it has been treated with an ACQ preservative, which stands for “alkaline copper quat,” and is the most effective preservative available today at preventing corrosion and decay. You can also use cedar or redwood if you want to save money, but keep in mind that they won’t last as long as treated lumber under ground contact.
You’ll want to make sure your deck frame is plumb (straight up and down). To do this, set up three temporary braces at each end of the frame (two on the top of the frame and one on the bottom). Then screw two wood stakes into the ground so they’re level with each other (see photo above) and run a string between them — this will be your guide when attaching joists to posts on either side of
If your backyard is uneven, you may be able to level it out with deck blocks. These interlocking blocks are made of cement, and when used in conjunction with a wooden deck frame and joists, they can provide a strong base for your outdoor living space.
The first step in building a floating deck is to lay out the deck blocks on the ground, in the shape you want your finished deck to take. To do this, simply spread out the blocks on the ground until they cover all of the uneven spots in your yard.
Once you have determined where each block will go, use a chalk line to mark off where each block should be placed. This will help ensure that all of your deck blocks are evenly spaced and aligned with one another.
Once you have marked off where each block will go, use a hammer and chisel to cut through any roots or stumps that are underneath each block location. This will allow them to sit flush against the ground once they have been placed there during construction.
Once all of your cuts have been made and your stumps removed from underneath each block location, it’s time to start laying down cement pours! Place one layer of concrete over top of each marked off spot where a
Floating decks are a great way to add value and function to your home. They are easy to build and can be customized in size and design. Floating decks can also be built on uneven ground, but there are some things you’ll need to consider before you begin construction.
The first thing you’ll need to do is level the area where the deck will be built. If the ground is too soft or unstable, you may want to dig up some dirt and place it back into place once the deck is installed. If the area is too hard, consider adding some gravel or sand beneath your deck blocks so that they are stable on your uneven ground surface.
Once you’ve leveled the area, mark off where you want each of your deck blocks to go. You can use a chalk line or string line for this step if necessary. Place one of your deck blocks in each spot and then attach them together using screws or nails through pre-drilled holes in each block’s bottom side (not the top).
Once all of your deck blocks are attached together, check for level again using a level tool or bubble level (if needed).
Floating decks are great for uneven ground, but not all floating decks are created equal.
For example, if you’re building a floating deck on uneven ground and your concrete pads are level to within 1/4 inch, then you can use our standard deck blocks as illustrated in the following diagram:
If your concrete pads are not level to within 1/4 inch, then you will need to use our adjustable track system. The adjustable track system allows you to adjust the height of each deck block by up to 3/8 inch (1 cm). The diagram below illustrates how this would work:
If your concrete pads are significantly out of level (more than 1/4 inch), then it may be necessary for you to use our double-track system which has two sets of tracks with different heights. The diagram below shows how this would work:
Building a floating deck on uneven ground is not as difficult as it may seem. The key is proper building techniques and choosing the right materials.
Building a Floating Deck on Uneven Ground
A floating deck is typically built using pressure treated wood or composite materials like cedar, redwood or Ipe, which are more resistant to rot than other woods. To build a floating deck, you will need to secure it to the ground and make sure it is level before you begin installing your decking boards.
If your yard is uneven, you can use concrete blocks to create level surfaces for your deck posts.
Step 1: Prepare the Ground
Level out the ground by filling in low spots with dirt or sand and removing high spots with a shovel or spade. Make sure there are no large rocks or roots in your yard before building your foundation for your floating deck.
Step 2: Attach Posts to Concrete Blocks
Position concrete blocks around each post location so that they form a square shape around each post location. You may need extra blocks to fill in any gaps between the existing ones if there are any gaps between them. Attach each post securely into place using lag bolts or through bolts depending on what type of
Floating decks are built on a concrete slab or a wooden sub-floor. These decks are more expensive than their more common cousins, as they require extra materials and labor. However, they are very useful in areas where the ground slopes or to create an elevated deck in a high water table area.
Floating decks do not require any footings. The deck is supported by blocking between joists, which are spaced at 16 inches on center. Floating decks are easy to build and should be considered when building on uneven ground or when you want to use the deck for entertaining guests.