Deck beams and posts are the backbone of any deck. Learn how to design your deck beams and post connections so you can build a strong, reliable deck.
When building a deck, the post-to-deck beam connection is essential. Besides acting as the lifting point for the deck, it will also transfer the force exerted from the posts to the structure of the deck itself. This guide offers you helpful tips on constructing this part of your deck.

How to build a deck beam
The deck beam to post connection is critical to the structural integrity of your deck. A typical beam is composed of two 2x6s joined at an angle, with the joists attached to each end. The joist hangers are attached to the beam using screws and/or nails.
Deck Beam Construction Code
The International Residential Code (IRC) requires that a deck support system be capable of supporting a minimum load of 50 pounds per square foot of deck area. This means that a 200 square foot deck needs to be able to support 10,000 pounds. Most residential decks are constructed with 6×6 treated pine posts, which will only support about 4500 pounds apiece when spaced at 16 inches on center (o.c.). In order for your deck to be structurally sound, you need to provide supplemental lateral support for each post by attaching it to another structure such as a wall or stud bay in the house. This connection is usually made by attaching an angle bracket between the post and wall studs using lag screws or carriage bolts (see diagram below).
The deck beam to post connection is the most critical part of any deck.
The deck beam to post connection must be strong enough to support the entire weight of the deck and it must be able to withstand the stress caused by moisture and movement.
You can use two methods for attaching your deck beam to your posts:
Post-to-beam or post-to-post: This is the most common method for attaching a beam, but it isn’t always the best option. If your beam is longer than the length between your posts, you’ll have a gap in your deck where you can see daylight through it. This can look unsightly and if you ever need to replace a board, it will be difficult because you’ll have to remove all of them at once.
Post-to-beam: This method uses an L bracket on each post and attaches directly to the top of your deck beam. It’s not as strong as post-to-post, but it’s better than having gaps in your decking.
The most common way to support a deck is with posts and beams. Posts are the vertical supports that hold up the deck. Beams are horizontal members that span between posts or between posts and walls.
In this article we’ll look at beam design considerations, including how to determine the size of your beams. We’ll also discuss some framing options, including how to make your deck code-compliant and how to build strong connections between your deck beams and posts.
Beam Design Considerations
There are a lot of variables that go into choosing the right beam size for your project. The first step is determining what type of wood you’re using — cedar, pressure-treated pine or redwood — because each kind has specific characteristics that affect its strength and durability. For example, cedar is more rot resistant than treated pine or redwood, but it’s also softer and more prone to splitting when nailed or screwed into place (see “Cedar vs. Pressure-Treated Wood” below).
Once you’ve chosen your wood type, you’ll need to decide how much weight your deck will carry before designing your beams. This will depend on how many people will be standing on the deck at any one time as well as whether it’s designed for entertaining
A deck beam is a large, heavy timber that holds the joists of your deck in place. The joists rest on the beam, which is attached to your house or railing posts. A deck beam can be made from pressure-treated wood or cedar lumber. You can also buy pre-cut beams from your local building supply store.
Step 1: Marking the Beam Location
Use a framing square to mark a line parallel to the top edge of your post. This line will indicate where you want the top edge of your beam to be located.
Step 2: Measuring for Beam Width
Measure from one end of the post to the other and subtract 5/8 inch from this measurement. This gives you an accurate width for your post bracket cutout so that it fits around both sides of the post without having any gaps between it and the post itself.
Step 3: Cutting Your Beam Lengths
Cut two pieces of lumber at this length with a circular saw or table saw using a crosscut blade set at 90 degrees. Use a miter saw or handsaw if necessary to make angled cuts along corners when necessary during construction of your deck. Measure these pieces against each other so they match before moving on to Step 4 below
The deck beam is the horizontal beam that connects the posts and supports the joists. Many decks use a simple, solid wood beam.
To build a deck with a solid wood beam, lay out the post holes as you did for the floor joists. Then cut two 1×12 boards to length for each end of your deck and nail them together with 16d nails along their long edges at 24-inch intervals.
Cut two 2×6 boards to length for each end of your deck and set them on top of the beam, which will be lying flat on its side between the posts. Cut them so that they fit snugly against each side of the deck frame and nail them in place with 16d nails at 12-inch intervals.
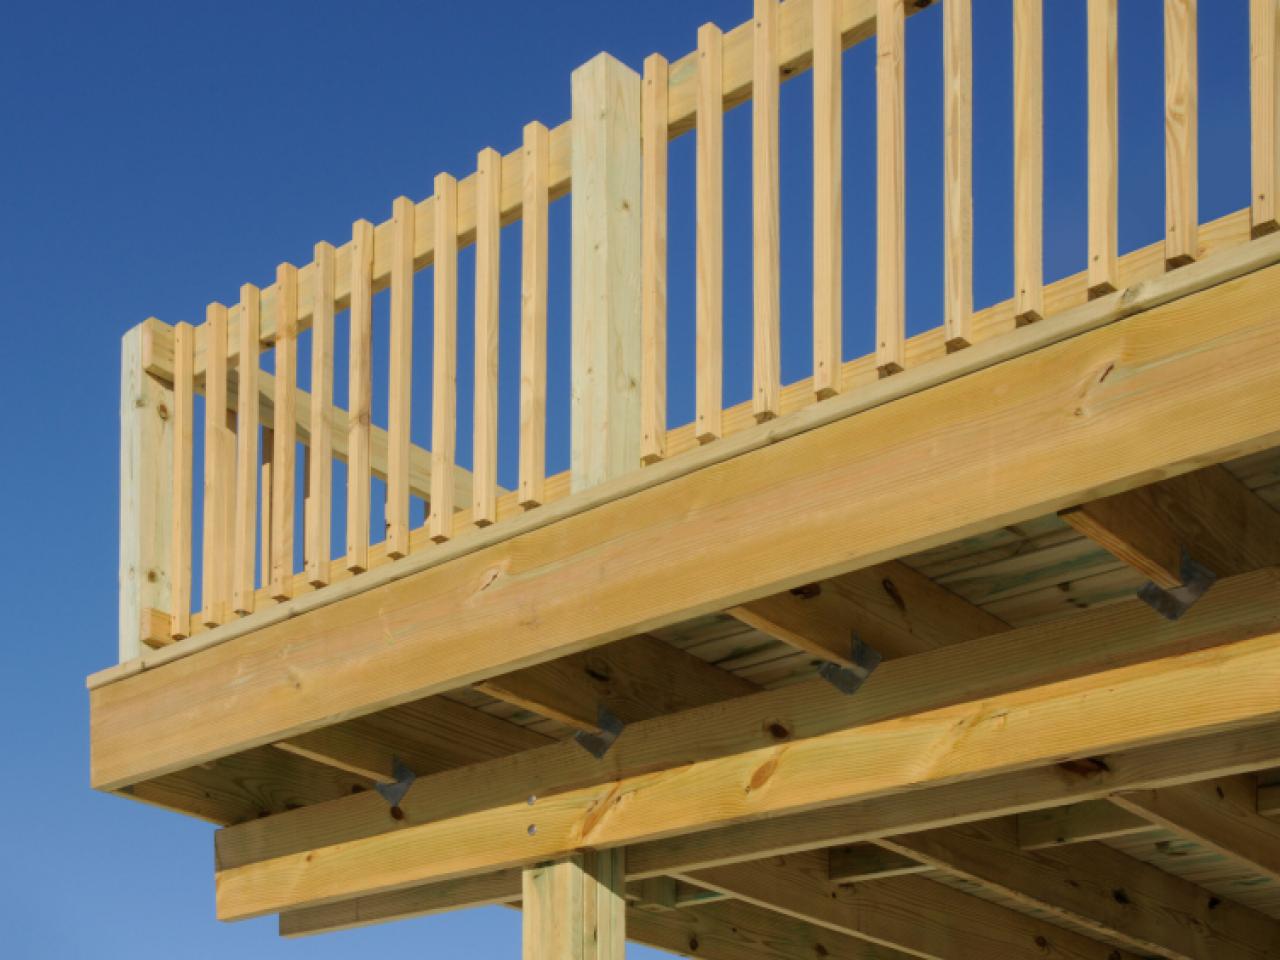
The deck beam to post connection is typically made with a single joist hanger, which is affixed to the post and has a hanger plate that is fixed to the bottom of the beam. The connecting bolts are then threaded through holes in the beam and through holes in the hanger plate. This type of connection is considered a temporary connection, and it should only be used for short-term applications.
The deck beam construction code requires this type of connection for decks that are less than 6 feet away from the house or garage wall or when there is not enough room for two 2x6s to be installed between posts at least 18 inches apart. The length of these single joist hanger connections cannot exceed 24 inches, which is half of the span distance between support posts (see Figure 1).
For deck beams that are not connected to posts, the minimum allowable spacing between beams shall be 4 times the least dimension of the decking boards.
Deck beams that are connected to posts shall be attached using bolts or lag screws at least 1/2-inch diameter, with a minimum length of 3 inches and a minimum head diameter of 3/8 inch.
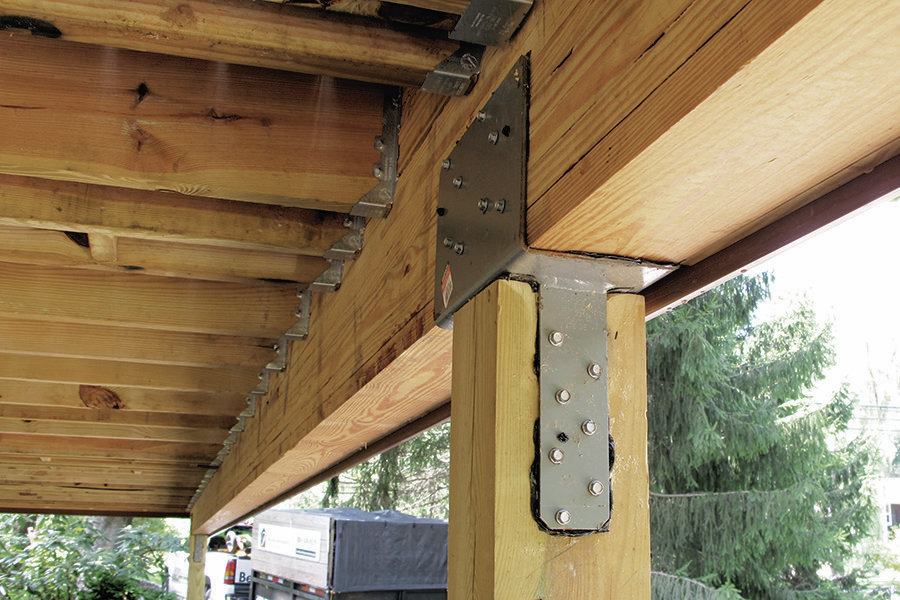
Deck Beam to Post Connection
The connection between the deck beam and the post is critical to the strength of the deck. The code requires that this connection be made with a steel plate or strap.
In addition, the connection must be bolted through at least two pieces of lumber (one on each side of the post). This helps ensure that forces on one side of the beam are transferred to other parts of the structure (and not just concentrated at one point). The bolt holes in this connection should be filled with epoxy putty after installation for added strength and durability.
The following diagram shows an example of how deck beams can be connected to posts:
The deck beam to post connection is the weakest link in your deck. It is also the most susceptible to damage from termites and other insects. The most common method of attaching a beam to a post is with lag screws and washers or carriage bolts and washers. If you are using an aluminum beam, the lag screws must be at least 1/8 inch longer than the thickness of the beam. This will prevent them from pulling through when you torque down on them during installation.
If you use carriage bolts and washers, make sure that you use Grade 5 fasteners and stainless steel washers. You should also use a torque wrench and set it to between 80 and 100 foot-pounds when tightening your fasteners. This can be difficult if you have never used one before but if there are any doubts as to whether or not they are tight enough, they are usually not tight enough!