So you want to build a curved deck huh? There are several different methods but most of them are expensive and involve a professional unless you have the time and patience to learn yourself. In this post we will show you how to build a curved deck for under $200 in materials.
Whether you want to add an arched deck, curved deck or even build a curved deck, you must first consider the structural aspects of a curved deck. A lot of people decide to construct arched or curved decks just because they are trying to clear out some space against the side of the house in order to make extra room for whatever they want.

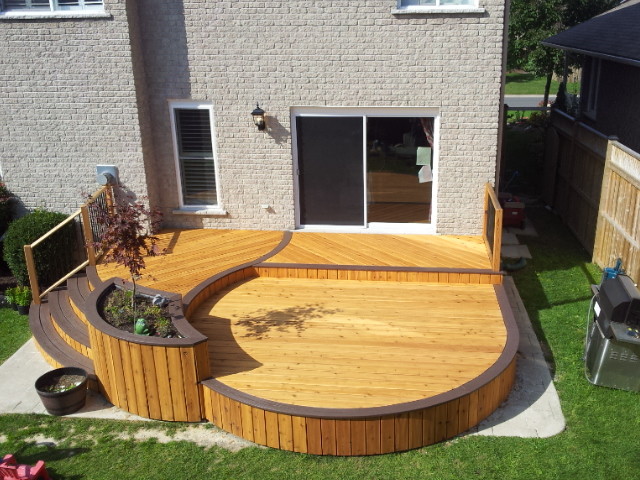
how to build a curved deck
Curved decks are a great way to add interest and style to your outdoor living area. They also tend to be less expensive than many other decking options. While curved decks can be made out of any material, they often use composite materials such as PVC or composite lumber.
Curved decks are built with the same materials as straight decks, with some additional considerations.
A curved deck frame is built much like a straight deck frame. The main differences are that you need to allow for more structure in the joists and beams, and you must ensure that each joist is properly supported at its ends.
The first step is to determine how many joists you need for your curve. For example, if you want a radius of 8 feet, then each joist will need approximately 5 inches of overhang on each end. This means that your joist spacing will be 16 inches from center point (with 24 inches between centers). Then you will start with one end post in the ground, which has two supports attached at 45 degree angles from each other (each support should be about 2 feet tall). Then attach the first beam (also called stringer) onto that end post using special connectors called clips (or
Curved decks are a great way to add interest and style to your deck. They can be built in a variety of shapes, so you can choose the one that best suits your property. Curved decks can also help create more privacy for your outdoor living space by providing a visual barrier between you and your neighbors.
If you’re considering building a curved deck yourself, it’s important to know how much time and money it will take. The process involves designing the deck first, then building the frame and stairs before adding the finishing touches.
Designing the Deck
The first step is to plan out your deck design. You might want to consider:
The size and shape of your lot (if you have one)
What kind of materials will work best for your project
Curved decks are an elegant and unique addition to the landscape. They can be used for entertaining, relaxing and enjoying the outdoors. These decks are also a great way to increase your home’s value.
.jpg)
Building a curved deck requires careful planning and attention to detail. However, if you follow these tips, you should be able to build a curved deck that will last for years to come:
1) Choose the right materials
2) Build the frame first
3) Lay out the decking boards
4) Attach the railing posts and balusters
5) Install the railing caps
The first step in building a curved deck frame is to decide how much of the curve you want. The larger the radius, the more expensive it will be to build.
The next step is to choose your materials. This can range from standard pressure-treated lumber, which costs less than $100 per linear foot, to exotic woods like ipe or teak, which cost several hundred dollars per linear foot. For most residential applications, pressure treated lumber is sufficient.
If you’re using pressure treated lumber, you should also consider using joist hangers instead of just toe-nailing them into place. This will make your deck stronger and easier to move later on if necessary.
You’ll need a miter saw to cut all of your pieces properly. If you don’t have one yet, now is a good time to invest in one as well as other tools such as a cordless drill/driver (if you don’t already have one).
If you’ve ever had the pleasure of building a curved deck, you know it’s no walk in the park. The first step is to determine the radius of your curve. This can be done by measuring the distance between two points on the deck and using trigonometry to calculate the degree measurement. For example, if you want a 10-foot radius and you know that one point on your deck is 30 feet from another point, then subtracting 30 from 10 gives you 20 degrees.
In order to keep things simple, make sure that all measurements are made with a tape measure or laser level rather than by eye. This will make sure that your curves are as accurate as possible.
Once you have determined the curve’s radius, use it as a guide for installing your joists. The joists should be spaced evenly along the entire length of the deck frame so that they don’t interfere with each other when they’re installed later on.![How to Build a Deck: Step by Step Guide [with Pictures]](https://plasticinehouse.com/wp-content/uploads/2018/05/Curved-deck-from-top.jpg)
Next, build up the center portion of your deck frame by adding cross pieces between each joist until there are no gaps between them. You can use screws or nails for this part since it will be hidden once you install siding later on! Once this is done, add braces around each corner so that
Building a curved deck frame is a bit more complicated than building a straight one. It’s also much more beautiful and impressive.
In this article, we’ll give you all the information on how to build a curved deck frame so you can build your own beautiful curved deck stairs.
How to Build Curved Deck Stairs
Building curved deck stairs is no different than building straight ones, except that instead of using pressure-treated 2x4s, you’ll use 2x6s — or even 2x8s if you want to make them extra-strong. The same goes for the rails and stringers: Make sure they’re made from pressure-treated lumber or cedar.
As with any deck project, it pays to take your time when building a curved deck frame. You’ll want to measure twice before cutting once; check every measurement twice; and make sure everything fits together perfectly before driving any nails or screws into place.
In this video, we’ll demonstrate how to build a curved deck frame using pre-made parts.
A curved deck frame is an excellent way to add elegance and character to your outdoor living space. It can also be used as an accent feature in a corner or along the edge of your deck.
To build this type of frame, you will need the following materials:
2×4 lumber or 2×6 lumber – cut down into 2′ lengths (1 piece will be used for every step)
2×12 lumber – cut down into 6′ lengths (1 piece will be used on each side of every step)
How to Build a Curved Deck Frame
A curved deck frame is an attractive way to add architectural interest to your outdoor living space. A curved deck frame can also be used where a straight deck rail would not fit. Whether you want to build a curved deck frame around a hot tub, or just want to add a unique touch to your deck, you can build one using common tools and materials.
When building a curved deck frame, it is important to use the right lumber. The lumber needs to be strong enough so it will not sag under the weight of the people who will be using it. It also needs to be able to withstand weather conditions such as rain or snow without rotting or warping. The best choice for this type of project is cedar lumber because it has natural resistance against rot and deterioration from moisture. Cedar does not need any type of finish because it has an attractive reddish brown color that does not need to be stained or painted.
The first step in building a curved deck frame is measuring the length and width of your desired shape with string and then marking these measurements on your lumber with chalk lines so you can cut them out with power saws or circular saws. Next use two-by-four plan
Building a curved deck is not that different than building a straight one. You just need to be more careful about your measurements and design. Here are some tips for building your curved deck:
1. Make sure you have enough room for the radius you want. A deck with a radius of 6 feet can be built in an area as small as 20 feet by 10 feet, but if you want a larger radius, you may need to consider moving back from the house or adding more space behind the house.
2. Measure the distance between the center post and end posts at each section of the curve before cutting them down to size. This will ensure that when they’re all connected together they make up the correct shape and size.
3. Use flexible polyethylene pipe as a form around which concrete can be poured for support posts or footings. The pipe is cheap, easy to use and allows you to pour concrete around it without having to worry about it falling over or getting damaged during construction. When finished pouring, simply remove it from the hole using pliers or tongs and proceed with other steps in your project plan
A curved deck is a beautiful sight to behold. It can add to the overall aesthetic of your home and give you a unique space for entertaining or relaxing. A curved deck is also an economical way to increase the size of your deck without having to build any additional structure.
The first step in building a curved deck is determining whether it’s structurally possible. If you already have a deck, simply measure the distance between the posts. If this distance is less than 12 feet, you can use pressure-treated lumber for framing. For longer distances, you will need to use cedar or redwood because they are more resistant to moisture damage than pressure treated wood.
Once you’ve determined which type of lumber to use, cut out all of your pieces using a circular saw. Make sure that each piece is exactly 45 degrees with respect to its neighbor on either side. This can be done by using a protractor or simply placing two sticks together at an angle and marking where each piece should be cut on both sides so that they meet in the middle when put together properly (see pictures).