What happens when you take a useful article on how to build an above ground koi pond and give it an engaging intro paragraph? You get more traffic from people who would have never found your website had you not described what you are about in the first few sentences!
Nowadays, with all of the gardening shows on television, it seems that every homeowner wants a koi pond. And if you want a beautiful new outdoor water feature in your yard, then you need to know how to build an above ground koi pond. It can be a great conversation piece or even used as a water feature to add extra value and beauty to your home. In this topic we talk about How to build an above ground pond with wood, How To Build An Above Ground Pond.

How to build a above ground koi pond
Building a koi pond is a great way to add a little something special to your yard. Koi fish are beautiful and fun to watch, but they can be expensive if you buy them from a pet store. If you have the land space, you might want to consider building an above ground koi pond. This article will tell you how to build an above ground pond with blocks, above ground koi ponds for sale, how to build a koi pond with waterfall, how to build an above ground pond with wood or concrete blocks.
The first step in building an above ground pond is choosing the location for your new water feature. Make sure that the area where you plan on placing it will be easy for you to maintain and will not be in direct sunlight for most of the day so that algae does not grow too quickly on the surface of the water. Choose an area that has low traffic so that there is less chance of someone accidentally stepping on top of your new project!
Once you have decided where you would like your new water feature placed, mark out where it should go using stakes or wooden stakes and string (or rope). Next dig out approximately 6 inches deep around all sides of where your future pond will sit so that when you lay down
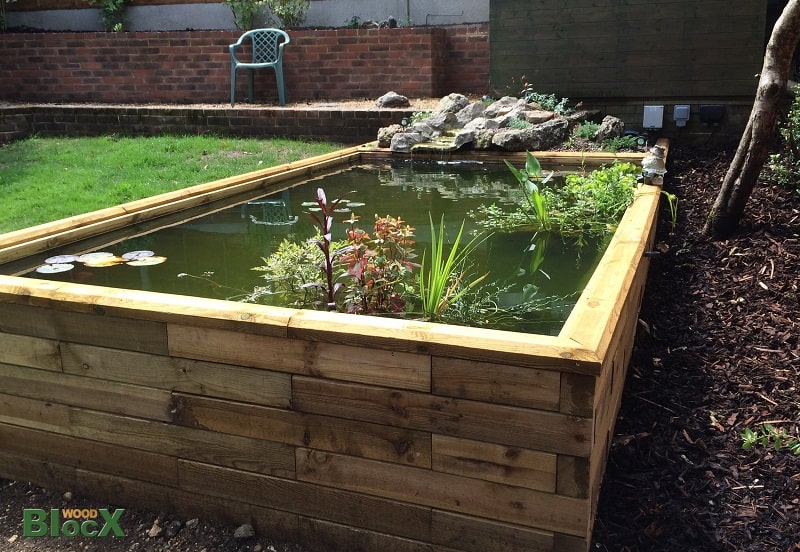
How to build an above ground pond with wood
Building an above-ground koi pond is a great way to add beauty and tranquility to your yard without having to dig a hole in your lawn. You can also use these ponds as conversation starters when you have guests over. It’s also a good way to keep your fish healthy and happy, as they get plenty of sunlight and fresh air. The only downside is that you’ll need to make sure it stays clean and free of algae. Here’s how:
Step 1: Build the Frame
Create the frame for the pond by laying out 2x4s in a square shape on your lawn. Place them about 8 inches apart from each other and make sure there are no gaps between them. Use screws or nails to secure them together. You could also use bricks or stones if you don’t want to use wood for aesthetic reasons.
Step 2: Make Sure It’s Level
Use a spirit level or similar tool to make sure that all sides are at exactly level before continuing on with your project. If there are any areas where your frame isn’t level, adjust.

How To Build An Above Ground Pond
Below ground ponds are the most common types of koi ponds, but you don’t have to dig a hole to build one. You can make an above ground pond with blocks or wood, or you can build one with concrete slabs. The first step is choosing a location for your new garden feature. It needs to be close enough to your home so that you can take care of it easily, but far enough away that it doesn’t take up valuable space in your yard.
The next step is deciding what kind of material you want to use for the base of your pond. If you choose concrete blocks, they will be more expensive than other options but they are more durable and easier to clean than wood. If you choose wood, it will be cheaper than concrete blocks but will need more maintenance over time as well as protection from termites and other insects that love rotting wood.
If you are going with concrete blocks (or precast concrete), follow these steps:
Measure out the area where you want your pond and mark off where each block will go. This should be done before digging so that there isn’t any dirt left behind from digging which could cause problems later on when
How to Build an Above Ground Koi Pond
Building a koi pond that is made of wood is a great idea. It will not only look good but also add value to your house. If you want to build this for yourself, here are some steps to help you:
Step 1: Make sure the ground where you are going to build the pond is level and has no holes or cracks in it.
Step 2: Create a drainage system by making holes on the bottom of your pond. You can use PVC pipes or plastic tubes as long as they are large enough for water to flow through them easily without creating any problems in the future.
Step 3: Build a base frame using wood and nails so that they fit together perfectly without any gaps between them and also make sure that all sides are straight and square before nailing them together. You can also use cement blocks if you want something more permanent than just wood alone.
Step 4: Once all sides are assembled, place them inside their respective positions on top of each other until they reach the desired height for your aquarium, making sure there are no gaps between them at any time during construction because this will result in leaks later on when water begins flowing into your tank
How To Build A Koi Pond
Step 1: Use a level to mark the center of the circle.
Step 2: Using a compass, draw a circle that is 24 inches in diameter. This will be the base of your pond.
Step 3: Use a shovel to dig out a hole for your pond that is about 8 inches deep and 24 inches wide. This will form the bowl of your pond. Make sure it’s level so water will drain easily from it.
Step 4: Cut two pieces of plywood that are 24 inches by 48 inches each and set them aside so they’re ready when you start building the sides of your pond.
Step 5: Measure around the edge of your bowl and cut four pieces of wood to fit those measurements with a handsaw or jigsaw (make sure they’re level!). These will be used as braces for your walls so they don’t cave in when you add water to them later on (if they’re not braced properly, this can happen). Now measure across the top of each brace and cut four pieces that are 12 inches long; these will be used as cross beams at each corner where two braces meet together
How to Build an Above Ground Pond with Wood
An above ground pond is a great way to add a splash of color and tranquility to your yard, but they’re not always easy to find. Here’s a step-by-step guide on how to build your own above ground pond with wood.
Materials:
-20 blocks or cinder blocks (as many as you want)
-4×4 lumber for framing (amount varies depending on size of pond)
-2×4 lumber for framing (amount varies depending on size of pond)
-4×4 post for mounting pump and filter (amount depends on size of pond)
You can build an above ground pond from scratch using wood, blocks or bricks. The most common materials used to build these ponds include concrete blocks and wood.
A pre-built pond can be purchased at your local home improvement store.
But if you want the satisfaction of doing it yourself, here are some simple steps to follow.
Choose Your Location
The first step is to choose the right spot for your new pond. You’ll need to find a place where there’s plenty of sunlight and room for plants and fish. If you plan on having koi fish in your pond, they will need access to shade during warmer months when they get too warm out in the open.
Make sure that the area is level so that water doesn’t flow out of one end and into another during heavy rainfall or snowfall.
Prepare Your Site
Clear away all debris from the area where you plan on building your pond, including rocks, roots and other items that may interfere with construction. Make sure there’s no standing water on or near the site as this could cause damage during construction or later on when filling up with water.
How to Build an Above Ground Pond
Building a pond can be a fun and rewarding project, but it can also be very challenging. If you’re not sure what you’re doing, it’s possible to end up with a mess that won’t hold water. However, if you follow these steps carefully and plan ahead, you can build an above ground pond that will look great and function well for years to come.
The first step is selecting the location for your pond. It should be as level as possible and not in direct sunlight since this will cause algae growth on the sides of your pond. You’ll also want to avoid areas that are subject to flooding or heavy winds.
Next, measure the area where you want your pond and mark out a rectangle using stakes and string or rope. Make sure it’s big enough so that you don’t have any extra room after adding everything else! Measurements should be taken from corner-to-corner diagonally at each corner of your rectangle so that there are no gaps between them once they’re put together.
Once you’ve marked out all four corners, dig out an indentation in each one equal in depth and width as the blocks being used (usually 2″x2″x8″). This will prevent water
If you’re looking for an easy way to create a pond in your yard, the above ground pond is the perfect solution. They are easy to install, inexpensive and can be placed almost anywhere.
If you are considering building an above ground pond, you have several options when it comes to materials.

Below we will discuss the pros and cons of each material so that you can decide which one is best for your needs.
Concrete Ponds: Concrete ponds are made from cement mixed with sand or gravel and water. The mixture is poured into a mold and allowed to set up before being removed from the mold. These ponds are strong but heavy and difficult to move once they are installed.
Polymer Ponds: Polymer ponds are made from a combination of resins and hardeners which allow them to be molded into any shape or size desired by the installer. These ponds are lightweight which makes them easy to move around once they have been installed but they are not as durable as concrete ponds so they may need replacing more often than concrete ones do over time if you live in an area where freezing temperatures occur frequently during winter months when water tends to get pushed out of the bottom of the pond onto your lawn underneath it causing it
This is a step-by-step guide on how to build an above ground pond with wood. This is a great way to start your aquaponics garden. The steps are simple, but the result is quite impressive!
Materials needed:
1. A stand for the pond (the dimensions are up to you)
2. Wood or other material for the frame of your pond (cut into pieces)
3. Clear pond liner (thickness depends on your needs)
4. A pump and filter (if needed).