Building a concrete form is an essential part of constructing any type of concrete wall. You cannot simply set concrete on the ground without a form because it will end up in a puddle. Also, the wall will not take shape as you want it to. Also, the structure may even collapse! Therefore, you must build a concrete form for your project ahead of time and correctly fill it with concrete so that the wall takes the shape you want. But before starting on how to build a concrete form for your project, there are some things you need to consider.
How to Build a Concrete Form For a Wall. The forms are made of plastic that should be heavy enough not to break under the weight of the wet concrete.

Concrete form
In this article, we will give you some tips on how to build a concrete form. Before you start, make sure that you have the right tools and materials to do the job.
How to Build a Concrete Form for a Wall
1. The first step is to lay out your form on the ground. If you are building a straight wall, use stakes and string as guides. If you are building an arched wall, mark off the desired dimensions with stakes and string, then stake off the curve with stakes and string as well. Make sure that your stakes are in line with each other so that there are no gaps between them.
2. Dig holes for your posts using either an auger or hand shovels depending on how deep they need to be buried in order to support your walls properly (generally at least 6 inches). Make sure that these holes are dug at least 4 inches away from your layout lines so that there will be enough room for gravel around them when they are filled in later on with concrete mix.
Step 1:
Build a form by cutting 2x4s to the desired length and attaching them together with nails. The length of the form should be at least 12 inches longer than the height of your wall. You’ll need to cut several sections of 2x4s for each side of your wall.
Step 2:
Nail one end of a section to the ground, then lay another section across it, creating an L shape, and nail both ends together. Repeat these steps until you have eight sections lined up in an L shape. Lay the last two sections on top of the rest so that they form an inverted T shape, with one end extending past the other by at least 12 inches. Nail these pieces together as well.
Step 3:
Using your shovel, dig out a trench that is 6 inches deep along the outside edge of your form where it meets the ground or foundation and extends 18 inches beyond both sides of your wall’s footprint (total). The trench should be wide enough and deep enough that it accommodates two rows of bricks on either side of your wall’s exterior foundation; if you’re building an interior foundation, dig out a trench that extends at least 6 inches past each side of your wall (total
Footings are the foundation for a house. They support the weight of the home and keep it from sinking into the ground. In most cases, concrete footings are used because they’re durable and long lasting.
Footings can be poured in one of two ways: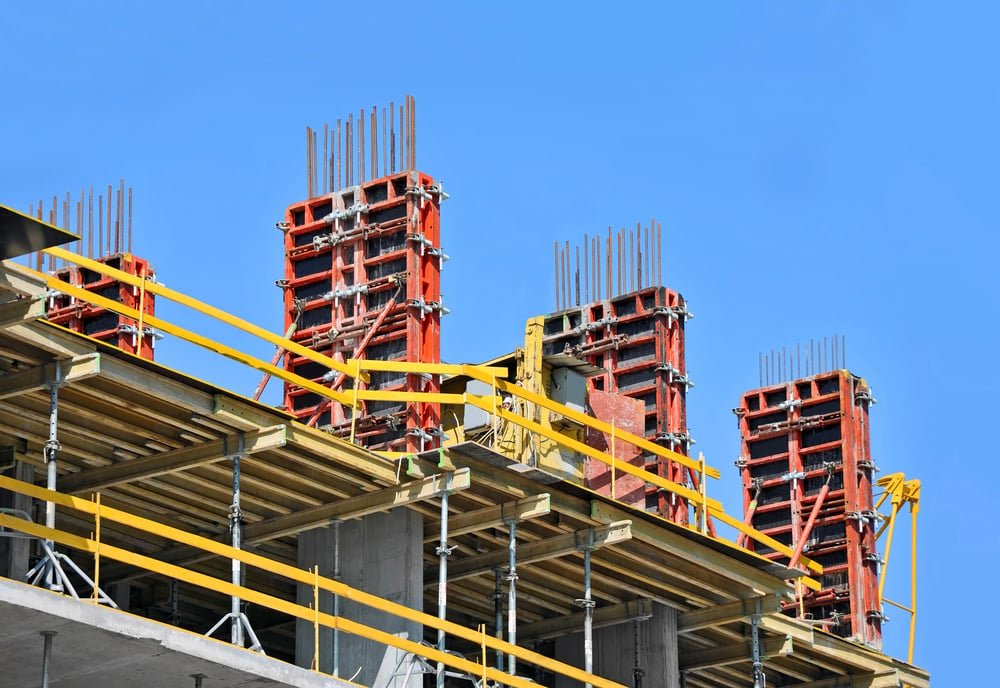
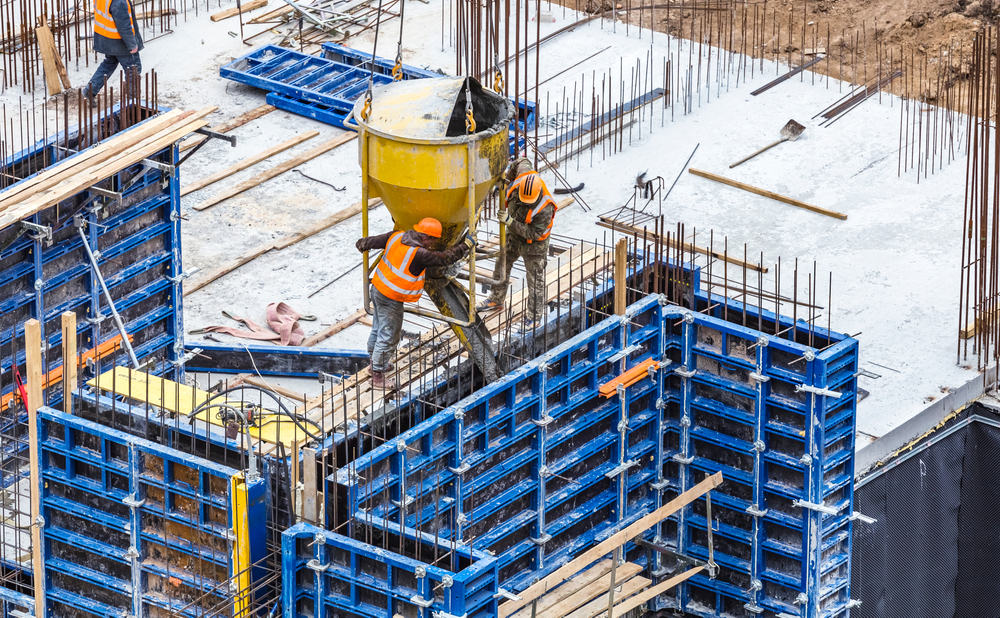
Footing forms — The easiest way to pour concrete footings is by using footing forms. These small, pre-cast blocks allow for easy placement of your footing. You simply set them in place and pour your concrete into them. Footing forms are available in various shapes and sizes depending on what kind of foundation you’re building. They’re typically made from plastic or fiberglass and can be reused if they aren’t damaged during use.

— The easiest way to pour concrete footings is by using footing forms. These small, pre-cast blocks allow for easy placement of your footing. You simply set them in place and pour your concrete into them. Footing forms are available in various shapes and sizes depending on what kind of foundation you’re building. They’re typically made from plastic or fiberglass and can be reused if they aren’t damaged during use. Pour-in-place — For larger projects that require multiple
A concrete form is a temporary structure used in building to aid in the placement of concrete. Concrete forms are used in brick walls, foundation walls, slabs, and other structures. The most common type of concrete form is made from plywood or OSB sheets with wood framing.
Forms can be built using wood or steel studs, with the studs attached to the form by nails or screws.
The use of plywood in concrete forms began in the 1930s when it was discovered that plywood could be used as a base material for temporary construction such as bridges and buildings during World War II. In 1946, Joseph Eichler built his first modernist home using plywood as a primary building material for both exterior and interior walls.
Concrete formwork is the framework that supports the concrete during the early stages of construction. It can be made of wood, steel or other materials, depending on the type of structure being built. Concrete formwork is often used to create curving walls and other shapes that would be difficult to create using conventional methods.
Concrete formwork is made up of individual elements that are joined together to create a structure that can be dismantled after the concrete has been poured. The elements are often made from timber but can also be constructed from metal or plastic.
The process begins with an architect designing a building which will require concrete formwork to support it during construction. A builder then creates a set of plans for how this will be achieved. In some cases, the builder may have their own design team who will work with them on these plans.
The next step involves constructing temporary supports which will allow builders to raise walls while they work on them from below ground level or above ground level depending on what type of wall they are creating. These supports are usually held in place by cables which must be connected to other parts of the building so that movement cannot occur causing damage or injury as well as ensuring safety for those working around it
How to Build a Concrete Form for a Wall
Step 1: Get Started
Start by marking the location of your wall. Determine how many forms you’ll need and where they should be placed on the ground.
Step 2: Place the Forms
Create a level base for each form by digging dirt out from under it until the top is level with the rest of the ground. Then, place wooden stakes in each corner and drive them into the ground using a sledgehammer. Secure each stake with an L-shaped brace.
Step 3: Prepare Your Concrete Mixer
Add water to your concrete mixer according to manufacturer’s instructions, then add concrete mix gradually until you have about two inches left at the top (this will allow for extra space for mixing). Pour enough water into your mixer so that when you start mixing it will turn easily without any clumps forming in the bucket. Once mixed, pour the concrete into your forms, then use a trowel to smooth over all surfaces inside and outside of your forms.
Step 4: Set Your Top Forms First
Once all sides are set, begin setting your top forms first (these will be easier than setting lower ones). Place one person on top of each form while another person stands nearby with
Concrete forms are used to create a smooth, flat surface for the concrete to cure. The form helps to ensure that your concrete wall is perfectly straight and level. This is important because if your wall isn’t straight and level, it can cause cracking or warping of your finished product.
 all, you’ll need to make sure that you have the right form to place it in. You can’t just stick your hand into wet concrete and hope for the best. You need something that will protect your hand from the wet cement and provide a solid enough surface to work on.
A simple form is much easier to make than you might think. All you need is a few boards, some nails, and some wood screws. Here’s how it works:
Step 1 – Measure the Length of Your Wall
Measure out the length of your wall from corner to corner with a measuring tape or chalk line. This will give you an estimate of how long each board needs to be in order to accommodate this length plus an extra inch or two on each side for overlap with other boards.
Step 2 – Cut Your Boards
Cut all of your boards according to these measurements with a circular saw or jigsaw if possible so that they’re all uniform lengths, but don’t worry if they aren’t exactly perfect because this won’t affect their functionality at all once installed in place.
A concrete form is a metal or wood structure that houses the concrete during the curing process. It is often made of plywood or OSB (oriented strand board). The form must be sturdy enough to withstand the pressures of the wet concrete.
When building a wall, first decide where you will place your forms and how many you will need. You may need only one form for each side of a room or two forms if you plan on making both sides at once. For example, if you are building a shed with two walls, you may want to use two forms for each side so that they match up when they meet in the middle.
Building forms out of plywood is easy and inexpensive, but it also takes up more space than some other materials do. If space is an issue, consider using plastic sheeting instead of plywood to make your forms. Plastic sheeting comes in rolls that can be cut with a utility knife and then attached together with double-sided tape or zip ties.
You will need one sheet of plywood per form needed (two sheets if using plastic sheeting). For example: If you have four sides to pour into and want each side to look identical, then you would need eight pieces of plywood (or six pieces if using
Concrete walls are often used to support the roof of a building. Building a concrete wall can be as simple as pouring concrete into a form, but there are also other options available.
Concrete forms are available at most home improvement stores, and they come in different sizes and shapes. The easiest way to build a concrete wall is to use pre-made forms.
To build a concrete wall using pre-made forms:
1. Lay the form on the ground where you want your wall to be located and trace around it with chalk or spray paint. You may need to put down stakes or posts at each corner so you can get them exactly straight.
2. Dig out the area for your wall about 12 inches wider than your desired finished width (4 inches for gravel base, 8 inches for concrete base). Then dig out about 18 inches deep from the ground level on down (6 inches for gravel base, 12 inches for concrete base). You will also need to dig out about 2 feet deep in order to support any other structures on top of your new foundation such as plumbing pipes or electrical wiring.”