Welcome to the Visual Studio Development Web Server blog. This blog is a place to share information about the upcoming release of Visual Studio Development Web Server (VWDWS). VWDWS is an add-on for Visual Studio that allows developers to build web applications using the ASP.NET 4.6 technology stack on Microsoft IIS without having to install and configure IIS separately. The product will be released as part of Visual Studio Professional 2013 Update 2 and above, which will be available in early 2015.

Visual Studio Development Web Server
In this article, we will discuss how to deploy asp net web application visual studio 2019 in iis.
This article explains how to deploy an ASP.NET application by using Visual Studio 2019. It also explains how to use the Web Deployment Tool (Web Deploy), which enables you to deploy your ASP.NET application from Visual Studio 2019.
Unable to connect to the configured development web server
If you are unable to connect to a specified development server, then check for the following issues:
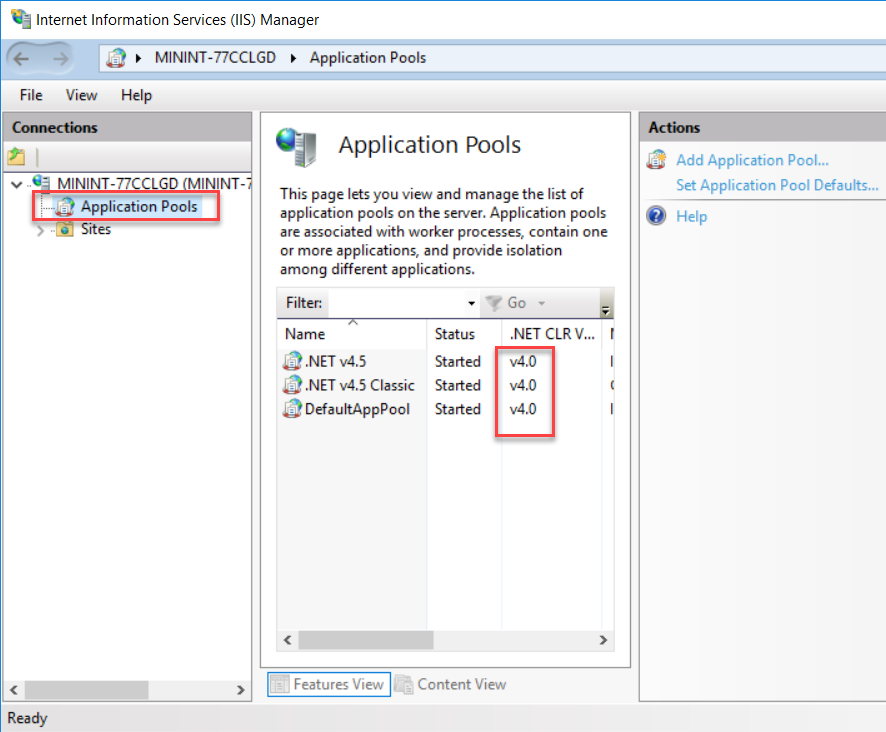
The development server is running on Windows Server 2008 R2 or Windows Server 2012 and does not have Internet Information Services (IIS) installed. The development server must have IIS installed on it.
This is a simple tutorial on how to deploy asp.net web application in IIS without visual studio.
The below steps helps you to configure your development web server, if you are using Visual Studio 2019.
1) Open the Visual Studio and change the target server to localhost:portname
2) Right click on the project and click on “Publish”.
3) Click on “Web Deployment” and then click on “Publish”.
How to deploy ASP.NET Web application using Visual Studio 2019?
To deploy ASP.NET Web application using Visual Studio 2019, you need to first create an empty folder on the server where you want to deploy your ASP.NET Web application and then open the Developer Command Prompt for VS2019 (formerly known as the “Visual Studio Command Prompt”) from Start menu. Now, navigate to this folder and type the following command:
dotnet publish –configuration Release –output ../MyWebApp/bin/Debug/netcoreapp2.2/publish
This command will create a publish folder in your current directory with all the required files for deploying your app into IIS or any other server that is hosting .NET Core 2.2 applications.
In this post I am going to show you how to set up Visual Studio 2019 with IIS, and build an ASP.NET Core website. If you are using Visual Studio 2017, please see this blog for instructions on setting up your development environment.
Let’s get started!
First, make sure that you have the latest version of Visual Studio installed. If not, download it from here.
***Note: If you already have Visual Studio installed but want to upgrade it to the latest version, please see this article for instructions: https://blogs.msdn.microsoft.com/dotnet/2019/04/12/how-to-upgrade-your-visual-studio-tools-to-the-latest-version/
Visual Studio Development Web Server
If you are developing in Visual Studio, you have a shortcut to launch your web server. The shortcut is under the Debug menu:
The “Web Server” menu item launches Visual Studio with the web server running. Once the server has started, you can see it in the taskbar:
If you are not developing in Visual Studio, but still want this functionality, then you can use a command line tool called IIS Express. IIS Express is included in all versions of Windows 10 (but not 8 or 7). You can download it here: https://www.iis.net/downloads/microsoft-web-platform-tools
First, you need to create a new web project or use an existing one. Now, simply go the Solution Explorer window, right-click on the project name and select Publish.
You will see the following dialog box:
Select Remote Machine option from Where should this code run drop-down list and then click Publish button. Next, a new dialog box appears asking for credentials for remote machine where your application will be deployed. Provide valid user account which has administrator rights on remote machine and click OK button.
After that, you need to specify how you want your application to be hosted by clicking on Web Deployment button as shown below:
Now, follow these steps carefully:
1) Select Online in Choose how to publish drop-down list and click Next button;
2) In Select Source drop-down list select Local IIS Web Server option;
The error “Unable to connect to the configured development web server” is one of the most common errors in .NET development. This error usually occurs when you try to open a website from Visual Studio, but there is no local web server running or it’s not set up correctly.
In this article, we’ll show you how to fix this error and get your website running again.
How to fix “Unable to connect to the configured development web server” error?
When you try to connect to your development web server, you get the following error message:
Unable to connect to the configured development web server.
This issue can occur when Visual Studio is unable to connect to the development web server using a secure connection. For example, if the development web server is configured for HTTPS and Visual Studio is configured for HTTP, then this error occurs.
In this article, we’ll show you how to fix this issue.
You may be using the wrong version of Visual Studio or IIS. Check your settings and make sure that you are using the right version.
If you have multiple versions of Visual Studio installed, make sure that you are using the latest version of Visual Studio 2019 (Professional, Enterprise, or Community). If you have multiple versions of IIS installed, make sure you have set up a default IIS website and that it is running on port 80.
If you are running Windows Server 2012 R2, check out this article for more information: https://docs.microsoft.com/en-us/aspnet/core/deployment/iis8-website
The most common cause of this error is that the development server is not running. This can happen if you are using a new project in Visual Studio and then try to run it from the command line, or if you attempt to debug an existing web application that has been deployed on your local machine.
The following steps should help you determine if your development server is running:
1. Open the Developer Command Prompt for VS2019
2. Type “command /?” to see all options available in the console window
3. Type “start” followed by a space, then type “iisreset /noforce” followed by another space and press Enter.