SMTP stands for Simple Mail Transfer Protocol, which is the standard protocol for sending email over the internet.
SMTP Relay is a service that allows you to send email from your own domain using Office 365 as an SMTP server. This allows you to send emails even if your company doesn’t have its own mail server or if you don’t want to use your own mail server. If your organization needs to send bulk email, such as marketing messages or notifications, having an SMTP relay can save you money on third-party services and help keep your existing hardware and software investments while still allowing you to send email messages through Office 365.
Setup Smtp Server For Office 365
Office 365 is a cloud-based email and productivity service from Microsoft, with the web-based suite of office applications. Office 365 includes Exchange Online for email, SharePoint Online for document collaboration, and Lync Online for instant messaging, voice and video conferencing and presence information sharing.
Office 365 Whitelist IP For SMTP Relay
Office 365 Whitelist IP For SMTP Relay is used to add the IP address of your computer or network in order to be able to send mails through the mail server. This tutorial will show you how to whitelist an IP address in Office 365.
Office 365 SMTP Not Working
If you’re having any issues with sending emails using Office 365 SMTP server then please follow these steps: Check your firewall and antivirus software if they are not interfering with your email delivery process; Make sure that there is no connection issue between your computer and our SMTP server; If you’re still unable to send emails then contact our
Office 365 is a cloud-based email service that provides a full range of communication, collaboration and productivity services to help businesses of all sizes.
Office 365 SMTP Settings for Scanner
The scanner sends emails using the Office 365 mail server. The scanner’s mail server is: mail.address-of-your-scanner.com.
To configure the scanner to use your Office 365 account, follow these steps:
Log in to your Office 365 account at https://portal.office.com/home#/login (where # represents the number assigned to your Office 365 account). In the left navigation bar, click Mail > Email Forwarding and POP/IMAP. If you don’t see Email forwarding and POP/IMAP listed under Mail, click More > Settings > Email Forwarding and POP/IMAP. Click Add new forwarding address under Email addresses that can send email as you or someone else (email aliases). Enter your full name in the Name field and then enter your scanner’s email address in the Email address field. Click Next on the next screen and enter an alternate subject line (optional). Then click Finish to save changes on this screen.
Office 365 is a popular cloud-based email and productivity suite, used by over 400 million users worldwide.
With Office 365, you can communicate more effectively with colleagues, partners and customers. It gives you access to all the latest tools and services so you can work better together, no matter where you are.
The Office 365 SMTP settings are used to send email from your computer or device to the servers of Microsoft Office 365. These settings can be found in OWA (Outlook Web Access) under Options > Email > More Settings > Advanced Settings > Basic Mail Settings in Outlook on the Web.
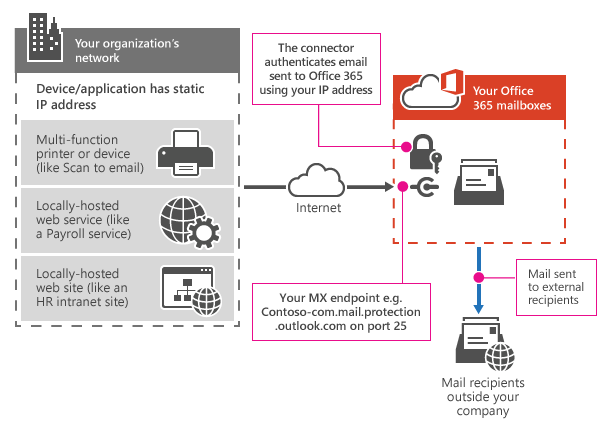
In this article we will show how to configure the SMTP server for Office 365 and how to use it for scanning documents through your MFP device.
Office 365 has a built-in SMTP server for sending out email. However, it is not possible to use this SMTP server for sending emails from a scanner or copier. This article will show you how to setup an external SMTP server in Office 365 so that you can send scanned documents through email.
Step 1: Open your web browser and go to https://www.office.com/setup. Enter your email address and password to login into your Office 365 account.
Step 2: Click on Admin in the top navigation bar and then click on Exchange Online Settings link under Mail section.
Step 3: In the new window, click on E-mail under Your app settings section.
Step 4: Under E-mail options section, click on Enable external email feature option to enable external e-mail sending feature in Office 365 account.
This article will guide you on how to set up SMTP relay with Office 365.
Office 365 has an SMTP relay service. This is a good thing, but it can be very confusing to set up.
The reason for this is because there are many different ways that you can configure the service, and each way can have different issues.
In this article, we will go through the steps for setting up SMTP relay for Office 365 in order to send emails from your own server or application (such as an email marketing tool).
You can use the Office 365 SMTP relay service to send email from your app. This allows you to send email using a domain that you own, rather than providing an external SMTP server and credentials.
To configure your app to use the Office 365 SMTP relay service:
Get the MX record of your domain. To do this, you can use a tool like MXToolbox or dig.
Create an Office 365 account and sign in with it.
In the Azure portal, select All services > Microsoft Azure Active Directory > Office 365.
Select Users and groups > Users > Add users or groups. Enter all required information (first name, last name, password). Select Next until you get to Create user pane and then select Create.
Office 365 SMTP Settings
SMTP is the most common method for sending e-mail from a computer. If you’re using Microsoft Office 365, it’s easy to set up SMTP for your account. You can also use third-party tools and services to send e-mail through Office 365.
If you want to send e-mail using your own domain name or third party domain, you can set up an email relay by connecting your domain with Office 365. This feature requires a Domain Name System (DNS) record change in order to connect two different domains together. If you want to use your own domain name or third party domain with Office 365 without changing DNS records, see Send email as another user in Office 365.
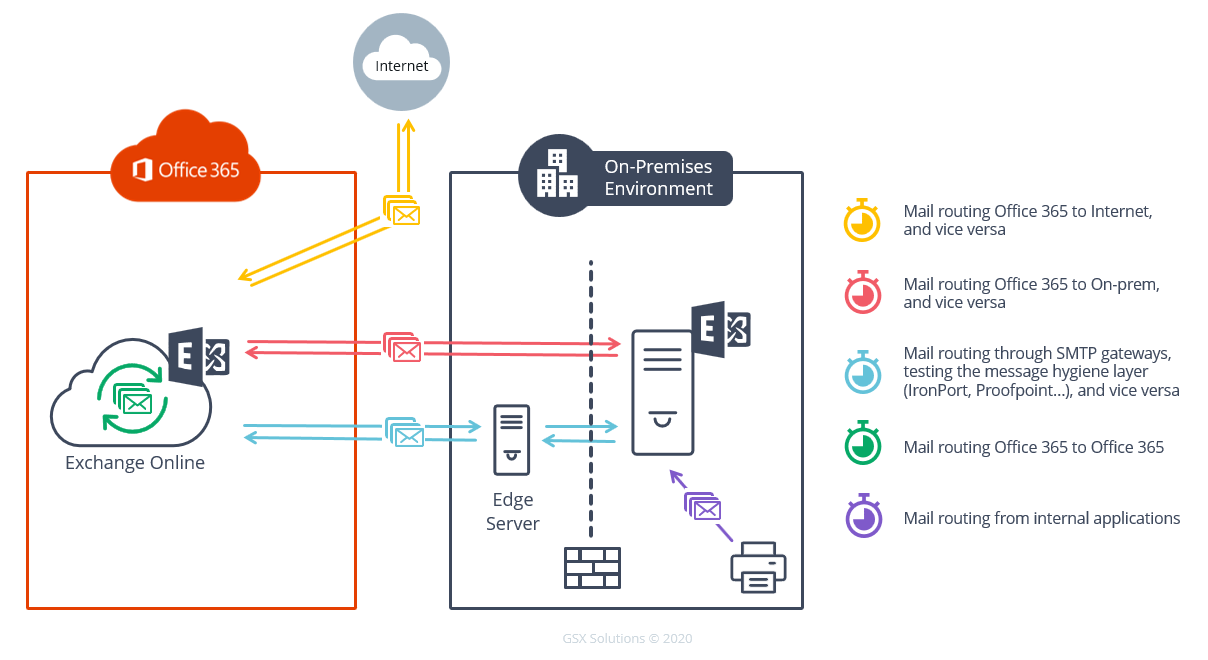
If you need to send mail from your own server and not Office 365 servers, you will need to configure your SMTP settings. The following steps apply to both Exchange Online and Exchange on-premises.
Office 365 SMTP relay is a feature that allows you to send email from third-party applications or devices through Office 365. By default, this setting is enabled for all customers who have an Exchange Online license. You can disable it by using the instructions below.
To disable Office 365 SMTP relay: If you don’t want to use Office 365 as an outgoing relay, follow these steps:
Sign in to the Office 365 admin center with your work or school account. In the left navigation pane, select Admin centers > Exchange. In the main pane, under Mail flow, select Send connector usage report. Select Disable inbound mail flow rules (at the bottom).
If you have an Office 365 account, you can use the Office 365 portal to set up your email. The steps below will guide you through the process of configuring your account for SMTP relay.
Configure SMTP Server Settings
Log in to the Office 365 portal and click on the gear icon at the top right of the screen. From here, select Mail under Email & Calendars. On this page, click on More Options in the right pane, then click on your domain name under Domains.
On this page in the Domain Settings window, scroll down and find SMTP servers under E-mail delivery options. Click Add next to Relay permissions and enter smtp.office365.com as your address space (including port). Then click Save Changes at the bottom of this window.
Office 365 SMTP Relay
In order to relay mail with Office 365, you will need to enable a feature called SMTP relay. To enable this feature follow the steps below:
Sign into your Office 365 account and go to https://portal.office.com/OLS/MyAccount?to=Settings. Create an Outlook profile if you do not have one already. On the left-hand navigation menu, select “Email”. Then click on “Manage my email accounts”, followed by “Email Forwarding” at the bottom of the page. Double-click on “Forwarding email from your other accounts”. Select “Add a forwarding address”, and add the address you would like to forward emails from. Your forwarding address must be an email address that is not already registered for Exchange Online (this means that if you want to forward emails from another domain, it cannot be registered as an alias or domain name in Exchange Online). Click on “Next”. In the next screen, select “Forward all mail”, then click on “Next”. You will now see a list of all domains in Office 365 that allow SMTP relay; click on each one until they all have a check mark next to them (see screenshot below).