WordPress is the most popular and easiest to use CMS (content management system). It’s free, easy to use and has an enormous amount of plugins available.
WordPress is primarily used for blogs but it can also be used to create a full website. There are many different hosting companies that offer wordpress hosting. In this article, I’ll go over some of the best options for hosting your wordpress site and how to setup your first blog using Hostgator.
![How To Install WordPress on HostGator in 2022 [With Pictures]](https://www.shoutmeloud.com/wp-content/uploads/2009/09/One-click-WordPress-installation-on-HostGator.png)
Setting Up WordPress With Hostgator
The process to set up WordPress on a Hostgator website is very simple. You can use the cPanel to install it and then follow the steps below:
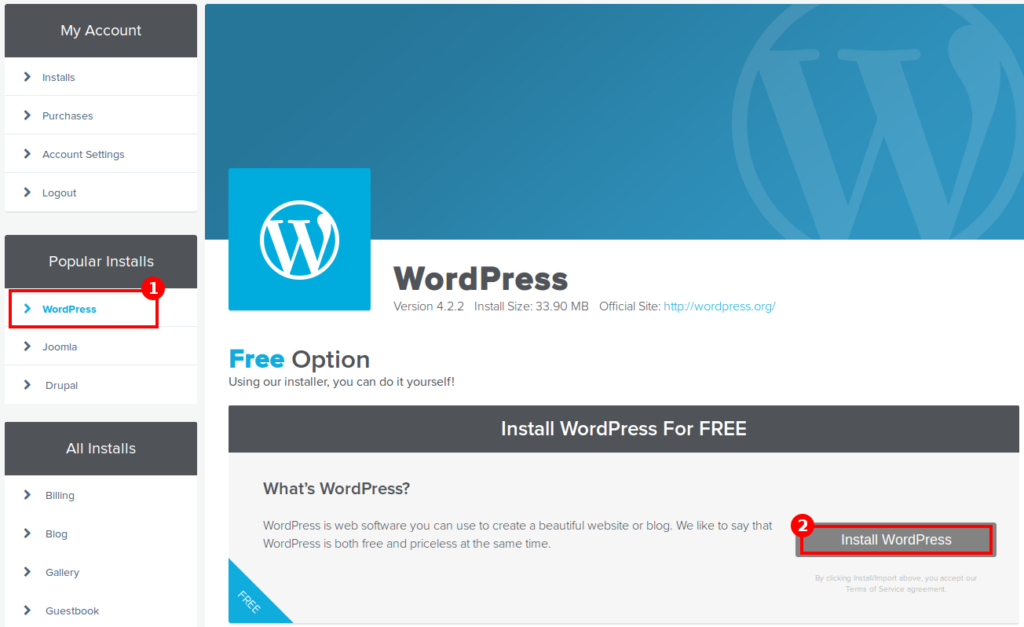
Login to your Hostgator account at https://cpanel.hostgator.com/login/
Click on Software Installer icon
Click on WordPress icon
Choose the domain name where you want to install WordPress and hit Next button. You will see an Install WordPress page, just hit Install button.
Step 1: Login to your Hostgator account and click on the cPanel icon.
Step 2: Under the Domains section, click on Manage next to your domain name.
Step 3: In the next page, scroll down and click on Install WordPress (or another application if you want to install something else).
Step 4: You will be taken to a page where you can choose whether you want to install WordPress or another application. If you are installing WordPress, select Install.
Step 5: Click on Let’s Go and wait for a while until it completes its installation process.
How to Install WordPress on Hostgator
To install WordPress on Hostgator, you need to first create a new website and then install the WordPress application.
The steps below will guide you through the process.
Step 1: Create Your New Website on Hostgator
Log in to your Hostgator account and click on Create Site option under Web Hosting menu. This will take you to the next page where you can enter all details of your new website like domain name, site name and email address etc.
Step 2: Download WordPress Application
Once you have created your site, go ahead and download WordPress application. Log in to your cPanel account and click on Softaculous icon under Software section. This will take you to the main Softaculous page where all applications are listed with their description. Select WordPress from this page and click on Install button from the right side bar. It will open another page where you just need to enter FTP details of your site which we had given while creating our site earlier in step 1 above
Step 1: Creating a Database
Once you have your Hostgator account set up, you need to create a MySQL database for your website. To do this, log into your Hostgator control panel and click on the “MySQL Databases” icon. You should see something like this:
Once you’re in your MySQL databases page, click on the “Add New DB” button. This will bring up another form like this:
In the “Database Name” field, enter whatever name you want for your database (for example, I used “wptest”). Leave everything else as it is and click “Create Database”. After a few seconds, you’ll see that it’s created successfully. Now go back to the main databases page by clicking on “Databases” at the top of the page. You should see your new database listed here:
However, there’s still one more thing we need to do before our wordpress install works properly…
1. Create a Hostgator account
2. Purchase a hosting plan
3. Create an FTP account
4. Sign in to your Hostgator cPanel account
5. Choose File Manager and then click on the link “Create a New Directory”
6. Type in a name for your directory (I used wordpress) and then click on “Create Directory” button
7. Click on “Enable mod_rewrite” checkbox and type in file name .htaccess into text box after “Add these directives to” (if you skip this step, WordPress will not work correctly). Click on Save button at the bottom of page
8. Now you need to upload WordPress files to your new directory (which we created earlier). You can do it by using FTP or File Manager (both methods are described below). I recommend using File Manager because it’s easier than FTP
In this video I will show you how to uninstall WordPress HostGator. This is a very easy process and it may take only 2 minutes. You will have to do it if you have purchased a new domain with another hosting provider and want to move your website away from HostGator.
How to uninstall wordpress hostgator
Step 1: login to your hostgator cpanel account.
Step 2: click on the “Manage” option under “WordPress” menu.
Step 3: you will see a list of all your wordpress sites in the left panel. Find the one which you want to delete and click on it.
Step 4: click on “Delete Site” button.
Uninstall WordPress Using Cpanel
In order to uninstall WordPress using HostGator cPanel, you will first need to log into your account. Once you are logged in, you can follow the steps below:
1- Click on “Latest News” and then select “Hosting Control Panel” from the list of choices displayed.
2- In the “Software” section, click on “WordPress”. This will take you to a page where you can manage your website.
3- Select the option labeled “Remove” next to your WordPress installation. You should now see a pop-up window asking if you want to remove all content and files related to your site as well as the database information associated with it (This includes all posts, pages and comments). Select “Yes” and then click “OK” to continue.
How to uninstall WordPress from HostGator?
WordPress is the most popular content management system (CMS) in the world. It allows you to create a website or blog without knowing HTML, PHP or any other coding languages.
HostGator is one of the most popular web hosting providers. They offer a wide range of hosting plans and features for all types of websites. However, if you are not satisfied with their service, you can always migrate to another provider. In this article we will show you how to uninstall WordPress from HostGator easily.
How to Uninstall WordPress From Hostgator?
Step 1: Log into your Hostgator cPanel account and click on Manage Website option under “Hosting” section:
Step 2: Now click on “Canonical Name Record” link in the left navigation bar:
Step 3: On the next page click on “Actions” button near “Contact Information” section and select “Delete Contact Information” option from drop-down menu:
Step 4: Click on “Delete Contact Information” button at bottom of page to confirm deletion of this record from DNS server:
1. Log in to your HostGator account.
2. Click on My Account.
3. On the left hand side of the page, you will see Domains and Web Hosting. Click on Manage next to your hosting account (the one you want to remove wordpress from).
4. This will bring you to a new page where you can manage your cpanel login, domains, emails and other accounts that are related to the hosting plan you are using. Scroll down until you see WordPress and click on it (make sure you are logged in first).
5. You will be brought to another page where you can see all of the details related to your domain name’s WordPress installation. There should be two tabs: General Info and Databases/Users. Click on Databases/Users at the top of this page – this will show all of the databases and users that were created when we installed WordPress initially (this is different than your database username/password which can be found under Settings -> General).
6. Next click on the Delete button for whichever database you would like to delete (make sure you have backed up your database first!). Now that this database has been deleted, it will no longer show up as an option under Settings -> General.