
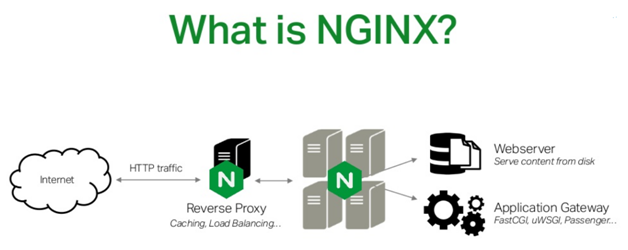
Nginx is a high-performance web server and reverse proxy server for HTTP, HTTPS, SMTP, POP3, and IMAP protocols. It started as a fork of Apache HTTP Server in 2004, but has since grown to be more advanced than its predecessor.
Nginx is known as a single-threaded application that offers high performance and stability. Nginx is an open source software developed by Igor Sysoev, who also works on the project. In this article, we will show you how to install Nginx web server on Ubuntu 18.04 LTS server. The installation process is very simple and easy to understand.
Setting Up Nginx Web Server
Nginx is a reverse proxy server for HTTP, TCP, HTTPS, SMTP, POP3 and IMAP protocols. It can also be used as a web server and a mail proxy server. Nginx is known for its high performance and stability.
Nginx is free software released under the open source license. It is used by many high-traffic websites such as Dropbox, WordPress and Netflix.
nginx installation ubuntu 16-04
Step 1: Install Nginx
Step 2: Check the configuration file
Step 3: Create the default site
Step 4: Restart Nginx
Step 5: Test your installation
In this article, we will learn how to install Nginx Web Server on Ubuntu.
Installing Nginx Web Server
First, we need to install some dependencies and other software that are required for installing Nginx web server. Run the following command to install Nginx web server on Ubuntu Linux:

sudo apt-get update
sudo apt-get install nginx
In this tutorial, we will discuss how to set up Nginx web server on a Linux system. This article is intended for beginners who want to set up a simple website or blog on their local machine.
Requirements:
You should have basic knowledge of Linux and you must be able to use the terminal application on your system.
Step 1: Install Nginx
First, open a terminal (Ctrl+Alt+T) and run the following command to install Nginx. Make sure that you are logged in as root user otherwise it will not work.
sudo yum install nginx
Step 2: Update The System
Once installed, run the following command to update all packages on your system:
sudo yum update -y
Nginx is a lightweight, high-performance web server and reverse proxy server, written by Igor Sysoev. Nginx is known for its stability, rich feature set, simple configuration, and low resource consumption. This tutorial contains step-by-step instructions on how to install nginx on Ubuntu 16.04 LTS.
1. Install nginx
Before installing nginx, update your system by running the following command in terminal:
sudo apt-get update && sudo apt-get upgrade
Now, install nginx using the following command:
sudo apt install nginx
yum install nginx
nginx -V
nginx -V
nginx -V
nginx -s reload
You will get the following output:
nginx is a free, open-source, high-performance HTTP server and reverse proxy, as well as an IMAP/POP3 proxy server. It was originally written by Igor Sysoev in 2005 and has since gained a large user base. Nginx is known for its stability, rich feature set, simple configuration, and low resource consumption.
nginx can be installed using yum or apt-get command on linux distro like ubuntu.
The nginx package contains the Nginx HTTP and reverse proxy server. The nginx package has been built with SSL support. A modified version of the Apache 2.4 HTTP server, Nginx is designed to serve dynamic web content. It can also be used as a proxy server for HTTP, HTTPS, SMTP, POP3, and IMAP protocols, as well as a load balancer and an HTTP cache.
The Nginx package has been built with SSL support. A modified version of the Apache 2.4 HTTP server, Nginx is designed to serve dynamic web content. It can also be used as a proxy server for HTTP, HTTPS, SMTP, POP3, and IMAP protocols, as well as a load balancer and an HTTP cache.