Setting up a file server for your small business is an excellent way to allow employees to access files from anywhere in the world. A file server is often thought of as a complicated set-up that requires extensive technical knowledge, but it doesn’t have to be.
A server can be set up in as little as 15 minutes, and it’s easy for even novice users to use.
The first step in setting up a file server is to decide what kind of network you want to create. If you’re looking for something simple and inexpensive, consider using a cloud service such as Dropbox or Google Drive. These services allow you to share files with other people without having to install any software on your computer. If you need more control over your files, or if you want them stored on your own computer instead of someone else’s servers, then setting up your own network may be better suited for your needs.

Setting Up A File Server For A Small Business
Small businesses and home offices often need a server to store important documents, photos and other files. Setting up a file server can be difficult, but it’s not impossible. You just need to know what you’re doing.
In this article we’ll look at how to set up a server on Windows 10, how to build a small business server and how to use Windows 10 as a server at home or in a small business. We’ll also cover how to set up a server at home. If you’re looking for more general advice on how to set up your own server, check out our guide: How To Set Up Your Own Home Server For Cloud Storage And More [Windows].
Requirements For Setting Up A Server
If you want to set up your own file server, there are some requirements you should take into account:
A decent internet connection – The more people using your server at once, the more bandwidth will be required for it to run smoothly. In other words, if you have five people accessing files from one computer at the same time, it will slow down significantly as well as use more bandwidth than if only one person were accessing it.
You’re ready to set up a file server. It’s not an overly complicated process, but there are a few things to consider before getting started.
First, you’ll need a physical computer with enough hard drive space and RAM to make it worth setting up as a server. If you’re using Windows 10, this can be any version of Windows 7 or newer (including the free Windows 10 Home edition). If you’re looking for something more powerful than what’s available through Microsoft’s offerings, we recommend checking out our article on building your own PC for more information on choosing the right components for your needs.
The second thing to consider is whether or not you want to use your computer as a server or if you’d rather have something dedicated for that purpose. If all you need is basic file sharing capabilities with some added security features like remote access and backups, then using one of your existing computers will probably be fine — just make sure it has enough storage capacity first! However, if you want more advanced features like file sharing across multiple locations or network printing capabilities (which require extra software), then it might be worth considering investing in an actual server instead of trying to shoehorn one into an existing computer.
Setting up a file server can be a great way to back up and share data between computers in your home or small business, but it’s not as simple as just installing Windows Server on a PC and adding some shared folders. There are some requirements for setting up a server, as well as some things you’ll need to do to prepare the PC before you can install Server.
If you’re looking for an easy-to-use file server solution that doesn’t require any configuration and will work right out of the box, I recommend checking out our guide to setting up an NAS device.
If you want more control over how your files are shared, though, a dedicated Windows Server machine is still the best option. And since Windows Server is free for most small businesses, there’s no reason not to set one up yourself! In this guide we’ll cover everything from choosing hardware for your server to installing the operating system and configuring shares for each user account on your network
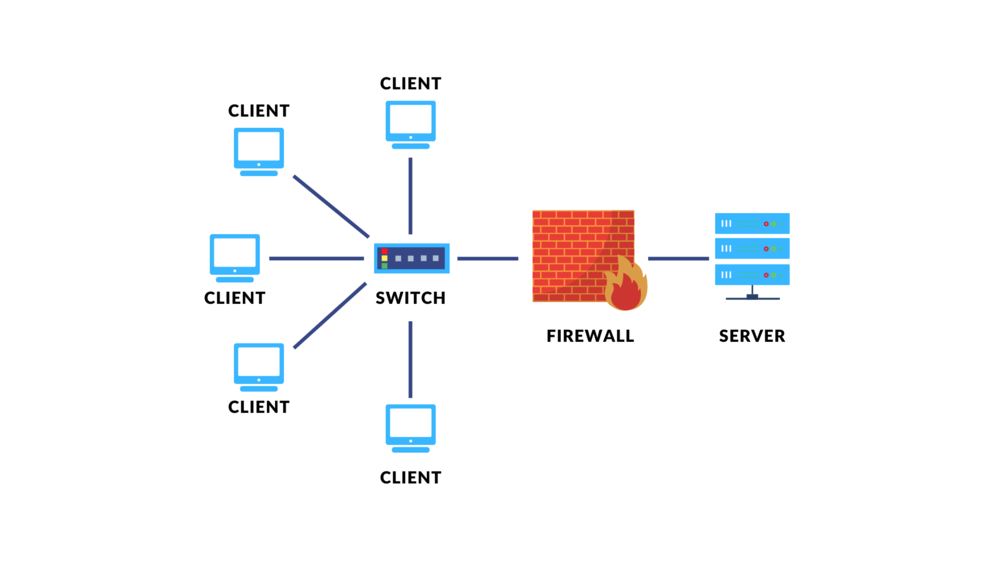
A file server is a computer that stores files and shares them across the network. This allows other computers to access the files and transfer them easily.
A file server is useful for small businesses or home offices, especially if they have multiple users who need access to different files at the same time.
The benefits of using a file server include:
It can be used as a backup system for important files. This means that if one computer goes down or becomes infected with malware, there will be an extra copy stored on another computer elsewhere in your business or home.
It speeds up file transfers between computers. If you’re transferring lots of large files between two computers, it can be faster to transfer them between both computers on the network instead of sending each file individually through email or using online storage services such as Dropbox or Google Drive.
Setting up a file server is not difficult, but it does require some planning and attention to detail. You must make sure that your network has sufficient bandwidth and that the server can accommodate all the users who will be accessing files on it.
If you are setting up a home network with Windows 10, here are the steps you should follow:
1) Install Windows 10 on one of your computers. You don’t have to buy a new computer for this purpose; any PC or laptop will do, even if it isn’t new. If you already have Windows 10 installed, make sure that it’s updated to the latest version (at least version 1809).
2) Configure networking on your computer so that it is connected to the Internet and can access other devices on your home network. This step is optional but recommended because it makes sharing files easier later on.
3) Install File Server Resource Manager (FSRM) as an optional feature in Windows Server 2008 R2 or later versions of Windows Server. It is included in all other editions except Home Premium Edition and Starter Edition.
4) Use FSRM to create shared folders and configure user permissions for those folders so they can be accessed remotely by other devices on your network through File
Setting up a home server is actually a lot simpler than it sounds. A home server can be built with any old computer and a hard drive, and the process doesn’t take much more effort than installing Windows on your PC.
However, if you’re looking for something more powerful and flexible, there are several options to consider.
What do you need?
The first thing to consider is what kind of server you want to build. If you have a small business or just like having all your data in one place, then go with a file server. This will allow everyone on your network to access files stored on the server easily.
If you’re just looking for some extra storage space, buy an external hard drive that’s large enough to store all your files (1TB or larger). If you don’t mind spending money but still want something simple, consider buying an external hard drive enclosure that allows you to connect up multiple drives at once and combine their storage capacity into one volume (a RAID 0 array).
Windows Server 2016 is Microsoft’s latest operating system for servers and offers plenty of features for managing networks at home or in small businesses. If you’re not sure which version of Windows 10 has what features.
You can set up a server at home if you have the right equipment and software. A server is a computer that provides services to other computers and devices on a network. For example, you might use a file server to share files and printers with all the computers in your home or small business, or use a mail server to send and receive email messages.
It’s common for businesses to run their own servers, but it’s also possible for individuals to do so.
You’ll need:
A computer that can run Windows 10 Pro (or Windows Server 2016) as an administrator account. This should be a dedicated machine, not shared by other family members or used for entertainment purposes (such as running games).
An internet connection with sufficient bandwidth for the number of users who will connect to it at once.
The ability to install software updates automatically when they become available (Windows 10 will automatically check for updates every day).
A server is a computer that stores and distributes data to other computers. Servers are often used by businesses and organizations, but they can also be used in the home. Setting up a server at home can be useful if you have multiple computers that need access to the same files or if you want to make it easier for family members to share files with each other.
The following information will help you get started setting up a server at home:
What kind of server do I need?
If you’re using your server for business purposes, then there are many different types of servers on the market. However, if you’re only planning on using it for personal use, then there are only two main types of servers that most people choose from—a file server or an application server. A file server stores all of your files in one place so that they can be accessed by anyone who needs them (no matter what type of computer they use). An application server uses applications such as Microsoft Office 365 or Google Docs to allow users to access documents from any device with an internet connection. While both types of servers can be set up on Windows 10, we’ll focus on how to set up a file server here.
The first step in setting up your own server is to make sure that you have the right hardware. At minimum, you’ll need a computer with a processor that’s capable of running virtual machines. In most cases, this means that you’ll need at least an Intel Core i3 processor from the past few years.
If you’re using Windows 10 as your main operating system, then you can install Hyper-V on it and use it to create virtual machines for your servers. If you’re using a different OS, there are other options available for creating virtual machines — such as VMware Player or Oracle VM VirtualBox.
There are also some virtual machine applications built into modern versions of Windows and macOS that don’t require installing additional software. These include Hyper-V on Windows 10 Professional or Enterprise editions, and Parallels Desktop 12 on macOS Mojave (10.14).
After making sure that your computer has the right hardware in place, the next step is to decide what kind of server environment you want to create: Linux or Windows? The answer depends largely on personal preference — but there are also some technical considerations involved here too.
To set up a server, you’ll need to meet some basic requirements. These include:
Server hardware. You’ll need a computer that’s capable of running Windows Server 2019. The minimum requirements are 4 GB of RAM and 64 GB of storage space, but you’ll likely want more memory and storage than that.
Internet connection. To obtain software updates from Microsoft, your server must have Internet access. If you have an existing network infrastructure, you may be able to connect your server directly to the Internet or use a virtual private network (VPN) connection over the Internet. If not, you’ll need to set up your own local area network (LAN) and then configure it for Internet access by using a router or modem/router combination device that supports Dynamic Host Configuration Protocol (DHCP).
Software. You’ll also need an installation disc or ISO image file containing the operating system files required to install Windows Server 2019 on your server hardware. This can be obtained from Microsoft either by purchasing a boxed copy of Windows Server 2019 or downloading an evaluation version from Microsoft’s website (https://www.microsoft.com/en-us/cloud-platform/windows-server).