The Web Server role in Windows Server allows you to host web sites and applications on your PC. You can use it to host public websites, such as blogs and personal websites, or you can use it to host private websites for your business.
Setting up a web server isn’t difficult, but there are many steps involved. In this guide, we’ll show you how to install and configure a basic web server on Windows 10.
Windows 10 includes the Internet Information Services (IIS) Web Server feature, which allows you to host websites and applications on your computer. There are several ways that you can set up a web server on Windows 10:
Use the IIS Manager applet in Control Panel to create new sites and add new features and modules to existing sites. This is the most common way of setting up a web server because it’s simple and easy. However, there are some limitations with this method, including the fact that it doesn’t let you use non-Microsoft software like PHP or MySQL databases (which are used by many popular websites).
Set Up A Web Server On Windows 10
The easiest way to set up a web server on Windows 10 is to use the IIS (Internet Information Services) web server that comes with Windows. The IIS in Windows 10 has been upgraded and improved to work much more efficiently than previous versions.
How To Create A Web Server On Windows 10 For Free
If you want to host your own website then you need a web hosting account. There are many different types of hosting accounts available depending on your budget and needs, but one thing they all have in common is that they cost money each month so if you are looking for something free then read on!
Setting up a web server can be a very straightforward process, but it can also be a very complicated process. It all depends on what you want the web server to do and how you want it to behave.
If you want to set up a web server so that you can host your own website, then it is quite easy. You will need to install an Internet Information Services (IIS) server on Windows 10, but this is usually done automatically through the operating system.
In this article, we will show you how to create a simple website with IIS so that you can host it on your local computer. We will also show you how to configure IIS for ASP.NET applications so that they run smoothly in Windows 10.

Web servers are essential for hosting websites and other web content. The process of setting up a web server is fairly simple, but it requires some basic knowledge of the inner workings of Windows 10.
If you just want to set up a local web server on your computer, check out our guide on how to create a website on your Windows 10 PC. In this tutorial, we’ll be covering how to host an external website with IIS (Internet Information Services), which is the web server built into Windows 10.
How To Create A Web Server On Windows 10?
Creating a web server on Windows 10 is very easy and can be done in two ways:
Using IIS which comes pre-installed with your operating system.
Using Nginx which is an open source alternative to IIS.
If you don’t have any experience with IIS or Nginx, then we suggest that you go with Nginx as it’s easier to setup and configure than IIS.
There are many reasons why you might want to create a web server on your computer. For example, you may want to host your own website or a web application, or you may have some other project where you need to host files across the Internet.
In this article, I’ll show you how to create a web server on Windows 10 using the built-in Internet Information Services (IIS) tool.
Creating a Local Web Server On Windows 10
The first thing we’re going to do is install IIS on Windows 10. You can do this by opening up PowerShell and running this command:
Add-WindowsFeature Web-Server -IncludeManagementTools
Here are some of the most popular ways to create a local web server:
1) Use Python – Python is one of the most popular languages and has an easy-to-use library called SimpleHTTPServer that can be used to create a local HTTP server very quickly.
2) Use Visual Studio Code – The VS Code integrated terminal can be used to start the HTTP service using the node command.
3) Use Node JS – Node JS is one of the most popular frameworks used with JavaScript on both client side and server side applications. It includes everything needed to write fast high scalable network applications as well as easy access from command line interface (CLI).
Create a free web server and host your website locally.
.NET Core is a cross-platform, open-source and modular .NET development framework for creating console and web applications as well as microservices. It was first announced by Microsoft in 2015 as part of an effort to unify the separate .NET frameworks that had been created by Microsoft, Xamarin, and Mono under one standard.
In this guide we will show you how to setup an ASP.NET Core 2.0 Web Application on Windows 10 using Visual Studio 2017. This process will work for other versions too (VS2017 or VS Code).
The easiest way to create a web server is to use an existing one. Your computer already has several web servers installed, including Internet Information Services (IIS) and Apache HTTP Server.
If you want to host a website on your localhost, you don’t need any additional software. You can create an HTML file and open it in your browser.
If you want to host a website on the internet, then you will need to install a full-blown web server on your computer. For example, if you want to host a website like this site, then you would need IIS or Apache HTTP Server installed on your computer.
Step 1: Setting up the web server on Windows 10
Open the Windows command prompt. You can do this by clicking the Start button, then typing “cmd” in the search box and pressing enter.
At the command prompt, type “iisreset /noforce” and press Enter. This will reset Internet Information Services (IIS) to its default configuration.
Type “iisreset” and press Enter again. IIS will now be reset to its default state.
Next, we need to install WebMatrix. Click here to download it and run it once downloaded. We’ll use WebMatrix to set up our site locally on our computer before uploading it to a web server later on.
After you’ve installed WebMatrix, click on “New Site” from the Home menu in WebMatrix, then select ASP.NET Empty Site from the list of templates that appears.
How to Host a Website on IIS in Windows 10
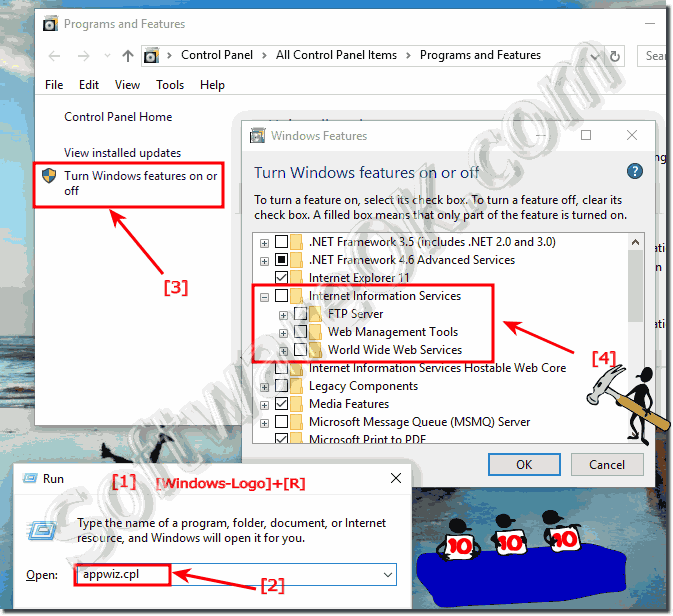
First, open up the Control Panel from the Start menu. You can also open Control Panel by pressing Win + X and selecting Control Panel from the menu that appears.
In the Control Panel window that opens up, click “Programs” and then “Turn Windows features on or off” in the left pane. This will bring up a new window where all of the features that come pre-installed with Windows 10 are listed under “Windows Features” (which is currently selected). Scroll down until you find “Internet Information Services” and check it so that it turns green like this:
In this article, we are going to explain how to create a web server on Windows 10. In the past, you could only create a web server on Windows by using IIS (Internet Information Services). But now, you can use the open source alternative Nginx for this purpose.