Server Database is a powerful database tool which provides you the ability to manage your data from anywhere. You can access and manage your server database with our android app, or from your web browser.
You can import/export your data from/to multiple file formats such as CSV, JSON, TXT and others. You can also synchronize your data with Google Drive, Dropbox or any other cloud storage provider that supports WebDAV protocol.
Server Database allows you to create unlimited databases with unlimited tables and unlimited records per table. It also has a built-in search feature that allows searching records by keyword or value.
Server Database For Android
Android Studio is a professional IDE for Android development. It can be used for developing Android applications and for building Android games. The IDE features an Android UI Designer, allowing you to create the user interface of your application without writing code.
The example below shows how to connect android studio to sql server database example.
Android SQLite Database
SQLite is a relational database management system that is built into the Android operating system (OS). SQLite databases are stored as a single file on your device and can be accessed using a library called “sqlite3” which is included with the Android SDK.
Database Insert In Android
You can insert data into an SQLite database using the insert() method of the Cursor class:
// Open connection to database
SQLiteDatabase db = this.getWritableDatabase();
// Create new row in table “Users” with columns: ID (INTEGER), Name (TEXT) and Email (TEXT)
ContentValues values = new ContentValues();
values.put(DB_USERNAME, username); // Add this column to values table if it doesn’t exist yet (NULL means no)
// Add new row at position 2 for // user with username=username and password=password
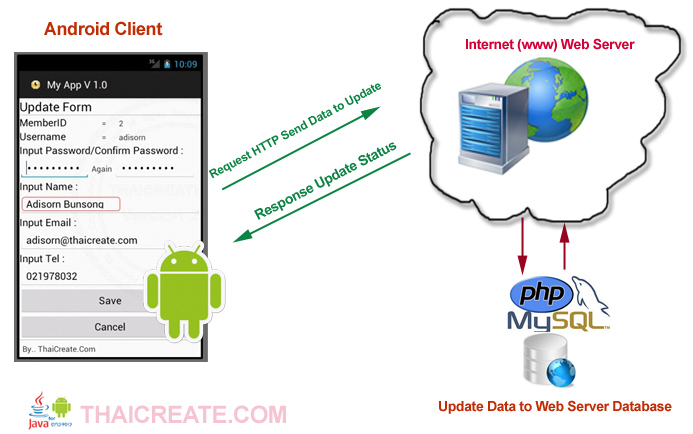
In this tutorial, I will show you how to connect android app to localhost database.
Database is a collection of data that are organized in tables with rows and columns. A database management system (DBMS) is a computer program that interacts with the user, other applications, and the data in the database itself to capture and analyze data.
There are several types of databases, such as relational databases, RDF databases, and NoSQL databases. Most of them are open source software, which means that you can use them for free.
In this tutorial we will be using sqlite for android app development because it is lightweight and easy to use. It does not require installation or configuration on your computer and it uses less memory than other database systems such as MySQL or PostgreSQL.
You can learn more about how to create an Android SQLite Database here: https://www.w3schools.com/sql/sql_create_table.asp
This is a tutorial on how to connect android app to localhost database.
First you need to create a new project in android studio(if you don’t know, How To Create A New Project In Android Studio?).
Create a new project called “AndroidLocalDatabase” or whatever name you want and fill the details as shown below.
After creating the new project, open it and go to build.gradle in your main directory and add the following dependencies:
compile ‘com.squareup.retrofit2:retrofit:2.0.0’ compile ‘com.squareup.okhttp3:okhttp:3.9.1’ compile ‘com.google.code.gson:gson:2.8’
In this tutorial we will show you how to connect your android application with a local database. This is done using the SQLite database, which is built into Android.
This tutorial will use a simple database called “contacts”. This database contains one table called “contacts” with two columns: id and name. The values are integers and strings respectively.

Connecting to SQLite Database in Android
Android provides SQLite library which can be used to create and manage SQLite databases. We can use the SQLiteOpenHelper class to access the database.
SQLiteOpenHelper is a subclass of the abstract SQLiteOpenHelper class and it has two important methods:
onCreate() – This method is called when we create a new database. The CREATE TABLE statement is executed in this method.
onUpgrade() – This method is called when we upgrade our database from one version to another. We can implement this method if we want to make changes to existing tables or columns based on new version.
To connect an Android app with an SQLite database, we need to follow these steps:
Connecting Android App to Localhost Database
In this tutorial, we will learn how to connect android app to localhost database. We are going to use MySQL for Android library to connect the localhost database.
This tutorial assumes that you have already installed mysql for android and sqlite for android in your project. If not then follow this tutorial: How To Install MySQL For Android & SQLite For Android In Your Project?
Now let us begin with our main objective of connecting android app to localhost database:
You can connect your Android app to a SQLite database or MySQL database.
First, you need to create the database on your computer. You can use this tutorial for SQLite databases and this tutorial for MySQL databases.
Then, create a new project in Android Studio.
Go to File > New > Import Module, then choose Android Library and click Next.
Select ‘Google Repository’ and click Next.
Select ‘Import all modules’ and click Next.
Click Finish, then open your build.gradle file and add the following dependencies:
compile ‘com.squareup.retrofit2:retrofit:2.3.0’ compile ‘com.squareup.retrofit2:converter-gson:2.3.0’ compile ‘com.android.support:design:25.3.1’ compile ‘com.androidcodezblog:sqlite-database-helper:1’
For this tutorial, we will be using Android Studio.

Once you have created your database file, it is time to connect it to your application.
To do this, follow these steps:
1) Open your app level build.gradle file and add the following line:
2) Open app level gradle dependencies and add the following line:
3) Add the following code in activity class:
1. Create a new project in Android Studio, select Blank Activity.
2. Open the build.gradle file and add the following lines inside dependencies:
3. Open the build.gradle file under app folder and add the following line to dependencies:
4. Create a new database file called db_test.db in Android Studio by going to File -> New -> Database (or press Ctrl+N) and selecting SQLite database:
5. Open SQLite editor by pressing Shift+F11 or going to Tools -> SQLite Data Browser (or press Ctrl+Alt+D). You should see your newly created db_test.db file appear on left side of the editor:
6. Right click on your database file and select Open in Browser from popup menu:
7. In browser window, right click on database name (it has no name yet) and select Rename option:
8. Type localhost in Name field (you may need to manually enter name if browser auto-completes it for you).
Android SQLite Database Example
The Android SQLite database is a simple and easy way to store data locally on your device. It is similar to a desktop database application like Microsoft Access. The SQLite database can be used in many different ways, from storing simple data to creating complex search and filter functions. In this example, we are going to create an Android application that uses the SQLite database as its main storage system.
MySQL for Android
MySQL Connector/J is the official JDBC driver for MySQL. It works with any Java application that needs to store data in MySQL databases. It provides full support for the standard JDBC API and implements many of the features of the native client library: https://dev.mysql.com/downloads/connector/j/
The most important thing that you need to do is to create a SQLite database. You can do so by using an IDE like Android Studio or by using the command line.