The same database for website and Android app eliminates the need for a separate database, which reduces the costs of maintaining two databases. This can be done by using something like Firebase or Parse.
The advantage of using the same database is that it reduces the cost of maintaining two separate databases. It also reduces development time because there’s no need for developing two separate apps.
The disadvantage is that if you want to use different data types (like strings, integers, etc.), you have to convert them between SQLite and your preferred format.
Same Database For Website And Android App
In this tutorial, we will show you how to connect your android app to a MySQL database.
You can find the database at http://127.0.0.1:3306/database_name/.
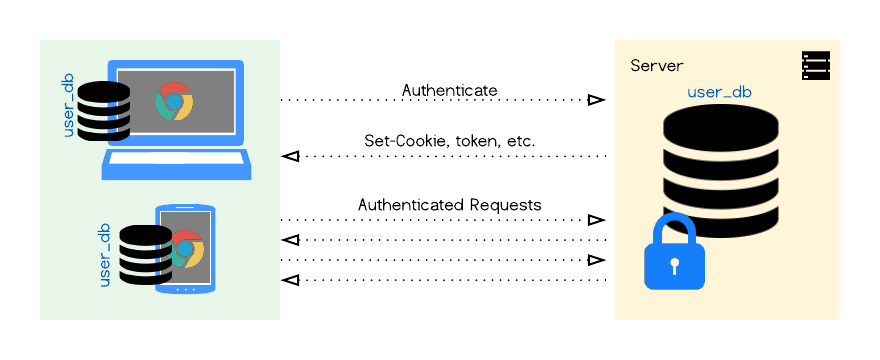
We will use the same database for both our website and our android application, so that they can share data with each other.
The database is the heart and soul of any application. Without a reliable database, you cannot develop a successful application.
In this tutorial, we will learn how to connect an Android Application with the same database that is used by the website version of your application.
For example, if you want to create an app for ordering food from a restaurant, then you can use the same database that is used by the website version of your application. So, whenever a customer places an order through your mobile app, it will be directly recorded in the same database which is used by your website version.
This tutorial will help you connect your Android Mobile App with MySQL Database using PHP Server scripts.
In this tutorial, we will see how to connect website and android app in the same database.
Android App Connect to MySQL Database
How To Connect Android App To Database:
In order to connect android app to database, you need an Android Studio IDE. First of all, you have to create a new project. After creating the project, you can observe that there is no MySQL database connection file. In this case, you have to add the database manually by going through below steps:
Step 1: Open the main activity of your project and add a new class named DBAdapter with extending SQLiteOpenHelper class. The following code snippet shows that how it looks like:
public class DBAdapter extends SQLiteOpenHelper { public DBAdapter(Context context) { super(context, DATABASE_NAME, null, 1); } @Override public void onCreate(SQLiteDatabase db) { db.execSQL(“CREATE TABLE IF NOT EXISTS user (id INTEGER PRIMARY KEY AUTOINCREMENT NOT NULL UNIQUE,” + “name TEXT NOT NULL,” + “age INTEGER NOT NULL,” + “email TEXT NOT NULL,” + “phone NUMBER(10) NOT NULL);”); }
Android App and Website Connect to a Single Database
Now, you can create one database for your website and Android application. This tutorial will help you to connect your website and Android app to the same database.
Android App Connect to MySQL Database
This tutorial will show you how to connect an android app with a MySQL database. The basic code for connecting an android app with a MySQL database is pretty simple. You can use the following steps:
Create a new project in Eclipse.
Add a new class called DbHelper in your package (com.example). Create this class as follows: package com . example ; import java . sql . Connection ; import java . sql . DriverManager ; import org . mysql . driver . MySQLDriver ; public class DbHandler { // Class variable private Connection conn ; // Constructor public DbHandler ( ) { // Create a connection String driverClassName = “com.mysql.jdbc.Driver” ; String url = “jdbc:mysql://localhost/myDatabase” ; String user = “root” ; String password = “” ; try { Class . forName ( driverClassName ) ;//
This is a basic tutorial on how to use the same database for your website and android app.
This is useful if you want to share the same userdata between the two platforms.
1) Create a MySQL Database (e.g. ‘mobiledb’)
2) Create a table in the above database called ‘user’ with columns username (varchar(40)), firstname (varchar(40)), lastname (varchar(40)) and email (varchar(40)). Set the id column to auto increment and initialise it with 0 (zero).
3) Create another table in the above database called ‘categories’ with columns categoryID (int), categoryName (varchar(40)) and categoryImageURL (varchar(200)). Set the id column to auto increment and initialise it with 0 (zero).
In this tutorial we will learn to connect android app to mysql database. We will also learn how to create database and table in php mysql and then how to connect android app with php mysql.
To build your own android application, you need to first install Android Studio which is the official IDE for Android Development. You can download it from here: https://developer.android.com/studio/index.html
After installing the Android Studio, open it and create a new project named “MySQLApp” and select an empty activity template as show below:
Now that we have created our project, let’s open our activity_main.xml file located in res/layout folder and add two buttons like below:
<?xml version=”1.0″ encoding=”utf-8″?> <LinearLayout xmlns:android=”http://schemas.android.com/apk/res/android” xmlns:tools=”http://schemas.android.com/tools” android:layout_width=”match_parent” android:layout_height=”match_parent” tools:context=”.MainActivity”> <Button android:id=”@+id/addButton” android:layout_
here is a simple tutorial for creating an android mobile application using mysql database.
In this tutorial, we are going to create a simple android mobile application with php database connection and display the result in the activity status tab.
1. Creating MySQL Database And Tables
2. Setting Up Database Connection In Android Project
3. Adding Database References To Android Project
4. Adding Database Permissions To Android Manifest File
How to connect App to database?
The first step is to create a database in MySQL server. In this tutorial, we will use MySQL Workbench to create a database and table. You can download the MySQL Workbench from here . After installing, open it and connect to your database server.
In this example, I am going to create a database named “mydb” and a table named “tbl_user”. Here is the screenshot of my database connection:
Now, let’s create a table called “tbl_user”. We need to give some columns and data types for each column. A column name must be unique in one table but not across multiple tables (unless you define FK). Here is an example of creating user table with columns id,name and email:
Now let’s insert some data into our user table:
Here are the steps to connect your app to a MySQL database:
1. Create a table in your MySQL database
2. Generating a .sql file from that table
3. Open the .sql file in Notepad++ and save it as ‘mydb.sql’
4. Drag and drop mydb.sql into your Android app project/folder
5. Select “Open As” > “SQLite Editor” on the right side of Android Studio (or open it up manually)
6. In SQLite Editor, select “File” > “Open” and find mydb.sql in the project folder you created earlier (not /data/data/com.example/files/.local/share/mysql/).
MySQL
MySQL is a relational database management system (RDBMS) that runs as a server providing multi-user access to a number of databases. MySQL is often used to run web applications, and it can be used in both embedded and standalone modes.
MySQL is free software, with most of the source code available under the GNU General Public License. The name “MySQL” originated from “mayonnaise,” because the founders thought it would taste good with sushi. MySQL was written by David Axmark, Allan Larsson and Michael “Monty” Widenius, who acquired it from its original authors, who had gone on to Sun Microsystems.
In this tutorial we will learn how to create a MySQL Database, create tables and insert records into them.