This summer we wanted to try something fun with the kids and build a popsicle stick bridge. So we got together at our place and started making it. It was not too hard to make but did take some time. I have noticed that there are a lot of pieces of paper out there with the instructions on how to build it, so I have decided to help collect them all in one easy to find place.
The Popsicle stick bridge can be a really fun and challenging project. I have worked very hard to put an easy to follow set of instructions together for you. This is what I have personally done when making this bridge and it may help others in their own builds.
Popsicle stick bridge instructions pdf
-Building a popsicle stick bridge is an exciting and challenging project. You can build a sturdy bridge that can hold up to 200 pounds.
-The first step is to make sure you have the right materials. You will need 200 popsicle sticks and two rubber bands per person building the bridge. You will also need some tape, scissors, and glue if you don’t have any of these things at home.
-You will also need a large table or floor space to build your bridge on. The bigger the surface area, the better!
-Once you have all of your materials, you are ready to start building! Start by making a “T” shape with 20 sticks across each side of your base and another 20 sticks across each diagonal piece of your base. Make sure that the sticks are touching each other at all times during this process because this is how they will support themselves once they are connected together into one long piece of wood. Once you have completed this step, it’s time for the next step!
Build a Popsicle Stick Bridge That Can Support 200 Pounds
Materials:
1. 100 wooden sticks (popsicle sticks work best)
2. A weight to be placed on top of the bridge (200 pounds is recommended)
3. Scissors, hammer and nails for any necessary assembly
4. Blue painters tape or masking tape (this will be used to hold the popsicle sticks in place while they are drying)
5. Paper towels (to cover your work surface when assembling your bridge)
6. Optional: An adult helper!
Popsicle Stick Bridge Challenge
The challenge is to build a bridge that can support the weight of a one pound bag of flour, then gradually increase the weight until the bridge finally collapses. The bridge must be able to support at least 200 pounds. The challenge is to build a bridge that can support the weight of a one pound bag of flour, then gradually increase the weight until the bridge finally collapses. The bridge must be able to support at least 200 pounds.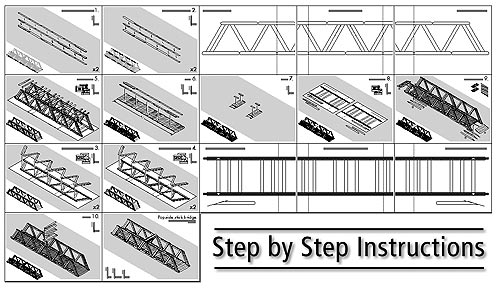
Materials:
-Popsicle sticks (cut into 2 in x 3 in pieces)
-String or yarn (for tying)
-Ruler or measuring tape (for measuring)
Instructions:
1. Take a few minutes to plan and design your bridge. You will need to make sure that it is strong enough to hold the weight you have planned for it! If you do not know how to do this, ask an adult for help with this step!
2. Begin building your bridge by placing two popsicle sticks together at a 90 degree angle, making sure they are perpendicular to each other. Tie them together with string or yarn so they stay together while you work on other parts of your bridge! Make sure you leave enough room on each side so that when you add
Popsicle Stick Bridge Challenge
Materials:
Popsicle sticks
Tape (preferably duct tape)
Instructions:
1. To begin, you need to make sure that the sticks are all the same length, so measure out one foot from one end and mark it with a pencil or pen. This will be the end of one side of your bridge. Then, measure out another foot from this mark and mark it as well. This will be the other side of your bridge. You should have two marks on each end now, with one being half a foot longer than the other.**
2. Take two sticks at random and tape them together at both ends until they form an L shape.**3. Once this is done, take another stick and attach it to one end of the L shape so that it forms a triangle shape when viewed from above with the first two pieces attached to each other at both ends.**4. Repeat this process until you have 9 triangles connected together in a row using 9 pieces of tape on each piece except for those connecting at both ends where there would be 12 pieces of tape used instead (if we were doing 10 triangles). This should result in a long
Popsicle Stick Bridge
To build a popsicle stick bridge, start by laying two rows of 5-inch-long popsicle sticks side by side on a flat surface. Make sure that the ends of the sticks are flush with each other.
Next, lay down another row of 5-inch-long popsicle sticks above the first row so that they are flush with it. Place another row of 5-inch-long popsicle sticks below this one so that they are flush with it as well.
Place one more row of 5-inch-long popsicle sticks on top of these four rows to create five layers total. Then, place one more row of 5-inch-long popsicle sticks vertically on top of this fifth layer to create six layers total. This forms the base for your bridge!