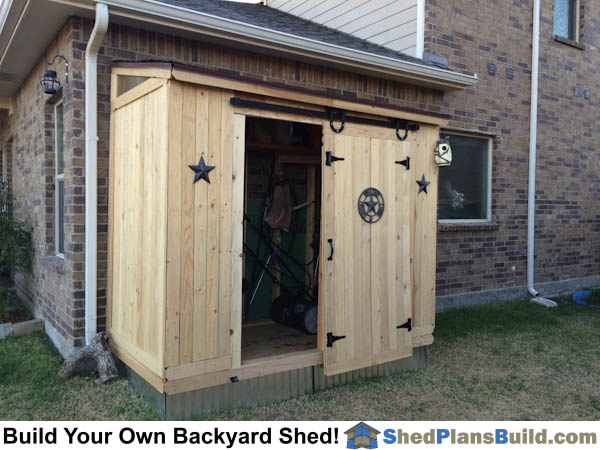
Interested in building some barn doors for your shed? There are many reasons for spending a weekend building barn doors for your shed. Building barn doors can help you turn an ordinary shed into something extraordinary. Barn door hardware is both decorative and functional, creating a low-cost upgrade to just about any storage space.
If you’re a fan of Bob’s Show and Charlene, you probably saw my old barn doors that were literally made out of doors. They looked like they came straight out of the Old West. I liked that they kept the animals out, but they weren’t functional when it came to letting fresh air in during the summer.

How to build barn doors for shed
Barn doors are great because they give you the ability to hide stuff you don’t want seen, or just make your shed look cool. It’s really easy to make these yourself if you have access to a table saw and miter saw, as well as some basic tools like a drill and screwdriver.
Step 1: Plan how big your door should be
The first step is to decide how big your door should be. You can buy ready made doors in any size from most hardware stores, but if you want something unique or custom-made, then this is the best option. Here’s an example of how I built my door:
Building a set of barn doors for your shed is a great way to add some style and function. It’s also not very complicated, so you don’t have to be an expert carpenter to complete this project on your own.
Step 1: Measure your opening
You’ll need to measure the width and height of your opening before you can start building your doors. Use a tape measure to take these measurements, then write them down on a piece of paper so you don’t forget them later.
Step 2: Cut two pieces of wood in this shape
Use the table saw or circular saw to cut two pieces of wood in the shape shown above. The size will depend on your measurements from step one, so make sure you have enough space for each piece to fit into your opening when you’re done cutting them out. If there are any extra pieces left over after cutting out both pieces, just throw them away; they won’t be used for anything else in this project anyway!
First, determine the width of your shed. If you have a standard 8-foot by 10-foot shed, then you will want to build barn doors that are 8 feet wide and 10 feet tall.
If your shed is not standard size, then you can adjust the width of your barn doors to fit. The height of the doors will usually be determined by the height of your shed door frame.
The next step is to determine how high you want your barn doors to hang from the ground. This will depend on where you will be installing them and what kind of clearance you have in front of your shed. For example, if you have an 8-foot tall door frame and want the top edge of your doors to hang about 4 inches off the ground when open, then subtract 2 inches from this number for each side (4 inches – 2 inches = 2 inches). Therefore, one side would measure 6 inches from the top of the door frame down and the other side would measure 4 inches from the top down (6 – 2 = 4).
The next step is to cut out enough lumber for all four sides of each door. If they don’t match perfectly at one end or another because they weren’t cut perfectly straight or square with each other, don’t worry
Building a barn door is a great project to do with your kids. The materials are easy to find, and you can build it in just a few hours. You can use the same instructions to build barn doors for any size shed or garage.
Here are the steps:
Measure and cut the boards. You’ll need two 2-by-4s and three 2-by-6s. Cut each one to length so that you end up with two long sides and two short sides, along with three pieces of trim.
Make the frame. Lay out the boards on your work surface and screw them together using 3″ screws. Use a drill/driver for this step because it’s easier than driving nails into hardwood boards.
Attach brackets to the inside face of each board, about 1/2″ from each edge so that they’re hidden from view when installed (photo 1). These will hold up the gate when you swing it open or closed, so make sure they’re sturdy enough for your door weight requirements (typically 40 pounds per inch of width). We used 1/2″ galvanized steel angle brackets because we had them on hand; check with your local hardware store for heavier-duty brackets if needed
If you want to add some style to your shed, here are some great DIY barn door ideas for your shed. You can use them for sheds, garages, playhouses and more.
This is a good project for beginners who want to get started with woodworking or just want a weekend project. If you have never built anything before, start with something simple like this and learn from there!
1) Start with the frame first. Cut all of the pieces of your frame to size and sand them down smooth with 120 grit sandpaper. Use a T-square to make sure your corners are square as well.
2) Next cut out all of our boards to size (6″ x 6″) and glue them together using wood glue and clamps until dry (allow 24 hours). Then cut out our middle board at 45 degrees on each end using a miter saw or circular saw and drill holes in the board at each end so we can screw it into place (using 1 1/2″ screws).
How to build barn doors for a shed
The first step in building your own barn doors is to find the right wood for your project. You want to find the best quality wood that you can afford. If you’re just looking for something simple, then you can probably get away with using some 2x4s and plywood, but if you want something that looks more professional, then you’ll want to use 2x6s or 2x8s on all sides of your door. You can even use 2x12s if you want it to look really nice.
Once you have your lumber cut down and planed smooth, it’s time to start assembling them together. The main part of this project is making sure that everything goes together properly so that the door doesn’t sag or fall off its hinges later on down the road.
To begin with, make sure that all of your joints fit together properly before screwing them into place. Don’t be afraid to sand down any rough edges or splinters using sandpaper or an electric sander if needed. Once everything looks good and fits together well enough, it’s time to start screwing everything together!
For this project we recommend using drywall screws because they are relatively inexpensive and easy
Building barn doors for a shed is easy and inexpensive to do. The doors are made with a frame and a sliding section that can be easily removed when you want to open the door.
Tools & Materials Needed:
2×4 lumber, cut into two pieces – one at 77″ long (for the horizontal rail) and one at 74″ long (for the vertical rails).
1×4 lumber, cut into two pieces at 77″ long for the stiles, and two pieces at 66″ long for the rails.
One piece of 1/2″ plywood cut to 77″ x 54″. This will be used as both a door panel, as well as a backing for the sliding portion of your barn doors.
Two hinges per door. You’ll need two hinges on each door if you want them to swing out like normal doors. If you only want one hinge per door then they’ll only open inwardly (like an entry gate in front of your house).
A handle or latch mechanism for each door panel. You can use any type of handle or latch mechanism that suits your fancy – a simple knob will do just fine!
Building your own barn doors is a great way to add some character and personality to your shed. It’s also a great project for the weekend warrior, because it doesn’t require any special skills or tools.
In this tutorial, we’ll show you how to build barn doors for a shed using common materials from your local hardware store. We’ll also provide some tips on how to design them so they look great!
Barn doors are a great way to add some style to your shed. They are easy to build and look great. In this article, we will show you how to make barn doors for your shed.
Step 1: Measure the opening of the shed where you want to install the door.
Step 2: Cut two pieces of plywood (or another material) that measure at least 1/2 inch wider and longer than the opening in your shed.
Step 3: Cut four hinges from a 2×4 piece of lumber. The best place to get these hinges is at your local hardware store or home improvement center. You will need screws or nails to affix each hinge on one side of each piece of plywood to attach them together so they hang as one unit when installed properly in your shed opening.
Step 4: Drill holes into each hinge with a drill bit that measures at least 1/2 inch larger than the screw or nail head size that came with the hinge kit when purchased from your local home improvement store or hardware store.
Step 5: Install two hinges on each end of one side of each piece of plywood (with screws), then flip it over so it stands upright and install two more hinges on each end of
Barn doors are a very popular home decorating trend. They make a great accent piece when used as a focal point, and they can also be used to hide storage areas or unsightly areas of your home.
If you have an old shed laying around that you’re not using anymore, or if you just want to add some rustic charm to your home, why not build barn doors for it?
What You Will Need:
Shed with 2 x 4 walls (or larger)
Screws and nails
2 x 6 lumber for the frame (you can use any size)
Roller wheels for the bottom of each door (optional)