In the article we are going to talk about how to build a wood headboard. This is not as difficult or expensive as it may seem. You just need time, patience and determination to succeed.
How to build a wood headboard is not a very difficult task and is relatively easy to learn, how to build a barn wood headboard, how to build a pallet wood headboard. Today we’re going to show you how easy it really is to build one for your home.

How to build a wood headboard
How to Build a Wood Headboard. A wood headboard can be built in a variety of ways, depending on the look you want. You can build a traditional headboard from 2x4s, or you can build one from pallets or other reclaimed wood. You can even build a simple but elegant headboard from just a few boards of wood and some brackets.
In this article, we will discuss how to build a barn wood headboard and how to build a pallet wood headboard. We will also talk about how to build a wood slat headboard, if that is what you want instead.
A headboard can be a great way to add style, color and personality to your bedroom.
There are many different types of headboards available on the market, but if you’re looking for something unique and inexpensive, building one yourself is a great option.
Here are some ideas for making your own headboard:
Barn wood headboard
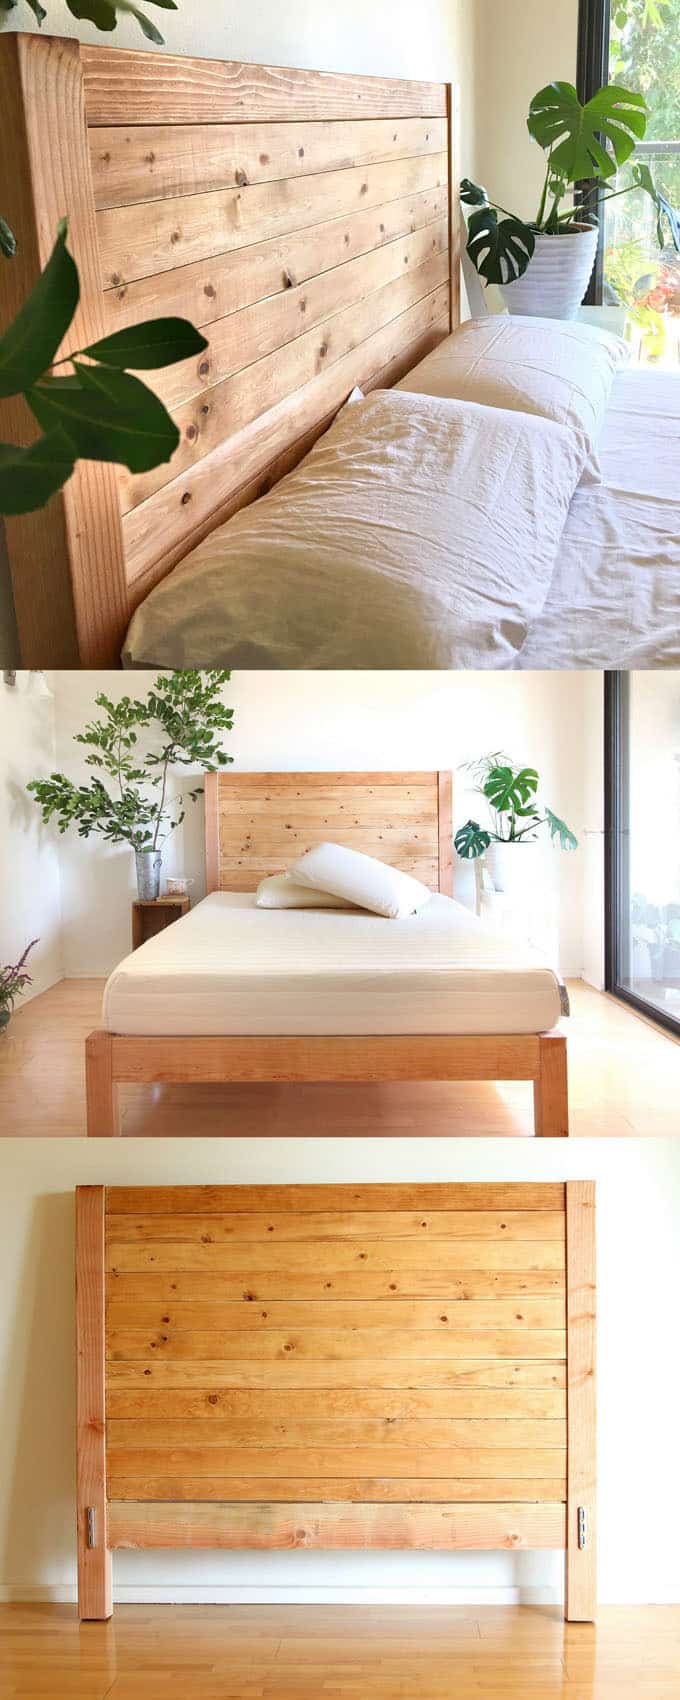
If you want a rustic look that’s still modern, this is a great option. The barn wood headboard shown above was made using old barn siding that was originally used on an old farmhouse in New York state. It was found at an antique store and then repurposed into this amazing piece of art!
Pallet wood headboard
Pallets are everywhere these days — from DIY projects to furniture stores — and they make great materials for DIY projects like this pallet wood headboard. All you need is some basic tools (like a saw) and paint/stain of your choice. You can also use metal brackets instead of nails to make it even more secure!
Wood slat headboard
Wood slats are another popular material for DIY headboards because they’re easy to find — just stop by your local home improvement store
Step 1: Assemble the headboard frame.
Step 2: Cut and assemble the headboard slats.
Step 3: Stain and protect your wood headboard with a clear finish.
Step 4: Attach the headboard to your bed frame using lag screws or carriage bolts.
Build Your Own Wood Headboard
Wood headboards are a great way to add character and charm to your bedroom, but they can be expensive if you buy them in stores. The good news is that they’re easy to make yourself, and you can easily customize the design to suit your needs and tastes.
This article will show you how to make an easy DIY wood headboard that looks great and costs less than $50!
Step 1: Gather Materials
To build your own headboard, all you need are some basic tools and materials:
Ruler or tape measure
Pencil or pen
Drill (optional)
Screwdriver or drill bit set (optional)
How to build a barn wood headboard
A barn wood headboard is an excellent way to add rustic charm to your bedroom. The look is perfect for those who love a country feel and want to create a cozy bedroom space that they can relax in. There are several ways you can build a barn wood headboard, so you don’t have to be an expert craftsman to create one. Here are some ideas:
Make Your Own Slats
If you have access to scrap wood or pallets, this is an easy option for building your own headboard. All you need is some basic tools and wood glue or nails. You can choose from either pine or oak if you want something lighter or darker in color. The most important thing is finding strong enough pieces of wood that won’t break under weight when sitting on the bed or leaning against it. You want to make sure they’re long enough too so that they won’t bend under pressure from being leaned against the wall or used as extra seating during movie nights!
Use Nails for Extra Support
Another option is using nails instead of screws for attaching the slats together at their corners. This will provide extra support for the slats when leaning against them while sitting on.
How to Build a Barn Wood Headboard
Building a barn wood headboard is not only fun, but it gives you the opportunity to use some of your favorite lumber and create something that is both functional and beautiful. This tutorial will show you how to build a barn wood headboard from scratch.

Step 1: Cut Your Lumber
The first step in building your barn wood headboard is to cut all of your lumber to length. You will need to cut two pieces at 4 feet long and one piece at 3 feet long. The middle piece should be 2 inches shorter than the side pieces so that it fits snugly between them when assembled. If you are using untreated wood, make sure to seal each piece with an exterior grade sealer before assembly so that it does not absorb moisture and warp over time.
Step 2: Assemble Your Frame
Next, take two 4-foot pieces of lumber and set them on top of each other so that they form a 90 degree angle as shown above. This will form the outer frame for your headboard which will support the slats later on once they are installed. Secure these two pieces together with 3 inch screws every 12 inches along each joint (or as required by local building codes).
How to Build a Barn Wood Headboard
A barn wood headboard is a great way to add some rustic charm to your bedroom. It’s also the perfect project for beginners, as it doesn’t require fancy tools or skills. You can make one yourself in just a few hours with a few simple supplies.
Materials:
2x4s
2x6s (optional)
1″ galvanized screws (purchased at hardware store)
Wood plugs (purchased at hardware store)
Paint or stain (purchased at hardware store)
How to Build a Barn Wood Headboard
It’s easy and fun to build your own barn wood headboard. The supplies are readily available at most home improvement stores, and the process is simple. This one was built with 1×6 boards because that was what we had on hand, but if you want a thicker look, use 2x4s instead. This project will take around two hours and cost around $75-$100 depending on how much lumber you buy.
:max_bytes(150000):strip_icc()/diy-59f21039054ad90010815556.jpg)
Step 1: Cut the Lumber
The first step is to cut all of the pieces for the headboard. For this design, the measurements are:
2 – 36″ long pieces for the sides of the headboard
2 – 42″ long pieces for the top and bottom of the headboard
4 – 30″ long pieces for support rails at each end of the headboard (optional)
Once everything is cut, you’ll have ten pieces total (two ends, two tops/bottoms and six rails).
For this project, you’ll need:
– A screwdriver or drill
– A tape measure and pencil
– Wood glue
– Wood stain (optional)
– Sandpaper or sander (optional)
Step 1: Measure your bed frame. If you’re building a headboard for a twin bed, cut two 2x4s in half to make two pieces that are 3 feet long. If you’re building for a full size bed, cut one 2×4 into two pieces that are 4 feet long. You’ll also need two 2x4s that are 10 inches long for the top and bottom rails. The remaining stock should be enough to build three shelves totaling about 20 inches wide by 12 inches deep.
Step 2: Attach the rails to the back side of each shelf with screws so they’re flush on all sides except the front, where there will be a gap between them when they’re installed on your bed frame. Then attach the shelves together using wood glue and screws through holes drilled into the edges of each shelf and rail before attaching them together. This will form an X shape when finished. For added stability, drill pilot holes in each shelf before attaching them together with screws