How to build a wishing well. First, you need to find the perfect spot outside your home. Many people choose to put them in their backyard. Second, you have to dig a hole so deep that you can’t see sunlight. This is for safety purposes as you don’t want anyone falling in. After that, get rid of all the dirt with a wheelbarrow and fill it halfway up with water from your hose. When the water feels cool on your hand, your wishing well is ready!
Wow. You’re still here? What are you looking for? How to build a square wishing well? How to build a round wishing well? A place to build a wishing well? The only way you’re going to find the perfect location for your wishing well is by following these steps. So, without further ado, let’s jump in!

How to build a wishing well
Building a wishing well is not as difficult as it may seem. This article will help you build your own wishing well.
How to build a square wishing well
The first step in building a square wishing well is to dig the hole for it. To do this, use a spade to dig out the dirt until you reach about 4 feet deep. Then, take out all of the dirt from the hole and put it somewhere else so that you can replace it later on. Next, place some bricks around the bottom of the hole and pour concrete over them so that they will hold up your wishing well. Make sure that you leave enough room below ground level for people to put their money into your well. After this, smooth out all of the bumps and holes in your concrete surface with sandpaper or a trowel until it looks like new concrete. After this, wait for your cement to dry before starting any other steps in building your wish well.
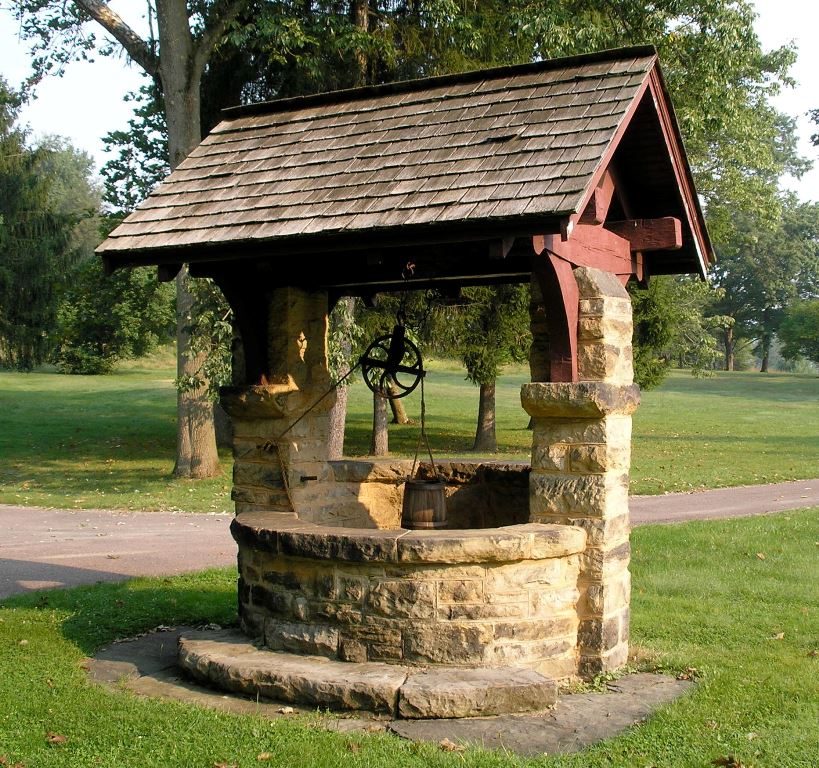
How to build a round wishing well
The first step in building a round wishing well is digging out dirt from where you want your well to be placed so that there is no grass growing around its base once finished (this will make it easier for people to throw coins
How to build a wishing well
Wishing wells are a beautiful addition to any garden or yard. They can be used as an ornament, or you can fill them with water and make them functional. You can also use this project as a place to put flowers, rocks and other decorative items. The possibilities are endless!
This article will show you how to build a wishing well out of wood pallets.
A wishing well is a great way to add a touch of magic to your garden and make it the place where all your friends’ dreams come true. If you’re looking for a place to put your money, this article will show you how to build a wishing well.
Wishing wells come in many shapes and sizes, but one thing they have in common is that they’re usually built from stone or brick. You could use concrete blocks or bricks if you want something easier to assemble than stone, but you’ll need to find some large stones if you want to create an authentic look.
Round wishing well
You can make a round wishing well by building up two concentric circles of bricks or concrete blocks. This can be quite time-consuming, so it’s best if you have some help when you start building it up (and even more so when you move on to the next step).
Square wishing well
If you want a square wishing well instead, start by making a square base out of bricks or concrete blocks. Then build up another layer around the outside edge of this base — again using bricks or concrete blocks — but this time leave gaps between each block so that water can flow through them freely.
How to build a wishing well:
1. Find the right location. The best place for your wishing well is in a secluded, quiet area of your yard or garden. This will help keep people from disturbing the natural flow of things and make it easier on you and your family to enjoy the well without interference.
2. Decide whether to use concrete or wood. Concrete is more sturdy and can be made to look like stone, but it’s also more expensive, as is the time required to pour the concrete. If you choose wood, you’ll need to choose between building an octagonal wooden wishing well or a round wooden wishing well, depending on what suits your fancy best. If you’re building an octagonal wooden wishing well, it may help to first build a box out of 2x4s (or whatever material you prefer) that has one side open so that you can slide it over top of your hole after digging it out (this will make building easier).
If you have kids, you know how many toys they lose. They lose them in the house, they lose them outside and they even lose them at school. So what do you do with all those lost toys? Well, if you are like me, you make a wishing well!
Wishing wells are a great way to teach your children about giving to others and being grateful for what we already have. They can also be used as a way to help children learn about charity and giving back to others who may be less fortunate than themselves.
There are two main types of wishing wells that I have seen around: square wishing wells and round ones. If you want to build a square one, then follow these steps:
Supplies Needed:
Materials
1x 4×8 sheet of plywood or other material (this will depend on the size of your sink)
1x 4″x4″ post (2 will be needed if building a square)
1x 2″x3″ post (2 will be needed if building a square)

How to build a square wishing well
A wishing well is an age-old tradition that’s been used for centuries to make wishes come true. You can create your own wishing well in your yard, garden or home. A wishing well isn’t just for kids — adults can make wishes too! There are many different ways to build a wishing well, from using concrete blocks to building one from wood pallets.
How to Build a Round Wishing Well
You can also make a round wishing well by using Styrofoam balls for the rocks and adding some lights so it glows at night. This idea is perfect if you want your wish to come true right away!
How to Build a Wishing Well Out of Pallets
If you want something more sturdy than Styrofoam balls, consider building a wishing well out of pallets instead. This DIY project is great if you have kids who love putting coins into fountains or ponds, because they can use this as an opportunity to make their own wishes come true!
A wishing well can be a beautiful addition to your backyard or garden. You can buy one, but it’s a lot more fun to build your own. Here are instructions for making three different types of wishing wells: round, square and out of pallets.
How to make a wishing well from a plastic tub
1. Cut the tub into four equal pieces using the miter saw or handsaw.
2. Drill holes in each piece for drainage with the 1/4-inch drill bit, and then glue them together with wood glue and clamps or rubber bands until dry. The top of the well should be about 1/4 inch shorter than the bottom so it will sit flat on the ground when you stand it up.
3. Paint or stain your well however you like, making sure to leave at least one side unpainted so that you can see how much water is in it.

How to Build a Square Wishing Well
Step 1: Mark the location of the well. The best place for the wishing well is in the center of your yard or garden where it can be seen from all sides.
Step 2: Dig the hole for the wishing well. Make sure that it’s wide enough so that you can stand up inside with ease, but not so deep that you can’t reach in and drop your coins into it.
Step 3: Pack down the soil at the bottom of the hole and compact it with a tamper so that there aren’t any air pockets left behind.
Step 4: Pour cement into your hole and let it set completely before proceeding to step 5.
How to build a wishing well.
A wishing well is a great addition to any garden, especially if you are hoping to attract wildlife to your garden. Wishing wells are often built into walls or fences and function as water features, but they can also be freestanding features in their own right. The first thing you need to do is decide where you want your wishing well and whether you want it freestanding or built into a wall/fence.
Once you have decided on location, you need to consider how big the well will be. If it is going to be built into a wall or fence then make sure that there is enough space for it, otherwise it may feel too small for the space available.
Once you have decided on size, think about how much water you want flowing through the wishing well and if this can be achieved using gravity alone or if there needs to be an electric pump installed. If using gravity only then make sure that the height of the water coming out of the top of the well is sufficient for what you want it for (if it’s simply decorative then height isn’t so important).
Build a wishing well using these instructions. The well is made of 4×4 wooden posts and 2×8 boards. The base is made of concrete blocks or cinder blocks, depending on the type of soil you have on your property. You can also add stone around the edge to make it look fancier, but this is optional.
A wishing well is a great addition to any garden or yard, especially if you want to add a little whimsy to your landscape. This project will take about 4 hours to complete and about $150 in materials for wood and concrete blocks (and even less if you can find some pallets for free).
Step 1 – Cut Posts
The first step is to cut the posts for your wishing well. Buy pressure treated lumber from a home improvement store or lumberyard so that they’ll last longer in wet conditions. Use 10 foot long 4x4s for the posts (you’ll need two) and 8 foot long boards for the sides (you’ll need four). You could also use 2x6s if you don’t have any 2x8s, but it will be more difficult to fit everything together and it won’t hold up as well over time because they aren’t as strong as 2x8s are.