When it comes to window design and installation, quality is a must. But in order to sell quality work and materials, a window contractor has to meet certain requirements to make sure the customer is receiving a good value.
The first step in building a window is laying the correct foundation. You can’t build a window without one, how to build a window sill, how to build a window seat with storage, and we are going to look at the steps you must take to lay the groundwork for your window project.

How to build a window
A window is one of the most important features in any room. Windows provide natural light and allow you to take in the view from outside your home. While windows can be expensive, there are ways to build them yourself and save money.
Building a window sill can be done in two ways: by using premade moldings or by cutting them yourself. If you want to add depth and character to your windows, creating your own molding is more attractive than using premade moldings.
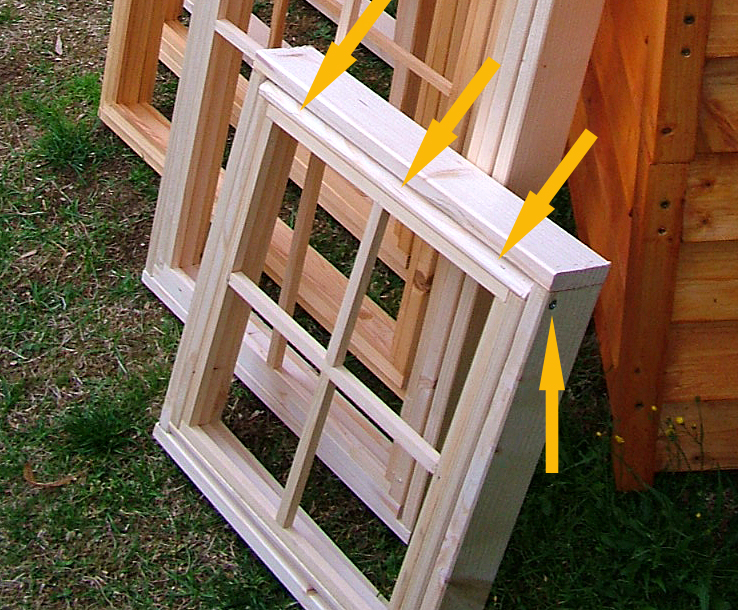
Window Sills
Window sills are the simple, flat pieces of wood that sit at the base of your window. They provide a place to rest your feet while you stand in front of the window, and they can also be used as storage space for things like books, magazines and plants.
The easiest way to make a window sill is with lumber purchased from a home improvement store. Many stores sell pre-cut pieces that make it easy for you to put together your own project. You can also buy lumber at most hardware stores or lumberyards. If your project is small enough, you may even be able to find scraps of wood at these places that will work just fine for your window sill.
If you want to make something larger or more decorative than just a plain piece of wood, then consider using something else as well as wood for your window sill. You can cover up some of the wood underneath with a material like paint chips or epoxy resin. You could also add tiles on top of the wood to give it some extra style if desired.
The window sill is the outside edge of the window frame. The rules for building a window sill are similar to those for building a wall. You need to consider the materials you want to use, how much weight they will carry and whether or not they will be damaged by water. The kind of sill you build depends on the type of window you’re installing.

Materials
The type of material you use for your window sill depends on a few factors:
Cost: Some materials cost more than others, so if your budget is tight, you may want to choose less expensive options that have similar longevity. For example, concrete can be used for building walls but it will be more expensive than drywall or plywood if your budget is limited.
Appearance: If aesthetics are important to you, consider what type of finish you want on your windowsill before choosing materials that don’t suit that particular look. For example, smooth concrete might look good with modern glass windows but not so good with old-fashioned wooden ones.
Durability: Some materials are more durable than others so it’s important to consider how long the material will last before deciding what type of construction method would work best for each project (see below).
How to build a window. The average homeowner will spend approximately $1,000 on windows, according to the National Fenestration Rating Council. You can cut costs by making your own windows instead of buying them ready-made at the store.
If you’re handy with tools and have some basic carpentry skills, making your own windows is a good way to save money and add character to your home.
Building windows isn’t difficult, but it does require careful planning and measuring before cutting any wood. You’ll also need some basic carpentry skills and be able to use power tools safely.
You may want to hire an experienced carpenter or contractor if you don’t feel comfortable doing it yourself or if you lack the time or skills needed to make sure everything is done correctly.
Using Vinyl Siding Instead of Wood Siding
Before we get into building your own windows, let’s talk about one more thing: replacing your vinyl siding with wood siding. Vinyl siding is relatively cheap compared with wood siding (it’s still pricey though), but there are many benefits associated with using real wood siding over vinyl siding in terms of curb appeal, insulation value and durability.
How to build a window
A window is a hinged or sliding opening in the wall of a building, room or vehicle that provides light and ventilation. Modern windows are usually glazed or covered in some other transparent material (for example with glass) to allow the passage of light, but they may be left uncovered for ornamental purposes.
In current English usage, a window is covered with an overlapping sash, so that the whole assembly acts as a single movable unit. The sash is made up of individual panels called “lights”, which may be opened outwards by operating a lever (or “crank”). The light is usually covered with a thin sheet of glass in order to keep the wind and rain out. However, modern manufacturing processes allow other materials such as polycarbonate to be used as well as glass. In cold climates, plastic sheeting may cover both sides of an insulating material such as polystyrene foam which acts as an insulator against heat loss during the winter months though it increases solar gain during the summer months when it can then be removed by unrolling it back into its housing roll.
How to build a window sill
In this article we will show you how to build a window sill. The window sill is an important part of the house and if it is not properly constructed, then there will be problems with water leakage.
The height of the window sill should be equal to the height of the floor. You can make this yourself or order a ready-made product from the market.
How to Build a Window Sill
A window sill is one of the most prominent features in any room. It’s where you set down your coffee mug, it’s where you rest your feet and look out into the world, and it’s even the perfect place to display some of your favorite mementos and keepsakes. So if you’re looking for an easy DIY project that will help add character to your home, consider building a window sill.
Building a window sill is actually quite simple: all you need is some basic tools and supplies, a little bit of time and patience, plus the willingness to get your hands dirty. To help make this project easier for you, we’ve put together this step-by-step guide on how to build a window sill in just about any size or shape that suits your needs!
Materials Needed
The materials needed for this project are fairly simple: all you need are some wood boards (ideally pine), nails or screws (to secure everything together), paint/stain (to give it that special touch), sandpaper (for smoothing out rough edges), caulk (for sealing gaps between wood pieces) and wood glue (to keep everything together).
How to Build a Window Sill
Building a window sill is an easy project that can be completed in a few hours. A common window sill is made from a piece of 2×4 lumber, but you can also use a 1×4 for a thinner ledge. The measurements for your project will depend on the size of the window and how much room you need for storage or seating.
The first step in building this project is to measure your window and mark the location where you want it to sit on the wall. Once you have that information, cut down your 2×4 into smaller pieces and attach them together with screws. Make sure they are level with each other so they will form one flat surface when placed on top of each other.
Next, screw these pieces together so they make up one solid piece. This will become your window ledge once it’s painted or stained to match your walls and trim.

After attaching all of your pieces together, place them against the wall at their designated height and mark where each one hits so you know where to place it when hanging on the wall later on in this process.
Step 1: Measure the height of your window and cut two lengths of 2x4s to the same length. These will be the sides of your window sill.
Step 2: Place a level along one edge of one board and mark where it touches with a pencil. Then, place another level on top of that mark and make another mark. You’ll have a perfectly straight line between those two marks. Repeat with the other board on its opposite side.
Step 3: Measure down from each end of both boards by 1/8 inch or so and draw lines across both boards in both directions from these points — these are your guides for cutting out your notches. Use a circular saw with a carbide blade to cut along these lines to remove most of the material inside the notches (don’t worry about cutting all the way through!).
Step 4: Flip over one of your boards and use a hammer and chisel to finish removing material inside each notch until it’s wide enough to fit over your window frame (you may need to trim off some more material if necessary). Make sure you don’t damage any painted surfaces while doing this!
Step 5: Line up one board into place over a window frame, then repeat
The window sill is the part of the window frame that extends beyond the wall. It’s not as simple as it sounds. You’ll need to cut your wood pieces to size, drill holes and screw in brackets before you can even begin to build a window sill.

Simply follow these steps:
1. Cut two 2-by-4 boards to the length of your window. This should be the exact width of the opening where your window will go, plus an inch or so on each side for painting and finishing (more on that later). Use a miter saw or circular saw with a guide to make straight cuts along each end of each board, then sand down any rough edges with 120-grit sandpaper.
2. Drill holes through both ends of both boards using a drill bit that’s just slightly bigger than your screws’ shank diameter (the part just beneath the head). The holes should go all the way through both boards, but don’t worry about making them perfect — just make sure they’re straight and evenly spaced apart from one another.