Cabinet making, while it’s a skill learned over time and experience, can easily be maddening on the novice level of experience. Without the ability to build cabinets, many do-it-yourselfers (and professionals) would not be able to complete the task at hand and leave us with a frustrating situation.
A weatherproof cabinet is a type of cabinet that does not allow outside air to pass through. The cabinet is typically used outdoors and it often has other features such as a seal and a lock, how to build a weatherproof outdoor tv cabinet, how to build weatherproof outdoor cabinets. Weatherproof cabinets are used in many commercial and industrial applications, including heating systems, sheds, fences, and ground canopies

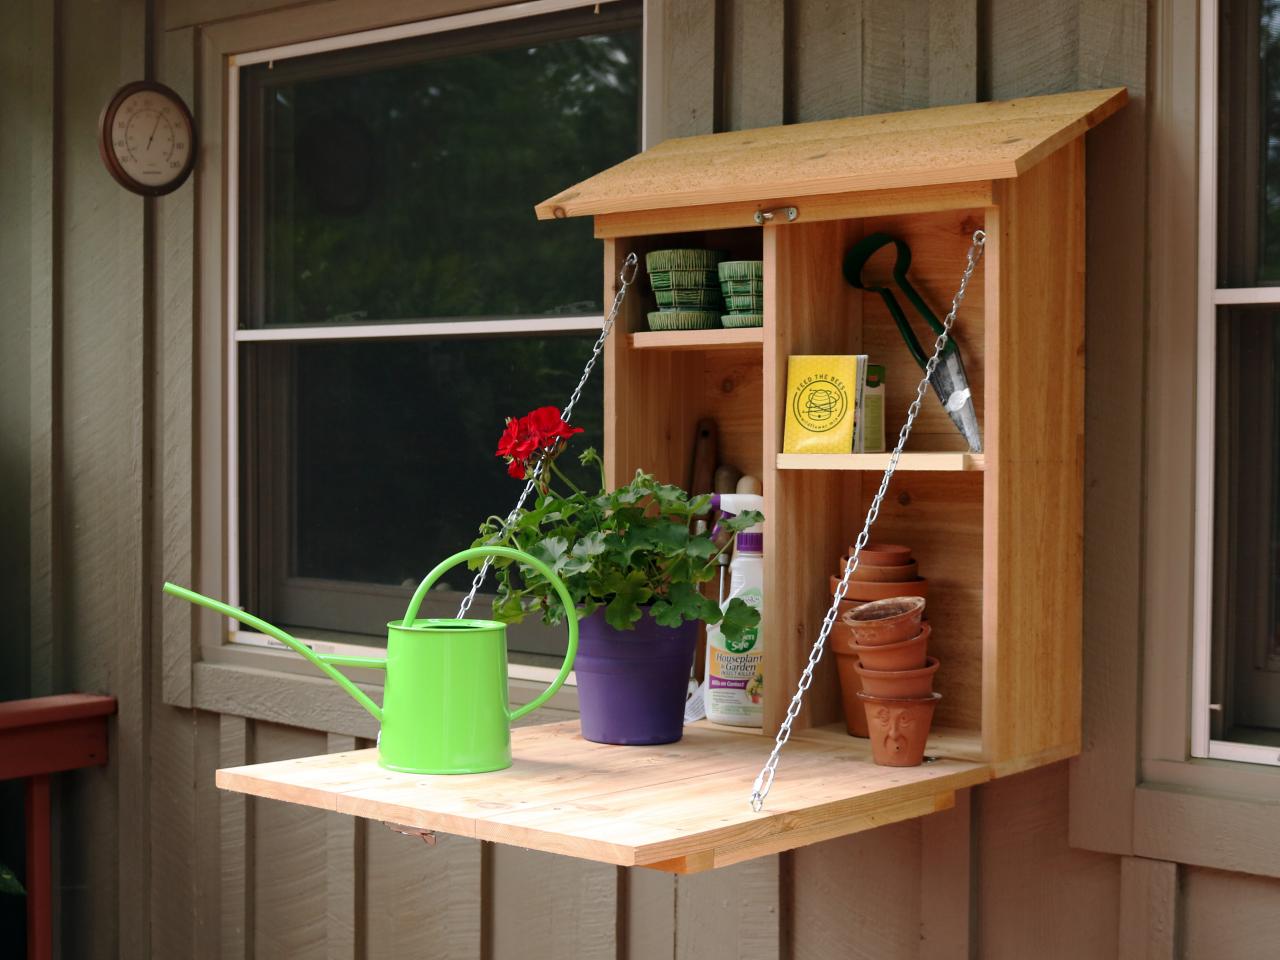
How to build a weatherproof cabinet
If you’ve ever watched a movie on a rainy night, you know that you can’t really enjoy the experience when the rain is blowing sideways. You can’t even see what’s on the screen because it’s raining so hard. The same is true of your outdoor TV. If it’s raining, or even if it’s just humid, your TV will fog up and be completely unwatchable.
The solution is to build a weatherproof cabinet for your television. This means that no matter what kind of weather you get, your TV will stay dry and clear for years to come.
How to build a weatherproof outdoor TV cabinet
A weatherproof outdoor TV cabinet is a great way to enjoy your favorite shows in the backyard or on the deck. The cabinets can be built with any size TV and can be painted any color you’d like. If you’re planning on building a cabinet, here are some tips on how to build a weatherproof outdoor TV cabinet:
1. Choose a wood species that will hold up in the elements. Cedar or redwood are good choices because they naturally resist moisture and insects. Alternatively, you can use treated lumber that has been pressure treated with chemicals to prevent rot and decay.
2. The joints should be glued and screwed together for added strength. You can use screws no longer than 2 inches in length so they don’t show through the outside of the cabinet when it’s finished. You’ll need 100-200 screws per side depending on how large your cabinet is. Be sure to pre-drill holes for each screw so you don’t split any wood when driving them in!
3. If you want to make your cabinet look more appealing, add decorative trim pieces around all of the edges with either pvc or plastic molding strips before painting it!
A weatherproof outdoor cabinet is an excellent way to protect your electronic equipment from the elements. It can also be used to hide unsightly components, such as a power supply or a satellite receiver. Building a weatherproof cabinet is not difficult, but it does require a few special tools and materials.
The first step in building an outdoor cabinet is to find the right materials. You’ll need plywood that has been treated with either water-resistant glue or exterior grade paint. This type of plywood will not absorb water and should last for many years without rotting or warping.
Next you’ll need to cut out some pieces of plywood for the sides, back and bottom of the cabinet. Most outdoor cabinets are made from 12-inch wide sheets of plywood, so it’s best to use these dimensions when cutting out your pieces of wood. The door frame should be cut from two smaller pieces of lumber instead of one large piece because it will be easier to fit inside the opening once assembled.
Once you have all your pieces cut out, you’ll need to sand them down with medium grit sandpaper until they’re smooth enough not to scratch your electronics or collect dust and dirt when placed outdoors in windy weather conditions.
How to Build a Weatherproof Cabinet
Weatherproof cabinets are a great way for you to protect your outdoor gear from the elements. They’re also easy to build and only require a few tools. If you’re looking for a project that will keep your equipment safe, consider building one of these outdoor cabinets.
Step 1: Sand the Pieces
The first step in making your weatherproof cabinet is to sand all the pieces. This will ensure that there are no rough edges on any of the wood once it’s assembled. It also helps ensure that the paint sticks well when you paint it later on down the road.
Step 2: Assemble the Bottom and Sides
Next, put together the bottom and sides of your cabinet by using screws or nails to connect them together. Make sure that all joints are tight so water cannot seep into them when it rains or snow melts off the roof above them.
Step 3: Cut Your Top
You need to cut out a hole in the top of your cabinet so you can store things inside without worrying about them getting wet from rain or snow buildup on top of it. You can make this hole any size you want based on what kind of things you plan on storing inside this particular cabinet but
A weatherproof cabinet is a must for any outdoor TV. It keeps your television safe from rain, snow and other harsh weather conditions. Many people prefer using an old cabinet for this purpose, but it is much better to build a new one from scratch. Here is how to build a weatherproof outdoor TV cabinet:
1.Measure and cut boards
2.Add crossbars
3.Install the doors
4.Add shelves or drawers
How to build weatherproof outdoor cabinets
In this article we are going to show you how to build an outdoor TV cabinet. This is very useful if you want to protect your television from the elements. These cabinets are also great for adding some style and elegance to your home. The instructions below will show you how to make an outdoor TV cabinet that will make your home stand out from the rest of the neighborhood.
How to Build a Weatherproof Outdoor TV Cabinet
Building an outdoor cabinet to house your television can be a fun and rewarding project. It’s a great way to add extra storage space, as well as create a beautiful addition to your backyard. The most important part of this project is making sure that you build the cabinet correctly so that it will be able to withstand the elements. In this guide, we will show you how to build an outdoor TV cabinet that will last for years.
The first thing that you need to do before starting this project is decide where you want it installed in your backyard. You should also consider whether or not you want it on wheels or not, since this can make moving the cabinet easier when needed.
Once you have decided on these two things, you can move forward with building your outdoor TV cabinet! We strongly recommend using cedar for any exterior surfaces since it lasts longer than other materials such as vinyl or aluminum and is less likely to warp or rot over time due to moisture absorption issues in humid climates like ours here in Florida (where I live!).

Build Your Cabinet
To begin building your cabinet, measure out where each piece will go on the back of your chosen plywood sheet(s) depending on
How to Build a Weatherproof Outdoor TV Cabinet
You can build an outdoor TV cabinet with simple materials. This project is easy and can be completed in one weekend. The best part is that this cabinet will last for years and years to come.
Materials Needed:
2x4s or 2x6s (for the base)
1x4s or 1x6s (for the sides)
MDF or plywood sheets for the back and top of the cabinet (you can use dimensional lumber if you’re not concerned about aesthetics)
Wood glue, nails, screws, and connectors (optional)
Paint or stain (optional)
A weatherproof cabinet is a great way to protect your favorite electronics from the elements. Here are some simple steps to build a weatherproof TV cabinet.

1)Measure the size of your TV and decide on the size of your cabinet.
2)Cut the plywood base pieces, top and bottom (A). Cut the top piece so it overhangs the sides by 1″ all around.
3)Cut two side panels (B) and drill holes for mounting hardware. Also drill holes for any electrical outlets or switches you may want in your cabinet.
4)Cut two end panels (C) with a notch for the hinges and drill holes for mounting hardware.
5)Attach three sides together with hinges (D). Attach two more sides with hinges to form an open box shape. Secure these two sides using screws through pre-drilled holes in each end panel into the side panels, as well as through pre-drilled holes in each side into the end panel from inside the box structure.
6)Attach hinges to remaining side panel and attach last side to form a closed box shape with doors on each side. Secure these three parts together using screws through pre-drilled
You can make your own outdoor cabinets, or buy them. But if you want to build them yourself, here are some tips:
The most important thing is that the cabinet be weatherproof. The easiest way to do this is to use materials that are already waterproof, such as cedar or redwood. If you can find a solid piece of wood with a tight grain, it will last longer than plywood.
You’ll also need to seal all the seams with waterproof glue and paint any exposed raw wood surfaces. Use a clear sealant first and then paint over it in a color that matches your house trim or other nearby structures so it blends in better.