A lot of homeowners have a hard time arranging the items in their homes because they lack enough cabinets and racks. The result of this is having things scattered all over the place, especially in their garages. They can be anything from gardening tools so that they can repair the driveway or car without having to go far away. Patio equipment, such as gliders, tables and benches, may need a home too. Those are just some of the many items that homeowners might need to store in the garage.
Here’s how to build a wall cabinet for garage, how to make cabinets for garage, how to build walls for a garage. I’ll walk you through every step of the process. You’ll also get my “insider tips” and resources from some great companies like Rockler Woodworking and Tools and Plumbing Supplies on where to find the best deals, etc.

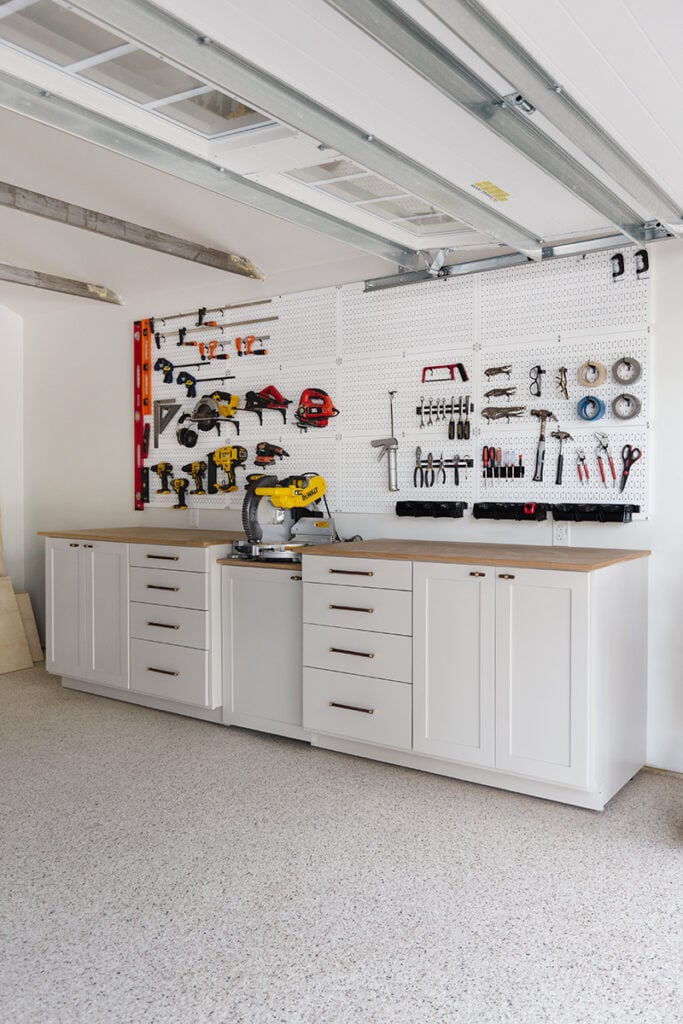
How to build a wall cabinet for garage
The garage can be a useful addition to your home. It provides extra space for storing things and keeps them out of sight. However, as you may know, it’s also not always easy to find a place for everything.
In order to avoid clutter and make sure that your items are safe, you have to build a wall cabinet for garage. This is easy and quick to do, so there’s no need to worry about the time it takes or the effort involved.
In this article we will show you how to make cabinets for garage at home using simple tools and materials available in any home improvement store.
Garage cabinets are the perfect way to keep your garage organized. You can install them on either side of your garage door or inside the garage with a wall-mounted cabinet. The following instructions will show you how to build garage cabinets, including how to make cabinets for garage and walls in garage.
Step 1: Set up a work area
The first thing you need to do is set up a work area where you can assemble the cabinet. Lay down some carpet or plastic so that your tools don’t scratch the floor.
Step 2: Assemble the framing
First, lay out all of the framing pieces on top of each other and place a level at each corner of every piece to make sure they’re all level with each other. Use wood glue and nails to attach each piece together, starting from one end and working your way towards the other end. Keep checking for levelness throughout this process and adjust as needed using shims or wood filler if needed until all four sides are perfectly square with each other.
Step 3: Install the back panel
Next, install a ¾-inch plywood back panel into place so that it covers up any gaps between frame pieces and also provides support for hanging doors later on down the road if desired (this
Building a garage wall cabinet is something that you can do in just a few steps. The first step is to make sure that your garage has been properly framed and braced for construction. These two things are critical for ensuring that your garage does not collapse on you when you try to build this wall cabinet. After the framing and bracing is complete, you can then start building the walls of your cabinet.
Once you have built the walls, it is time to add drywall or plasterboard over them. Drywall is the most common material used because it can be easily cut with a knife or by using a saw. After the drywall has been installed, there are several ways to finish up the project depending on what kind of look you want for it and what materials are available in your area.
Another option is to use plywood instead of drywall or plasterboard, but this will require additional skills since plywood requires more precision when cutting and installing than drywall does. If there are any gaps between panels or around doors and windows, they must be sealed off with caulk before painting or staining any surfaces with paint
Here are some tips to help you build a wall cabinet for your garage.
1. Start with a plan
A wall cabinet is the perfect place to store tools and other items that you use often in your garage. It’s also an excellent place to keep tools that you want to keep safely out of reach of children and pets. You can buy ready-made cabinets or build one yourself. If you’re going to build your own, make sure you have a plan for what you want the finished product to look like before going shopping for materials and supplies.
2. Choose the right material
Wood is a popular choice for building garage walls because it’s easy to work with and can be stained or painted any color you want. If wood isn’t available in the sizes you need, consider using metal studs instead because they’re easier to cut than wood studs are. The downside of metal studs is that they cost more than wood studs do — but this may not be a factor if there’s no way around having an extra-large wall cabinet built on site by contractors who specialize in this type of project (and who may be able to give you a discount if they’re working with someone else’s plans).
Step 1: Mark and cut the lumber.
Use a framing square to mark the length of each side of the wall. Measure up from the bottom edge of each side and make a mark at 16 inches (for top plate) and 24 inches (for bottom plate). Use a speed square or straightedge to draw a line connecting these marks, then snap chalk lines along this outside edge.
Cut along these lines with a circular saw or jigsaw. For best results, make your cuts just inside the line so you have room for error if you need to re-cut later.
Step 2: Attach the top plates.
Position one 8-foot 2×4 flat side down against one end of the wall, and attach it with three 8d galvanized nails or screws driven into every stud along that edge. Repeat on all four edges of the wall frame until all top plates are attached using your preferred method for nailing or screwing 2x4s together. Plates should be flush with each other and butted together tightly (no gaps between them). If using screws instead of nails, use 3-inch screws made specifically for exterior applications that are rated for exposure to moisture (such as stainless steel deck screws).
How to make cabinets for garage
A garage cabinet is an excellent way to add extra storage space to your garage. It can be as simple or as complicated as you like. The most basic design is made up of a frame, shelves and doors. More complicated designs have drawers, sliding doors and other features.
The first step in building a garage cabinet is to determine what size you want the cabinet to be. This will help you decide on the materials that you need to purchase and how many pieces of wood you will need for construction. Next, measure the wall where your cabinet will be placed and make sure that there is enough room for all of your tools and supplies before purchasing any materials.
Once you have purchased all of the materials needed for construction, start by assembling the basic frame for each side of the cabinet using 2x4s or 2x6s depending on how large you want it to be. The sides should be built from 2x4s if they will be attached directly to the wall with screws or bolts through drilled holes in each end of each piece of wood. If your side walls will not be attached directly to anything else then use 2x6s instead so that they can rest on top of supports made from 2x4s
How to Build a Wall for Your Garage
Step 1: Determine the size of your garage and where you want your walls to be. Plan out the design, keeping in mind that you’ll probably need to leave room for doors, windows and electrical outlets.
Step 2: Nail together two 4x4s to form a “T” shape. The top 4×4 should be at least 6 feet long; the bottom 4×4 should be at least 10 feet long. You can use shorter pieces if your garage is smaller than this.
Step 3: Place the frame on top of blocks or some other support so it’s at least 6 feet off the ground and level with both sides of the garage door opening. Line up one end of the frame with one side of your garage opening; then nail pieces of wood vertically between each leg of the frame, making sure they are level with each other so they form a rectangle overhanging your garage door opening by about 6 inches on each side (this will allow room for a header above your door).

How to Build a Garage Cabinet
Garage cabinets are a great way to add storage space to your garage. They can also be used as an outdoor kitchen, bathroom and even a wine cellar. There are many different types of cabinets available, but they all have the same basic construction. The following instructions will show you how to build a cabinet that is easy to customize, durable and attractive.
Things You Will Need
-Cabinet framing lumber (2x4s)
-Cabinet framing lumber (plywood or OSB)
-1/8″ thick plywood or OSB for the cabinet face and sides
-Wood glue
-Nails or screws (for attaching face boards)
Building your own garage cabinets is a fun weekend project that will add value and functionality to your home. The best part is that you can design your garage cabinets to fit your needs and budget.
Building your own garage cabinets doesn’t require a lot of advanced skills or tools. However, it’s important to know what you’re getting into before starting the project. Here are some tips for building garage cabinets:
1) Plan ahead
2) Make sure you have enough space for the cabinets
3) Choose the right materials for your project

How to Build a Garage
Building a garage is a fairly easy project to tackle. A garage can be built as an addition to your home or it can be constructed as a freestanding structure. If you are building the garage as an addition, then the first step is to have your home inspected by an engineer to make sure that the addition will not compromise the structural integrity of your home.
Once you have received approval from your engineer, you can start building your garage in one of two ways: prefabricated panels or traditional construction methods. If you want to save money, prefabricated panel kits are a good option because they are less expensive than traditional construction methods and they allow for greater customization options.
Traditional Construction Methods
Traditional construction methods involve pouring concrete footings and putting up walls with support beams every 16 feet apart. The beams should be placed on 3-foot centers with two inch thick lumber at each end and top plate cutouts in between them. Once all of these pieces are in place, attach 2x6s across them to create joists that will support your flooring later on.