A simpler, more elegant solution to vegetable gardening is to build a planter box with legs. Planter boxes can be functional and decorative, and are a great way to enjoy fresh herbs or vegetables in the comfort of your own home.
Are you having a hard time finding ideas on how to build a planter box? You’re not alone. What seems like an easy task often grows into being a cumbersome and overwhelming project.
How to build a standing garden box
Build a planter box for vegetables, herbs and flowers. This project is great for any size yard or garden.
In this video, we’ll show you how to make a simple garden box. It’s perfect for growing tomatoes and other veggies in small spaces. You can build it out of cedar or redwood, and it will last for years!
For gardening enthusiasts, there are few things more satisfying than growing your own vegetables. But if you don’t have a big backyard to plant in, you can still enjoy the benefits of having your own little garden. With a planter box, you can grow herbs, tomatoes, cucumbers and other veggies on your deck or patio.
Build an easy-to-build planter box using common woodworking tools. You’ll need a circular saw and drill for this project.
Cut the boards for the planter box sides using the measurements given in the diagram above. The top rail should be 1 inch wide and 15 inches long; cut two of these from one board. The side rails should be 1/2 inch wide and 36 inches long; cut four of these from one board. Cut two pieces of 2-by-4 lumber 10 inches long and two pieces 12 inches long; these will form the legs of your planter box.
Drill two holes along each edge of each top rail and screw it into place on one end of both side rails with 2 1/2 inch deck screws (see photo above). This will form the top lip of your planter box; make sure each side rail is flush with its corresponding end when you’re done drilling them together
If you want to grow your own vegetables, you need to start with a planter box. A planter box is a simple structure that can be made from many types of materials. The most common type is made from wood, but you can also make it from plastic or metal if you prefer.
There are many different ways to build a planter box for vegetables, including:
Building a wood frame and covering it with plastic sheeting (such as greenhouse film or other plastic sheeting)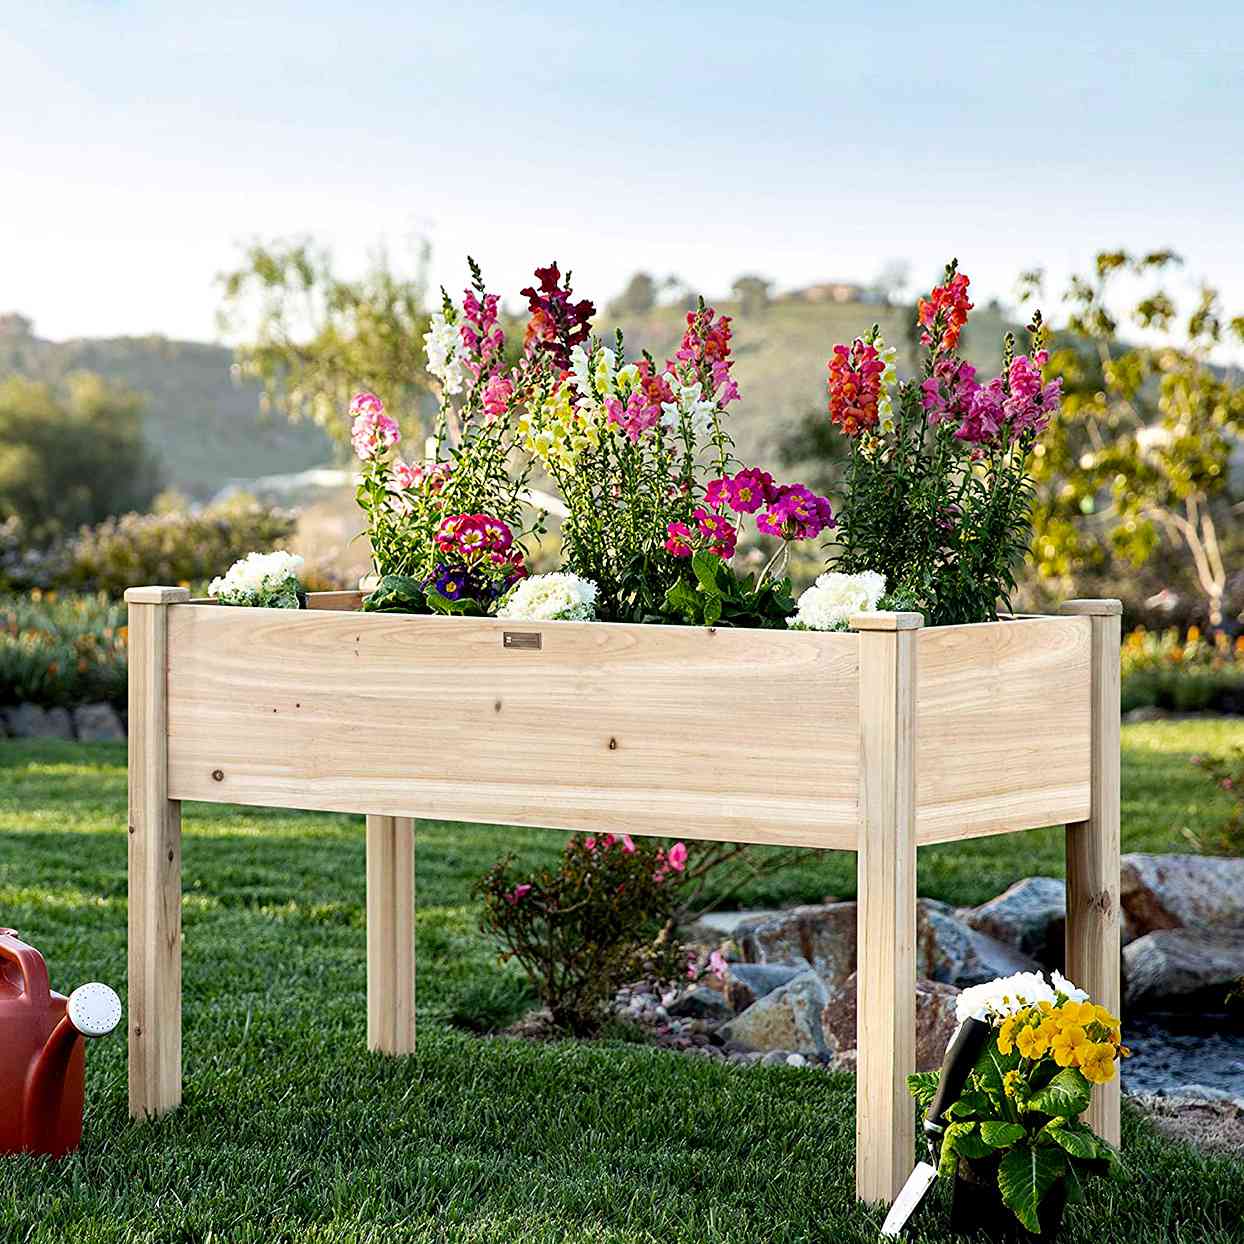
Building a wooden frame and covering it with lumber or plywood panels
Using metal framing and covering it with metal siding (such as galvanized steel)
How to Build a Planter Box
Planting veggies, herbs or flowers in the ground is an inexpensive and easy way to grow your own food. But if you don’t have an area in your yard that gets at least 6 hours of sunlight per day, you may want to consider building a raised bed planter.
These beds are typically made from pressure-treated lumber and can be as simple or as decorative as you want them to be. The most important thing is that they are sturdy enough to hold up against heavy winds and rain storms without toppling over or breaking apart.
Step 1: Determine Size of Bed
The first step in building your raised bed garden box is measuring and marking off the area where you want the planter box to be located. A good rule of thumb when choosing this location is for it to be at least 6 feet away from any other structures such as walls or fences. This will allow for enough room for proper drainage and airflow around the bed once it has been filled with soil and planted with vegetables or flowers.
Step 2: Marking Lumber
Once you have determined where you want your planter box to go, mark off the area with stakes and string. Make sure that all four sides of each stake line up perfectly
This tutorial will show you how to build a planter box. This is an excellent project for anyone looking to add some greenery to their home or garden.
The planter box shown here is made from cedar, which is a wood that is resistant to rotting and insect infestation. Cedar also has a natural look that blends well with most landscapes.
1. Assemble the sides of the planter box by attaching the top and bottom boards to each side panel with 2″ screws and glue.
2. Attach one side panel to another using 2″ screws and glue (Image 1). Repeat this process for all four sides until all eight pieces are connected together (Image 2).
3. Attach the remaining side panels to form three equal sections using 2″ screws and glue (Image 3).
4. Attach both ends of each middle section together so that they form two rectangles with two sides each (Image 4).
5. Insert a pair of joints between each rectangle-shaped piece to create three equally sized rectangles with three sides each (Image 5). The finished frame should look like Image 6 when viewed from above
You can build a simple planter box for vegetables in a weekend. The box can be as large or small as you want. It could be used to grow flowers or herbs.
I built this planter box from cedar and it has legs that raise the planting area off the ground to allow drainage through the bottom of the box. The legs also allow rainwater to flow away from the plants.
Tools and Materials
Carpenter’s square
Table saw with miter gauge
Clamps (optional)
Drill / driver
This article will show you how to build a planter box for vegetables, or any other plant. Whether you need to add a raised bed for your garden or just want a way to grow some of your own food, this guide will help.
The first thing to consider when building a planter box is what material you want it made out of. Wood is the most common choice, but there are others such as cinder blocks or even concrete blocks.
You’ll need:
2x4s – cut into lengths depending on the size of your planter box and depth of soil you want (see below)
1/4″ plywood – cut into sheets that are about 1/4″ smaller than your boards so they can be nailed in place on all four sides with 2 nails at each corner (see below)
Solid boards or 2x6s – cut into 2″ wide strips (optional) – these will be used for attaching legs to the bottom of your planter box so it can stand up by itself on level ground or in areas where you don’t have to dig deep for drainage (see below)
For this project, we made our planter box out of wood because it’s easy to work with and can be cut and drilled easily. You can also use metal or plastic if you want to avoid the mess of sawdust.
Materials:
1/2″ plywood (or whatever thickness you like)
3/4″ plywood for the bottom of the planter box (optional)
4x4s for legs (we used two)
Saw
Drill bit set (depending on what type of wood you’re using)
Planter boxes are a great way to add beauty and function to any space. They can be used in the front yard to hold flowers or herbs, or in the backyard for planting vegetables. Making your own planter box is a fun project that anyone can do.
There are several different ways to make planter boxes. This tutorial will show you how to build a simple wooden planter box using cedar lumber. There are two types of planter boxes that you can build: freestanding and wall-mounted. This tutorial will show you how to build both types of planters.
This planter box is designed to be easy to build and sturdy. The legs are made of 2x4s, and the rest of the frame is 1x2s. The legs can be cut to any length that you want. The dimensions in this tutorial are for a planter box that’s about 32″ by 16″, but it should be easy to adjust them if you want something different.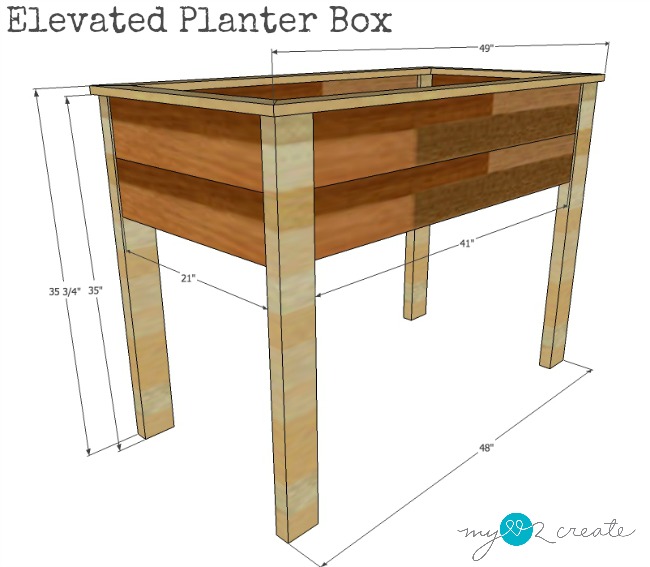
To start, cut your 2x4s into lengths that will form the legs. To figure out exactly how long each leg should be, divide your total height (in inches) by 4 and add 1 inch for the feet (the part where they touch the ground), and then add another 1 inch for each additional foot of height above 4 feet (e.g., 8 feet would have 6 inches added).
For example: a 5-foot-tall planter box would need its legs set at 16 inches (5 x 4 + 1 + 1 = 16); a 7-foot tall planter box would need its legs set at 19 inches (7 x 4 + 1 + 1 = 19).