Before we go into how to build a small pole barn in detail, let’s see what barns are and why would someone need one. A barn is a large rectangular and contained building in a farm intended for storage of hay, straw and grain and keeping livestock animals. In the old days they have been mainly used as a shelter for cows and horses; nowadays they have gained popularity among those who have turned this kind of storage space into their personal workshop or converted it into a small house.
For many of us, especially those with families, clearing a fence around the house and putting in a play yard is not feasible. Perhaps you’re even looking for an alternative to renting a storage unit for your outdoor gear, or perhaps you just need a place to put that disassembled triple toboggan your kids had outgrown. Whatever the reason, in many cases a pole barn is an inexpensive solution that allows you to create the space you need.
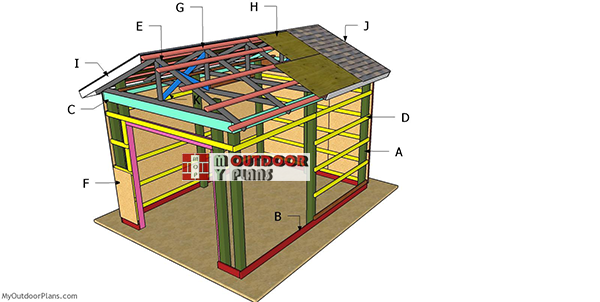
How to build a small pole barn
How to build a pole barn step by step. How to build a pole barn cheap. How to build a pole barn yourself. How to build a small barn cheap, how to build a pole barn yourself, how to build a pole barn roof, how to build a pole barn stall, how to build a small pole barn.
Pole Barns are the least expensive type of building structure for your farm or business needs and here is how you can build one yourself at home without hiring any professional help. The best part about this is that it can be constructed in just about any size and shape you want it to be, provided you have enough space around the site where you plan on building it.
The first thing that you need be aware of is that there are two types of Pole Barns available – “Single” and “Double”. The difference between them lies in their construction and the materials used in making them. A single-sided barn has all its posts arranged on one side only while double-sided ones have them on both sides of the building
How To Build A Small Pole Barn Cheap
Building a small pole barn is a great way to save money, and it can be done with very little prior experience. The following are some tips on how to build a small pole barn.
The first step in building a pole barn is to determine what type of structure you want for your livestock or other animals. The most common type of barns that people build are open-air structures with walls that consist of metal sheets or plywood panels. These types of structures can be used for many different types of animals, including cattle, horses, sheep and goats. There are also barns that have concrete floors instead of dirt floors, which makes them easier to clean after each use.
Once you have determined what type of structure you want for your livestock or other animals, you can begin planning out the size and layout of your building. You should also make sure that any area where humans will be working has adequate lighting so they can see what they are doing while they work on their projects inside the building. This will help keep them safe while they’re working inside the structure since they won’t have any other light source if something goes wrong with their electricity system or other parts of
Building a small barn is not something that should be taken lightly. This type of construction takes time, planning and some construction know-how. It is important to understand the basics of how to build a small barn before you start this project.
Step 1 – Find the Right Location
The first step in building a pole barn is to find the right location for it. Pole barns are typically used as storage areas or garages for farm equipment and other items that need protection from the elements. These structures can also be used for other purposes such as workshops or even homes.
Step 2 – Purchase Materials
Materials for building a pole barn will vary depending on what type of structure you want to build and how much money you want to spend on materials. You should purchase treated lumber for framing, insulation materials, metal siding and shingles as well as other supplies needed for construction.
Step 3 – Mark Out the Foundation
Mark out your foundation by placing stakes in each corner of where you want your structure to go. Use string or tape to mark out the corners with stakes so that they will remain in place while digging into the ground. Once all four corners have been marked out, dig holes
Step 1: Plan your pole barn by locating the design on a large piece of paper or plywood. Measure and mark the approximate dimensions, taking into account how much space you may need for doors, windows and utilities. Determine where the center of each wall should be, as well as where your door will be located.
Step 2: Build your foundation with concrete blocks by laying them out in an even pattern on top of the ground where you want your pole barn to stand. Leave enough room between each block so that they don’t touch when you pour in the concrete. After pouring in the concrete, let it set for at least 24 hours before continuing on with building your pole barn.
Step 3: Cut 4×4 lumber into lengths that will fit between each block on your foundation floor and secure them in place with nails or screws. If you’re not sure how long these boards need to be, measure from one end of a block to another and add about two inches for each board. You can also purchase precut studs from most home improvement stores if you prefer not having to cut them yourself.
Step 4: Attach metal roofing panels to the top edge of each wall using nails or screws. Make sure
A pole barn is a great way to store your tools and equipment. It’s also an excellent choice for those who need a workshop or garage. Pole barns are easy to build, cost-effective and can be constructed in less than a week.
A pole barn is similar to a traditional barn, except that it has fewer posts and beams and uses vertical poles or beams as its main support structure. There are two types of pole barns: wood frame and metal frame. A wood-frame pole barn is made from 2 x 6 framing lumber at 24 inches on center. A metal-frame pole barn has a steel frame with metal siding attached to it. Both types of pole barns can be insulated and finished in the same manner as traditional residential houses.
Pole Barn Plans
The first step in building your pole barn is choosing an appropriate design and layout plan that meets your needs, conforms to local regulations and fits within your budget constraints. You can find numerous plans online and in books at home centers or hardware stores such as Lowe’s or Home Depot.
Materials Needed for Building Your Pole Barn
You’ll need several items before you begin building your pole barn:
Building a pole barn is a great way to have a large, sturdy building for less than the cost of a traditional commercial structure. The poles make up the frame of the structure, and they are then covered with siding or plywood panels.
Building a pole barn can be done by anyone with basic carpentry skills and some time on their hands. It’s not an easy project, but if you have the right tools and materials, it can be done in just a few days.
Before you begin building your pole barn, it’s important to consider where you’re going to put it and how much space you need. You’ll also want to think about whether or not you’d like to include an attic area in your design.
If your budget isn’t enough to cover all of these items, try calling around for second-hand materials or finding used equipment that you can use instead of buying new ones. If possible, try getting help from friends or family members who may be able to lend a hand without costing anything extra.
Step 1: Locate Your Pole Barn Site
The first thing you will need to do when building a pole barn is find out where it will go. This step may seem simple at first glance but there are many factors that must be
A pole barn is a type of building that is used for a variety of purposes. These structures can be built in any number of shapes and sizes and are typically constructed from wood or metal. Pole barns are often used to store equipment, livestock or grain. They can also be used as garages for cars and trucks, or even as homes.
Building a pole barn on your property may seem like an overwhelming task at first, but it doesn’t have to be difficult if you understand some basic steps in the process. You’ll need to start with planning and design before you can begin construction. If you’re going to build this yourself, take some time to learn about the different types of materials available for building these structures and decide which ones will work best for you based on your budget and needs.
The first step in building a pole barn is to create plans for what you want the final structure to look like. You should consider factors such as how big you want it, how much weight it can hold and what kind of weather conditions it will be exposed to during its lifetime. Once these details have been determined, you can begin designing the actual structure itself by drawing up plans that include measurements and specifications regarding how big each section will be as well as where all
Building a pole barn is a relatively simple process that can be completed by almost any handy homeowner. It is important to keep in mind that the building of your pole barn will depend on several factors, including the size of your property, budget and personal preference.
Step 1 – Preparation
Before you start building your pole barn, it is important that you prepare the area where you will be constructing it. You will want to make sure that there is nothing obstructing the area that could cause damage to your new building. Also, make sure that there are no trees or other structures nearby that could fall onto your building during construction or when it is completed. Be sure to check the ground for holes and make sure there are no stumps from previous trees on the property before starting construction on your new pole barn.
If you have a small barn, you probably want to build it yourself and save some money. You can do this with a few tools and materials that are readily available at your local hardware store. This small barn will be made of wood and built on your property, which makes it easy to move later if necessary.
Step 1 – Prepare Your Site
The first thing you need to do is prepare the site where you’re going to build your small barn. This means clearing away any debris or brush in the area and getting rid of any rocks or other obstacles that would prevent you from digging holes for posts. You should also make sure that the ground slopes away from your house if possible so that water doesn’t pool up around your building site during heavy rains or snow melt.

Step 2 – Install Posts
Once the site has been cleared, it’s time to install posts for the frame of your small barn. The number of posts used depends on how many rows of studs are needed for each side of the building — typically one post per row at least 8 feet apart for stability (as shown in Photo 1 below). Use treated wood posts that are 4 inches by 4 inches by 12 feet long for best results (Photo
How to Build a Pole Barn
Step 1: Lay out the foundation.
Step 2: Construct the foundation walls.
Step 3: Install the rafters and trusses.
Step 4: Install roofing materials, sheathing and flashing.
Step 5: Install doors, windows and siding.