When building a deck or porch make sure to check the building codes. Building codes deal with height, construction, stability, and other factors that ensure the safety of the people that will be using the deck or porch. This guide will show you how to build a sliding gate for your deck step by step.
A sliding gate can be used for many things. If you have had a door that leads to your balcony, what you could do is replace the door with a wooden fence or a semi-permanent fence that can be opened easily when you need to go out on your balcony, such as when you want some fresh air.
How to build a sliding gate for a deck
I am building a wooden deck, and I want to install a sliding gate. The deck extends from my house and is about 10 feet wide. I plan on using 2x4s for the frame and 2x6s for the door panels. My question is how to build a sliding gate for my porch, and how much does this cost?
The cost of installing a sliding gate on your deck depends on several factors, including the size of your deck, the materials used to construct it, and how long you’re planning on keeping it in place. The average cost of installing a new sliding gate on your deck will be $1,500-$2,500. This includes materials and labor fees.
A custom-made 12-foot wide wood privacy screen will cost around $2,000 to install. A smaller 8-foot wide wood privacy screen can be installed for around $1,500-$2,000 depending on the contractor you hire and whether or not they need access to your backyard during construction
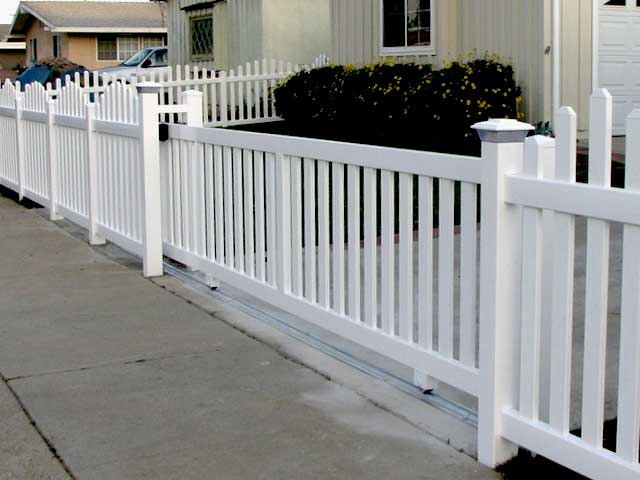
You can build a sliding gate for your deck or porch in just a few hours, and it doesn’t require any special skills or tools. The materials you’ll need include a piece of plywood, some 2x4s, a roll of chain link fence, galvanized nails and screws, hinges and handles.
First, cut the plywood to fit the opening of your deck. Attach it to the back of your deck using screws or nails. Then measure and cut two 2x4s to form the sides of your gate. Make sure they are long enough to fit snugly between the posts on either side of your deck opening. Attach these 2x4s with screws or nails so that they rest about 3 inches above the top edge of the deck railing.
Next, attach chain link fence to each side of your 2x4s with galvanized nails or screws. You’ll need about 10 feet of fencing for each side; this should be more than enough for most decks. If you have an especially large deck or porch, you may need more fencing material — just remember that it needs to be cut into sections that will fit through the opening in your sliding door frame when it’s closed!
As with any DIY project, there are several different ways to build a sliding gate for your deck. This guide will walk you through the process of building a sliding gate for your deck.
It’s important to use quality materials and follow good construction practices when building a new gate. The following steps will help you build a sturdy gate that will last for years.
Step 1: Measure Your Space
The first thing you need to do is measure the size of your deck and determine where the end posts should go. You’ll also need to measure the length of each rail and cut them down to size if necessary. Make sure that all of your cuts are square so that the rails will fit together tightly without gaps or overlaps.
Step 2: Mark and Cut the Posts
Once you’ve determined where your end posts should go, mark them on both sides with pencil marks every 16 inches (40 centimeters). At each mark, make a small X using an awl or nail setter so that you have something to drive into with your drill bit when making holes for screws later on in this step.
Next, take one of your 2x4s and place it on top of one end post so that it sits flush against it with no gaps between them
There are several ways to build a sliding gate for your deck.
In this article, we’ll show you how to make a sliding gate from scratch with materials from your local hardware store.
The first step is to install the posts that will support the gate. You’ll need to dig holes for them, so make sure you have plenty of room for digging. Digging up concrete and rocks isn’t fun, so if you’re not sure where your posts should go, sketch out a plan before you start digging.
Once the posts are in place, attach them together with lag bolts or carriage bolts. You can use either one — they both work well.
Next, cut two 2x4s (or one 4×8 sheet of plywood) into 12 inch lengths and screw them onto the posts with 3-inch screws every 6 inches or so (use more screws if using plywood). This will give us something solid to attach our hinges to later on.
We’re going to build our own hinges using some pipe fittings and some 1/2 inch threaded rod that we’ll cut into six pieces at 12 inches long each (or whatever length is appropriate). Thread on three nuts onto each pipe fitting (one on each side) and then add another nut
There are many different ways to build a sliding gate. It is important to choose the right type of gate for your needs.
Some of the most common types of gates include:
Sliding Gate – A sliding gate is a type of door that can be opened by simply sliding it back and forth. It is usually made of wood, but can also be made from steel or aluminum. This type of door is useful for homes with limited space because it does not take up much room when opened.
Rolling Gate – A rolling gate is also a type of door that can be opened by rolling back and forth on wheels. Unlike sliders, rolling gates do not have tracks on which they slide. Instead they use wheels to move around freely while still opening and closing like a regular door would. The main advantage to this type of door is that it takes up less space than traditional sliding doors when open and closed, making them ideal for small spaces such as garages or storage rooms where extra space is needed
French Doors – French doors are doors that consist of two panels hung side by side in an opening around 36 inches wide and 80 inches tall that swings open in one piece rather than two separate pieces like standard doors do
In this article, we will show you how to build a sliding gate on your deck.
We have built a couple of these gates and they work great!
Here is the basic design plan:
You need to make a frame that is 16 inches wide by 35 inches tall (or whatever size you want). This will be the outside frame for your gate.
You will also need to make an inner frame that is 9 inches wide by 35 inches tall (or whatever size you want). This will be placed inside the outer frame and attached with a hinge so that it can open. The inner frame needs to be covered with something since there won’t be any wood on the inside of your gate. We used plastic lattice which worked great! You may want to use something else like chicken wire or PVC pipe strips cut into lengths equal to your outer frame’s width (16 inches).
Now, attach a latch system somewhere on the back side of your outer frame so that when you open it, it locks into place with your inner frame in place behind it. We used a spring loaded latch system but there are many different ways to do this part depending on what kind of latch system works best for you!
Sliding gates are a great option for decks that don’t have the space for swinging gates. The wood frame is constructed using 2x4s and 1x3s. The gate itself is made from plywood, which is secured in place with carriage bolts.
The first step to building a sliding gate is to cut all of your lumber to size. You’ll need eight 2x4s cut at 8 feet long, and four 1x3s at 2 feet long. You’ll also need two 1x3s at 5 feet long, as these will be used as the top and bottom rails on the gate’s track.
Once all of your lumber is cut to size, use a Kreg Jig or pocket hole jig to make pocket holes in each end of each 2×4 leg (Image 1). Then drill through those pocket holes and secure them together with 3-inch screws (Image 2). Repeat this step for all eight legs so that you end up with a rectangular frame measuring 4 feet wide by 8 feet tall (Image 3).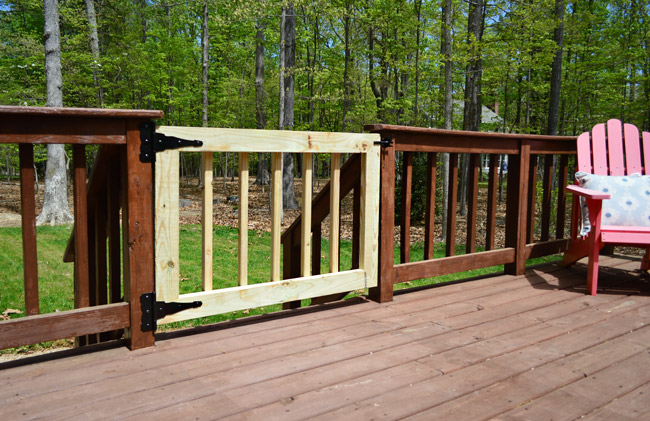
Next, attach one of the longer 1x3s along the top edge of one side of your frame using glue and butt joints (Image 4). Then secure it using wood glue and nails or screws every
The sliding gate is a great way to hide your deck and make it look bigger. It’s a very simple project and can be done in a weekend.
If you have an existing deck, this is the perfect design for you. You simply need to attach the track to the top of the deck posts and then slide the gate into place. This set up works well if you want to keep pests out of your yard or just keep children from going over the edge. If you have a small child who can’t yet climb over a standard gate, this option should work well for you!
For those who plan on building their own deck from scratch, this design will still work for you! The only difference is that instead of having pre-made tracks attached to your posts, you’ll have to build them yourself out of wood or metal. This also means that you’ll need something called a track hoe (or miter saw) which will make cutting those pieces much easier than trying to use just an ordinary saw blade
I have a small deck, about 12×12, with a large sliding door. I want to install a gate that will keep my dog from wandering off the deck.
I am not sure what type of gate to build, but I want it to be easy to open and close, and sturdy enough so the dog cannot knock it down or push through.
I don’t want to spend too much money since the gate will be hidden by plants, but I would like something that looks nice and is easy to operate.
I’ll need to know the length of your deck, the height of the ceiling, and the width of your door opening. It’s also important that I understand what you’re trying to achieve with this project. Are you looking for privacy? Will you be using it as a security door? Do you just want a place to store items in the winter?
The design I use depends on the answers to these questions. If you want privacy, I’d recommend doing something similar to what I did on this project