How to build wood shelves standing free, who to tell you do? Say, “I” will tell you! Just follow these basic step-by-step instructions, and in no time you’ll be enjoying your new wall shelf with confidence.
Building a wooden shelf can be simple. When we have spent most of our time on the internet seeing all kinds of complicated work, even if we don’t know it seems that we think that everything must be complicated to be beautiful.
How to build a simple wooden shelf
Building a shelf is a simple project that you can complete in an afternoon. This guide will show you how to build a wall shelf out of wood, as well as how to build free standing shelves.
Materials
Wooden boards cut to size
Nails or screws (depending on the design)
Drill
Hammer
Building a wall shelf is a great project for the beginner woodworker. It’s easy to do and can be built in an afternoon with just a few tools. If you don’t have any experience building furniture, this is a great place to start.
Before you start making your own wooden shelf, take some time to plan what you want it to look like first. You’ll need to know how many shelves there are going to be and how much space between them so that you can buy the right size lumber for your project.
Once you’ve decided on the size of your shelf, head over to your local home improvement store or lumber yard and buy some wood. You’ll need two pieces of plywood (one 4 ft x 8 ft and one 4 ft x 2 ft) along with some pine boards that are 1 inch thick by 6 inches wide (make sure they’re actual 1 inch x 6 inches). If you can’t find pine boards that are wide enough, just buy several narrower boards and make them fit together as best as possible.
Wooden shelves are easy to make and a great way to add storage space to your home. They can be built from scratch using a few tools or you can use ready-made shelves, which can be easily modified. Here’s how to build a simple wooden shelf.
Materials for building a simple wooden shelf
You will need:
4 x 1 x 6 lumber (for the front and sides)
screws (at least 1 inch long)
A shelf is a flat horizontal surface, which can hold things. It can be made of metal or wood. A shelf is also called a ledge, bracket and rail.
You will need:
-Wooden boards (4) for the sides and bottom of the shelf, about 2cm thick
-Wooden boards (2) for the top of the shelf, about 4cm thick
-Wooden board (1) for the back panel of the shelf, about 4cm thick
-Saw
-Drill with drill bits for wood and masonry drilling
-Hammer
The easiest way to build a shelf is with furring strips and plywood. I made this simple shelf using a single 4×8 sheet of 3/4″ plywood. The shelf is 48″ wide and 16″ deep.
You can find the plans for this project in my Woodworking 4 Home Office e-book (PDF).
The first step is to cut the top and bottom pieces from 1/2″ plywood. This will be the main support for your shelf. The top piece is 48″ long, while the bottom piece is 42″ long. These two pieces will be joined together to make one continuous piece.
The next step is to cut 2 – 3/4″ x 3/4″ rabbets into each corner of both top and bottom boards as shown below:
Now you need to cut 2 – 45 degree angles on each end of each board as shown below:
Next, cut 4 – 12 inch long pieces from 1/2″ plywood and attach them across the ends of each board as shown below:
Cut 4 – 2x4s into 16 inch long pieces and attach them inside each angle brace as shown below:
How to Build a Wall Shelf Out of Wood
In this article, we’re going to show you how to build a wall shelf out of wood. If you have some basic carpentry skills and time on your hands, you can easily build a wall shelf that will last for years.
The first step is to decide on the size of your shelf. You can get a very simple 6-foot-long piece of wood for about $15 at any hardware store. If you want a larger shelf, then it will cost more money and take more time to build.
Once you have decided on the size, cut your wood down into six equal pieces using a table saw or band saw. Once they have been cut down into six pieces, sand them down using 100 grit sandpaper so they are smooth and free from splinters or rough edges.
Next, drill holes through each piece of wood at intervals so that they can be connected together with screws or nails. This allows us to create a solid structure that won’t break apart easily when we put things on it or bump it with our foot accidentally!
Once all of our pieces are drilled out, we need to connect them together using screws or nails depending on what kind of material we are using. If the material
Building a wall shelf is easy to do, and you can build it in just a few hours. This shelf design is perfect for the space behind a door, or for an unused wall in your home. You can even put one together without any tools – just a hammer, tape measure, and pencil.
If you’re looking for a more permanent solution that doesn’t require any tools, check out our guide on how to build free standing shelves!
Materials:
(1) 1″ x 2″ x 8′ board
(1) 1″ x 3/4″ x 12′ board
(2) 1″ x 2″ x 6′ boards
(4) 1/4″ x 6″ bolts (with matching nuts & washers)
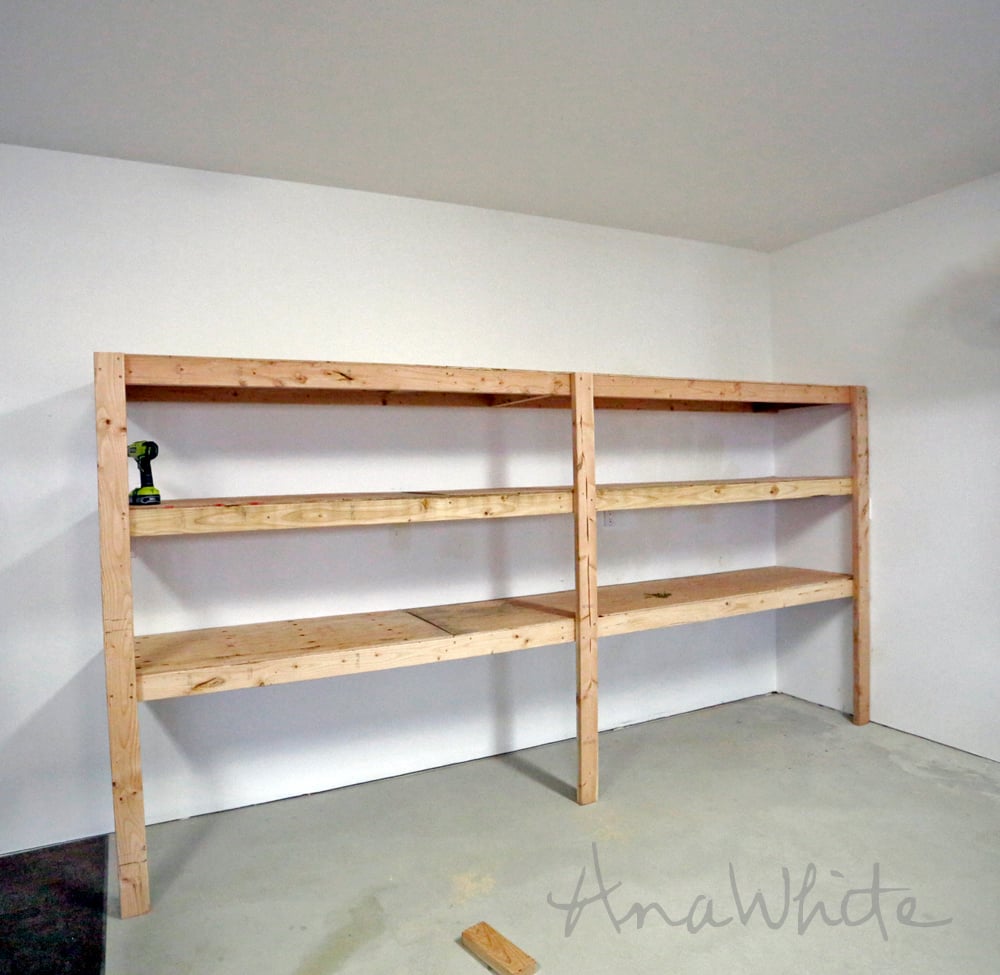
How to Build a Free-Standing Shelf
You can build a free-standing shelf using just a few simple tools and materials. This is an easy project that you can do in less than a day.
The shelf will be constructed from 2×4 lumber, which is available at home improvement stores. You’ll also need some screws for attaching the shelf to the wall and brackets for mounting the shelf on top of 2x4s. The total cost of this project should be less than $50.
Follow these steps to build your own free-standing shelves:
1) Measure down from the ceiling where you want your shelf to go, then make another mark where the edge of the shelf will be when installed against the wall (this will be 1/3 of its total length).
2) Cut two pieces of wood that are as long as from your first mark (where you want it mounted) to your second mark (where it will meet up with another piece). This will form one side of your shelf and may require some planning based on the dimensions of your room — get help if needed!
3) Attach these two pieces together using a Kreg Pocket Hole Jig Kit; this tool makes it easy to drill holes into wood that are perfectly
How to Build a Wall Shelf
A wall shelf is an easy DIY project that can be done with just a few tools and materials. It’s a great way to add functional storage space to any room in your home, and the shelf can be customized with different wood styles and finishes to match your decor.
In this tutorial, we’ll show you how to build a wall-mounted shelf using common materials like 2x4s and plywood. You’ll also learn how to make simple cuts and use pocket holes in your woodworking project.
Materials:
Wooden shelf brackets (2 per bracket)
3/4″ plywood (2′ x 4′)
2″ pocket hole screws (8 per bracket)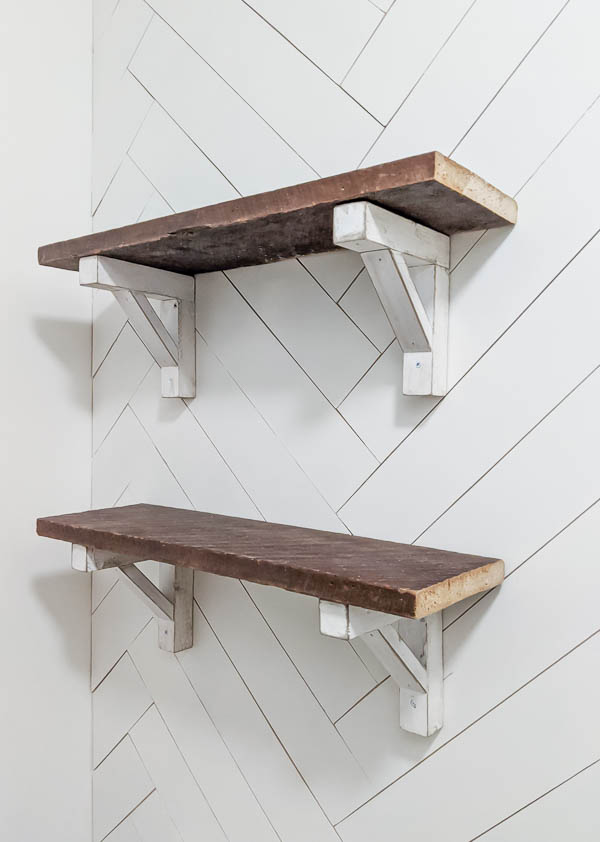
Whether you’re looking to update your home or just want to build something fun and useful, you can make a wall shelf that’s a perfect fit for you.
This tutorial will show you how to build a simple shelf that can be installed on any wall in your home. You can use this technique to create shelving units in any size or shape.
There are lots of different materials that you can use when building shelves, but we used pine because it’s inexpensive and easy to work with. We also used pine plywood in place of solid wood so that we could glue up the pieces quickly without worrying about grain direction. If you have an air nailer, then using solid wood won’t be an issue for you at all.
Materials:
3/4″ x 4′ x 8′ pine board (enough for 2 shelves)
4 – 3″ x 3″ legs (2 per shelf)