Learn how to build a Swinging Gate from Tree Limbs. The easiest way to stop people from going into your property is by building a gate; with the right experience, you can make one for your properties yourself, without having to call a carpenter.
So you have decided that the fence separating your home from the rest of the world isn’t enough? You want something more? That’s great! Here is how to build a simple wooden gate.
How to build a simple wooden gate
Step 1: Cut the post and rails to size. Cut four pieces of 2 × 4 lumber to make the post. The lengths should be as follows: 6 feet for the top part, 4 feet for the bottom part and 2 feet for each side piece. Cut four pieces of 2 × 4 lumber to make the rails. These should be 3 feet long for each of the two sides and 1 foot long for each of the two ends.
Step 2: Attach the posts and rails together with deck screws or nails. Place one end of a rail against a corner of a post, then place another rail against that same corner so that there will be two rails attached at once (one on each side). Use at least two screws or nails per joint but no more than three screws or nails per joint so that there is enough room for expansion and contraction in your gate.
Step 3: Attach hinges onto both sides of your gate with hinges on each side being placed about 12 inches from the top edge of your gate, according to Lowe’s Home Improvement Store[1]. Using two hinges per side will allow you to hang your gate from either end as well as from either side by simply flipping over one hinge pin every time
Building a simple wooden gate is a great way to add privacy to your yard or garden. Although you can buy wooden gates at most home improvement stores, building your own allows you to customize the size and design to fit your needs.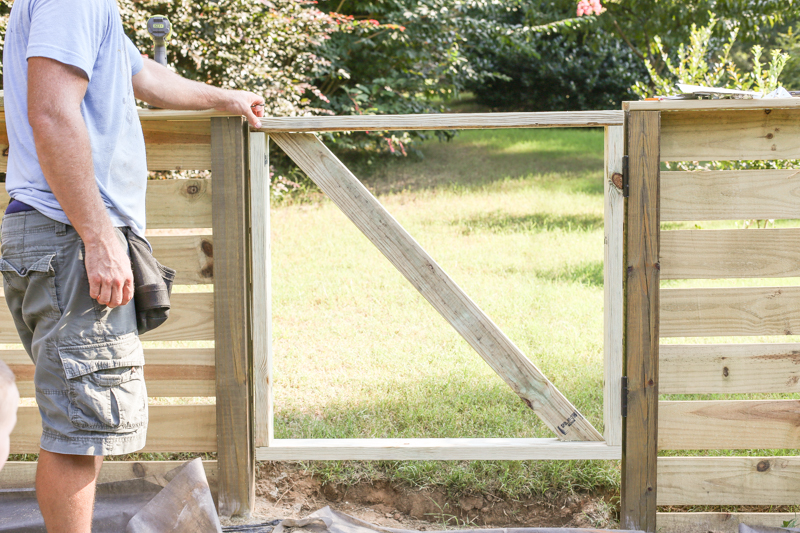
Building a simple swinging gate requires a few tools and materials. You can use pressure-treated wood for long-lasting durability, but untreated lumber also works well for a temporary or permanent gate. Use screws instead of nails since they are easier to remove if you ever need to take apart the project.
Materials
2x4s: 6 @ 8 feet long (for rails)
1x6s: 6 @ 8 feet long (for stiles)
Stringers: 2 @ 3 feet long (for bottom rail)
Screws: 12 inch wood screws and 1 1/4 inch screws
How to build a swinging gate
With about $80 and a weekend, you can build a simple wooden gate that swings open and closed. The key is to choose the right wood and follow a few simple steps.
The first step is to determine how wide the gate needs to be. The standard width of a swing-open gate is 34 inches, which allows enough room for one person to pass through at a time. It’s important to measure carefully — the top rail of your fence should be level with the top of your existing fence or wall (if any).
For this project, you’ll need:
3/4-inch plywood cut into 2 pieces that measure 2 feet by 7 feet (or as long as your available lumber will allow)
8 posts made from pressure-treated 4x4s (or whatever size you prefer)
10 inch carriage bolts with nuts and washers (we used 6 per hinge)
2 hinges per gate panel
If you’re looking to build a gate, you’ve come to the right place. I’m going to show you how I made my gate.
The first step is to cut the boards down to size. I used 4x4s for the posts and 2x4s for the rails.
Next, assemble the frame with 2″ lag screws and washers. You’ll want to pre-drill holes in the wood before screwing them together because it will prevent splitting and cracking later on.
Then mount the hinges on each side of the gate using 3/8″ bolts and nuts (you can also use lag screws). Make sure that your hinges have holes in them so that they line up with whatever mounting hardware you’re using on your gatepost: mine are mounted using carriage bolts into predrilled holes in my post so that they don’t need any additional hardware (otherwise I’d have had to drill pilot holes into my posts).
Next, drill holes through your gateposts where you plan on attaching your gate latch (I used carriage bolts through pre-drilled holes). Then cut two lengths of chain long enough to wrap around each post several times, plus an extra foot or so at either end for connecting everything up securely
How to build a simple wooden gate
A gate is a great way to keep your home safe, secure and private. You can build your own gate by following these instructions:
Materials needed:
2x4s (12 feet long)
1x6s (8 feet long)
5/4 deck boards (6 feet long)
1×8 deck boards (2 feet long)
1×10 deck boards (2 feet long)
Gate hinges, locksets and handles (see Resources below)
How to Build a Swinging Gate
A swinging gate is a type of gate that slides or swings on hinges from one side to the other. It is often used to enclose front yards or driveways and can be made from wood, iron, or aluminum. The most common sizes for swing gates are 8-foot and 6-foot, but you can make them in any size you want. Here’s how to build a swinging gate:
Step 1: Buy the materials you need for your gate. You will need wood (or metal) for the frame and hinges, as well as screws, nails and glue for joining pieces together; chain link fencing; hardware cloth; metal posts; and weatherproofing sealant.
Step 2: Build the frame of your gate out of wood (or use metal). The easiest way to do this is by cutting two pieces of plywood into strips that are 7 feet long by 1 inch wide by ½ inch thick (or whatever width you want). Then cut these strips into 15-inch sections using a table saw or circular saw. Use these sections as patterns when cutting more pieces of plywood (or metal) into 17-inch lengths. Use these lengths to help you cut out the sides of your gate frame so they
When building a gate, it is important to choose the right material and size. The material should be strong enough to withstand weather conditions and heavy use, while the size depends on the height of the gate. You can build a swinging gate using a variety of materials, such as wood or metal.
A swinging gate is usually 6 feet tall and 4 feet wide. To make sure it is sturdy and durable, use pressure-treated lumber for your frame. The weight capacity of pressure-treated lumber is about 2,000 pounds per square foot of cross-section, which allows you to hang heavy items from your gate.
For an attractive finish on your gate, paint it with an exterior latex paint that can withstand extreme temperatures and harsh weather conditions. Your gate will last longer if you treat it with sealant before painting it.
A swinging gate doesn’t have to be made from metal or wood; you can also use vinyl or plastic in its construction. Vinyl gates are less expensive than wooden ones but don’t last as long if left outside in extreme weather conditions for extended periods of time because they aren’t as strong or durable as other materials
How to Build a Gate
Step 1: Decide the gate’s size.
Determine how large the opening is and how wide you want the gate to be. If you are building a gate for a doorway, make sure that it fits within the width of your door frame (usually between 2 feet and 6 feet). For other openings, measure the length and height of the opening and use this as a guide for making your own gate.
Step 2: Mark out where the hinges will go.
If you are using pre-made hinges like those from Home Depot, then simply mark out where they need to go on each side of your gate post.
If you are using wood screws, then mark out where you want them to go with pencil. Make sure that there are at least two screws per side so that your gate won’t fall over when someone pushes against it. Also make sure that there is enough space between each screw so that they don’t interfere with each other when you insert them into wood or metal posts (a minimum distance of 1/4 inch should be sufficient).
Step 3: Cut down any extra wood off of each end of your post so that it is just slightly larger than its final length (1/8 inch or
When you’re installing a gate, you have to consider the weight of the gate. A good rule of thumb is that the weight of your gate should be no more than half the weight of your dog. So if you have a 60-pound dog, then your gate needs to be no more than 30 pounds.
If you have a lightweight gate, here are some tips to help you install it:
1. Make sure your posts are set into concrete or buried at least 24 inches deep. If they aren’t, then they’ll likely come out when you try to attach them to the frame with lag screws and carriage bolts.
2. Use 2 x 4s for framing instead of 2 x 6s or 2 x 8s — you’ll save about 20 pounds per panel by doing so!
3. Use 1/4″ plywood for panels instead of 3/4″. You’ll save another 20 pounds per panel by doing so!
4. Get the best hinges possible — this will make it much easier to open and close them over time as well as help keep them from sagging and breaking over time (which can happen if they’re too heavy).
This is a gate that can be opened from either side, and swings open in both directions. The advantage of this gate is that it can be swung closed without having to step over the top rail.
The disadvantage of this type of gate is that it only works with a dog that is trained to stay on one side of the fence, because if the dog crosses over, he will have no way back home.
This gate has been made using 2×4’s and 1×3’s. The width of the gate will vary depending on whether you use 2×4 or 1×3 material. The height is 20 inches high, so it should fit through most doors without having to remove any trim.
The frame pieces are cut out at an angle so they interlock when put together. You will need two 2×4’s for each end piece and two 1×3’s for each side piece (with an extra piece for strengthening). This makes a total of 16 pieces needed for construction plus two hinges and two latch mechanisms (one on each side).