You’ve fallen in love with the bathroom tile you picked out for your bathroom and now you’re ready to install it. Before you buy anything, make sure you know how to build a shower wall for tile or are prepared to pay the contractor heft price.
If you are considering building your own shower, there are many variables to consider when building a shower. Although building a shower is not as difficult as it sounds. The most important being the framing of the shower pan.
How to build a shower with tile
When you’re building a new shower, you want to make sure it’s set up properly. You’ll need to know how to build a shower wall for tile and how to build a half wall for shower.
The first step is to figure out what type of tile you want to use on your shower walls. This will determine the number of tiles you’ll need and the size of the tiles themselves.
If you’re using natural stone tiles, like marble or granite, then you’ll need to buy large sheets that are often 24″ x 48″. These can be cut down into smaller pieces with a wet saw or concrete saw. If you want an edge-to-edge look, then you’ll also need edging pieces that fit around the sides and top of the tiles.
Most people don’t have access to a wet saw at home and will need to go out and rent one if they want this look. It’s not something that everyone has in their garage or basement either because it’s expensive equipment that can take up valuable space as well as time when it comes time to clean up after using it.
The other option is getting plain white subway tiles that have rounded edges on each side already attached so that they can be laid directly against each other without
How to Build a Shower Wall for Tile
A shower is a great place to relax and get clean. It’s also a great way to add value to your home. If you are building a new home or remodeling an existing one, the first thing you may want to consider is adding a shower enclosure. There are so many options for material, size and design that it can be overwhelming. For example, you can choose from different types of tile and finishes like glass mosaics or metal tiles.
Building your own shower walls may seem like an intimidating task but it’s actually very easy as long as you follow these steps:
Step 1: Measure Your Space
Measure the area where you want your shower walls to be installed. This includes both inside measurements of the wall space and outside measurements of the opening into which you will install them. Make sure that when you measure these dimensions they don’t include any other features such as faucets or lighting fixtures that will be installed later on in Step 4 below; those items should only be included in Step 3 below when measuring for tiles or other materials that need to be installed on top of your finished walls. If your bathroom does not have an electrical outlet near where this project will
A shower is one of the most luxurious ways to bathe. The water pressure will be stronger and the spray more focused than in a tub, which makes it easier to clean yourself. A shower also takes up less space than a tub, so if you’re remodeling an old bathroom or building a new one, consider installing one.
The first step in building a shower is installing the plumbing pipes. You’ll need enough pipe to reach all the way from your main water supply to your shower plus some extra length for connecting fixtures such as valves and faucets. The pipes should be installed before you install anything else because they’ll dictate how much space you have for building walls and floors.
Start by measuring from where your pipe enters the house (usually near the street) to where it comes out under your tub or shower stall. If there isn’t enough room for all your piping, you may have to run some of it through walls or under floors. Ask at local hardware stores what kind of fittings are available for these situations so that you can choose ones that won’t leak or rust over time.
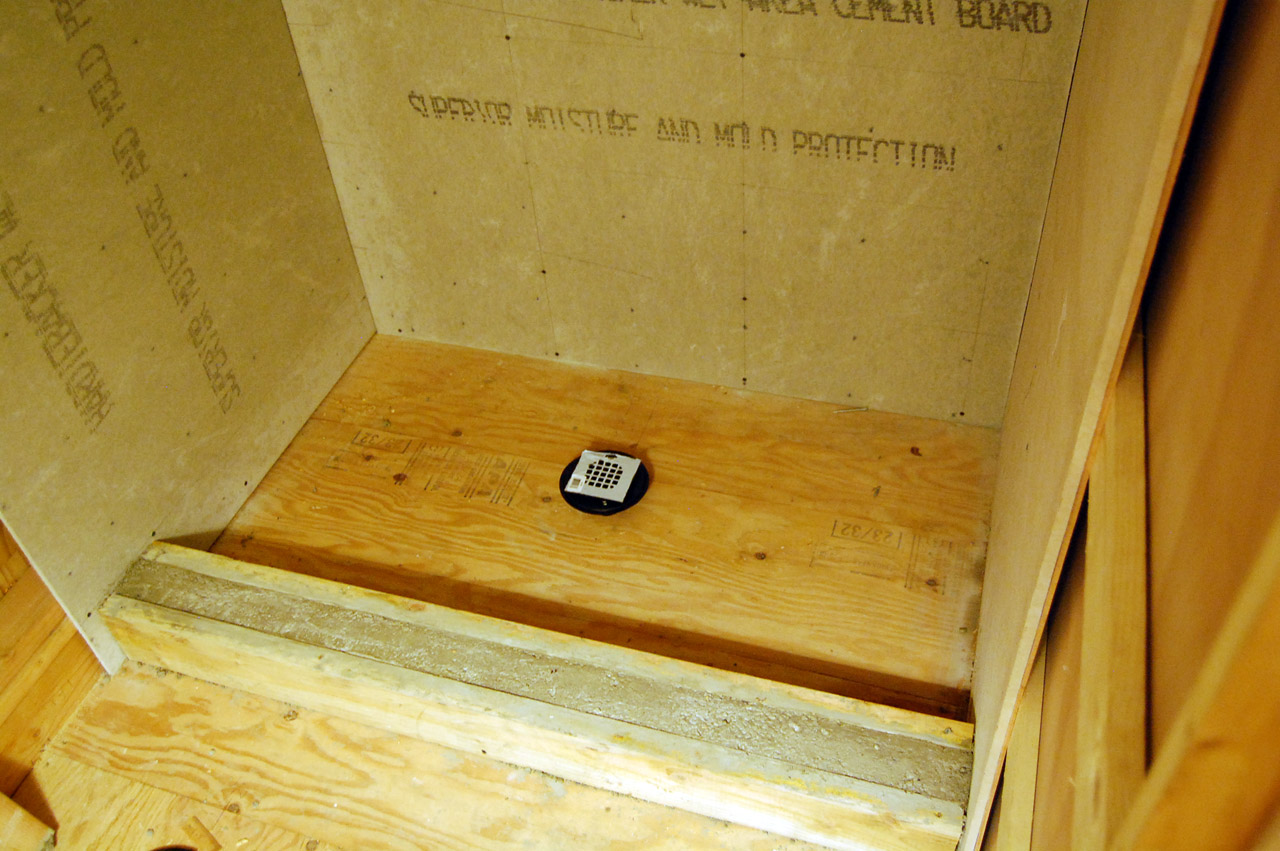
The first step in building a shower is to prepare the space and install the framing. In this article, we’ll walk you through how to build a shower, including how to frame the walls, flooring and ceiling.
Next, you’ll have to waterproof your bathroom. This is important so that moisture doesn’t seep into your home’s structure. We’ll show you how to waterproof a shower with tile by installing a vapor barrier.
Once you’ve waterproofed your bathroom, it’s time to install the flooring. While there are many options for shower floors, we recommend using tile because it’s durable and easy-to-clean.
Now that your walls and floor are installed, it’s time to add an enclosure around your shower. You can choose from several different styles of glass enclosures or other types of doors for your shower enclosure.
Step 1: Measure and mark the wall.
Measure and mark the wall where you want to install tile. Use a level to make sure your measurements are precise. Mark the stud locations along the top of your wall with a framing pencil or chalk line. If you have access to a laser or stud finder, use it for more accurate results.
Step 2: Install backerboard.
Once you’ve determined where your studs are located, cut pieces of backerboard (or masonry backer) to fit between them using a utility knife or circular saw with a masonry blade. Cut pieces that are at least 1″ larger than your tile, so that they overlap on all sides when installed. To ensure that the tiles will be level and plumb, place the backerboard over your lines and tack it into place with nails every 8 inches or so along each side.
Step 3: Install cement board anchors into concrete or block walls (optional).
If you’re installing tile in an unfinished basement or other area with exposed concrete block walls, skip this step because there won’t be any wood framing behind your tiles anyway! But if you’re installing tile in a finished basement or other room with wooden framing behind it, you’ll need to drive cement
How to Build a Half Wall for Shower
Building a shower wall is a relatively simple project that can add value to your home. It’s also a good way to use scrap materials from other projects around the house. You can build your own shower wall by following these steps:
Step 1 – Planning
Before you begin building, you’ll need to plan where your shower will go. You’ll want to find out how much space you have available and what type of materials are best for your needs. If there are no walls on either side of the shower area, then you can install an L-shaped wall for privacy or extra support. If there is already another wall in place, then you’ll need to consider how much space is available and how much room there will be for plumbing and electrical work.
Step 2 – Choosing Materials
The type of material used will depend on several factors including cost and durability, but most people choose tile because it’s easy to clean and maintain while also being durable enough to withstand wear and tear over time without cracking or chipping away like some other materials can do over time if they’re not properly maintained or taken care of properly after installation. If you’re using tile as part of your half
Building a shower wall is a great way to create a spa-like experience in your bathroom. It will also help you save money by eliminating the need for an extra room in your house.
In this article, we’ll show you how to build a shower wall for tile. We’ll walk you through how to build the base and framing and then we’ll show you how to install the mortar and tile.
First, let’s take a look at the tools and materials you’ll need.
Building a shower wall is not as hard as it sounds, but it’s not something you want to tackle without a plan. You don’t want to make any mistakes that can cost you time, money and energy.
The good news is that we have the plans for you! In this article, we will show you how to build a shower wall that will last for years. We will also give you tips on making sure your shower wall is waterproofed properly so the water doesn’t leak through the joints or cracks in the mortar.
Building a Shower Wall
The first step in building a shower wall is getting your materials together. You will need some basic tools like screwdrivers, hammers and levelers as well as some more specialized tools like drills and sawzalls depending on what type of material you are using for your shower walls. If you are making them out of stone or brick then chances are you will need these tools since they can be difficult to cut into by hand alone.
Once you have all of your supplies ready then you can start building your wall! The first thing that needs to be done is framing out the area where the shower will go so that it has support from all sides so it won’t collapse under pressure
The shower is one of the most important parts of any bathroom. It’s where you get clean, and it’s also where many people spend a significant amount of time in private. If your shower is outdated or just not working for you, then it might be time to consider building a new one.
Building a new shower can seem like a daunting task, but if you start by doing your homework and planning out the project, you’ll have an easier time with the actual construction. Here are some tips for building a shower wall:
First, figure out what type of shower pan you want to use. You can choose between cement board and tile backer board – both will work well and last a long time. Cement board requires more prep work than tile backer board, but it’s sturdier and less likely to warp over time due to humidity changes in the room. Tile backer board is easier to install because it doesn’t require as much prep work, but it won’t stand up as well over time as cement board will (especially if you live in an area that gets extremely hot or cold).
Second, decide how tall your wall should be before installing any tiles or other materials along its surface. This will depend on how much space you want between
The first thing to do is figure out where you want your shower to go. Then, take a measuring tape and make sure that the area is big enough for the shower.
Next, measure how tall you want your walls to be. The height of the wall depends on how much space you want between the top of your shower and the ceiling. If you want a lot of room, then make it higher; if you want less room, then make it lower.
Cutting out holes for plumbing can be trickier than cutting out holes for electrical work or wiring because there are more pipes involved. You have to make sure that there is enough room for everything to fit properly and that they won’t get crushed by other materials being installed in the wall (such as tile). This can be done by measuring before you start building so that when it comes time to install pipes or fixtures, they will fit nicely into place with no problems whatsoever..
Now that you have all your measurements down pat, it’s time to start building! Begin by laying down a base layer of concrete for strength and stability in this area (if using concrete blocks). Next, build up layers of block around this area until there is enough room.