Installing a shower shelf is easy. Unfortunately, there’s not a plethora of information out there on how to do exactly that. Here’s a nice tutorial that will teach you everything about building shower niche shelf.
A shower shelf is a great way to add storage and to keep your shower looking tidy. I love the idea of using tile in the bathroom, but it can add up really quickly. If you enjoy building things then you can learn how to build a shower shelf with tile. Or, if you want to save money, you might consider trying to build your own frame from wood. Either way, here we’ve got step by step instructions so that you can build a shower shelf just like the one I have in my own bathroom.
How to build a shower shelf
If you’re lucky, you have a tiled shower surround. If not, you can still build a shower shelf with tile. The process is the same whether you have tile or not. You just need to build your frame before you install the tiles.
Step 1 – Measure and Cut the Wood Pieces
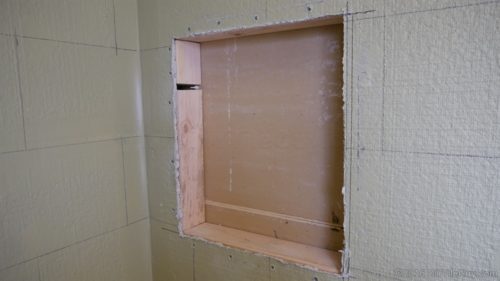
Decide where on your shower wall you want to place your shelf and mark it with a pencil. Then measure and cut two pieces of wood that are 2 inches wide by 2 inches thick by 16-1/2 inches long. These will form the sides of your shelf. Also cut two pieces of wood that are 1 inch wide by 1 inch thick by 15 inches long for the ends of your shelf. Finally, cut one piece of wood that is 1-1/4 inches wide by 1-1/4 inches thick by 15 inches long for the front board of your shelf (see Figure A).
Step 2 – Predrill Holes in Your Wood Pieces
Predrill holes in each corner of each side board so that when you screw them into place, they won’t split or chip out from underneath (see Figure B). Predrill holes in each end piece as well as on each side edge
In this video, I show you how to build a shower niche shelf. The material list is below:
4x4s for the legs (I used 2)
1x6x8′ pine for the shelf (I used 4)
2x2x8′ pine for the top and bottom of the shelf (I used 2)
3/4″ or 1″ thick plywood for the back (I used 1/2″)
Drywall screws and wood glue
If you’re looking for a way to add storage to your bathroom, this DIY shower niche shelf is the perfect project. It’s easy to build and looks great in any space.
Materials:
Shower niche shelf plans (download)
2×4 lumber (for the frame)
3/4-inch plywood (for the shelves)
3/4-inch plywood strips or 2×6 lumber (for the sides)
1/2-inch plywood (for the back)
Corner braces (to strengthen the box frame)
This is my first instructable. I decided to build a shower shelf after seeing tons of them online and in store. I wanted to make it so that it was easily removable, so that I could use the space for other things like a place to store towels and toiletries.
The bathroom is relatively small, so I wanted to make sure that it would be as compact as possible. This meant using tile instead of lumber (which would have been much cheaper).
This project took me about a day, but you could probably get it done in an afternoon if you’re going at a slower pace than me.
Building a shower shelf is a great way to add extra storage space to your bathroom. This project will take about two hours, and should cost less than $50.
Shower niches are an excellent way to add some extra storage space to your bathroom. They’re also much easier to install than most people realize. It’s not necessary to hire an expert for this project, although if you’re not comfortable doing this kind of work yourself, it’s probably best to have someone with experience do it for you.
What You’ll Need:
Drill
Hammer
Tape Measure
Screwdriver (Phillips)
You can build this shower niche shelf with tile in an afternoon, and it only requires a few tools. This project is perfect for the DIY-er who has never installed tile before. The only tools you will need are:
The shower niche shelf I built is about 3 feet long by 4 inches deep, but you can adjust the size to fit your needs. The important thing is that it fits inside your shower niche so that it won’t get wet when you shower.
How to Build a Shower Niche Shelf with Tile
Measure the depth and width of your shower niche and cut two pieces of plywood to those dimensions using a circular saw or table saw.
Cut several pieces of 1/4-inch thick plywood to use as spacers between each tile on the shelf.
Use a chisel or hammer to remove any molding from around your shower niche so that you have a smooth surface for gluing tiles onto later.
Screw one piece of plywood into each corner of the wall with drywall screws so that they are flush with the wall and level with each other when viewed from above or below. You can also use adhesive instead of screws if desired.
This is a how to build a shower niche shelf tutorial. This is a very easy project that can be built in a weekend. The first thing you need to do is measure your shower and see how much space you have available. Then, decide what size of shelving unit you would like to build. You can make it any height, width or depth that fits your space requirements.
After you have measured your space and decided on the size of the unit, you will need to buy some materials to build it with. You will need:
Wood Glue (1/2 gallon)
Liquid Nails Adhesive (6 tubes)
Pocket Screws (1/2 box)
3″ Wood Screws (1 box)
Here’s how to build a shower niche shelf
Materials:
2x4s
1/2″ plywood or OSB
1/2″ x 1 1/2″ wood screws (at least 40)
Tile backer board (for tile installation)
Trowel, grout float and caulk gun (for tile installation)
Follow these steps to build a shower niche shelf:
1. Measure the width of the back wall of your shower and mark it.
2. Use the level to check that your mark is straight across from one end to the other. If it’s not, use your stud finder (a tool that locates wood studs in walls) to find the studs on either side of your mark and make sure they’re in line with each other.
3. Use a pencil to mark across the studs at your mark on both sides of the wall.
4. Using a drill/driver, screw in two anchors at each end of each marked line — about 2 inches from each end — in order for them to be flush with the wall surface after installation (you will see how this works later).
5. Measure down from the top of each marked line by 3 inches and make another mark across both sets of studs (this will be where you attach your board). Make sure this measurement is consistent for both sides of the wall!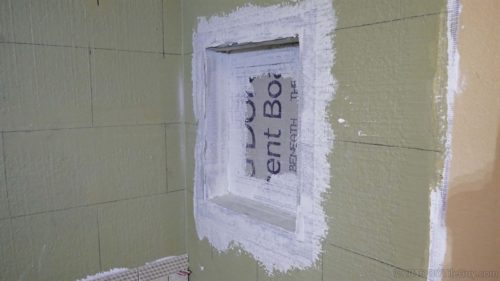
The process is simple, and it’s a great way to add storage space to your bathroom.
Here’s what you need:
Shower niche shelf kit
Tile saw or wet tile cutting saw
Grout sealant
Waterproof silicone caulk (optional)
Hammer and nail gun (or hammer and nails)