Today, I will teach youhow to tile a shower floor on concrete, how to install preformed shower walls, how to build a shower pan on concrete slab and how to waterproof shower img. I wii show uuu all these step-by-step.
A shower floor is a great addition to any bathroom, but it can be tricky to install. The tile surface must be even and stable and the cement grout strong enough to support your weight.
How to build a shower pan on plywood floor
A tile shower is a beautiful addition to any home, and it’s easy to install once you know how. The problem with tiling a shower floor is that concrete can crack and warp over time, which means that tiles may not stay in place or fall off the wall. A shower pan is a waterproof layer of material that covers the concrete floor and acts as a base for your tile project.
Materials needed:
Shower pan kit
Tile spacers
Tile saw with diamond blade
Tape measurer
Pencil or chalk line
When building a shower pan, you need to know how to build a shower pan on plywood floor. The process of building your own shower is not that difficult. You need to be very careful in this process, as it can be dangerous if you do not use the right tools.
Building a shower pan on concrete slab is not that difficult. If you want to build your own shower, there are some things that you need to consider before starting the project. Here are some tips for building a shower pan on plywood floor: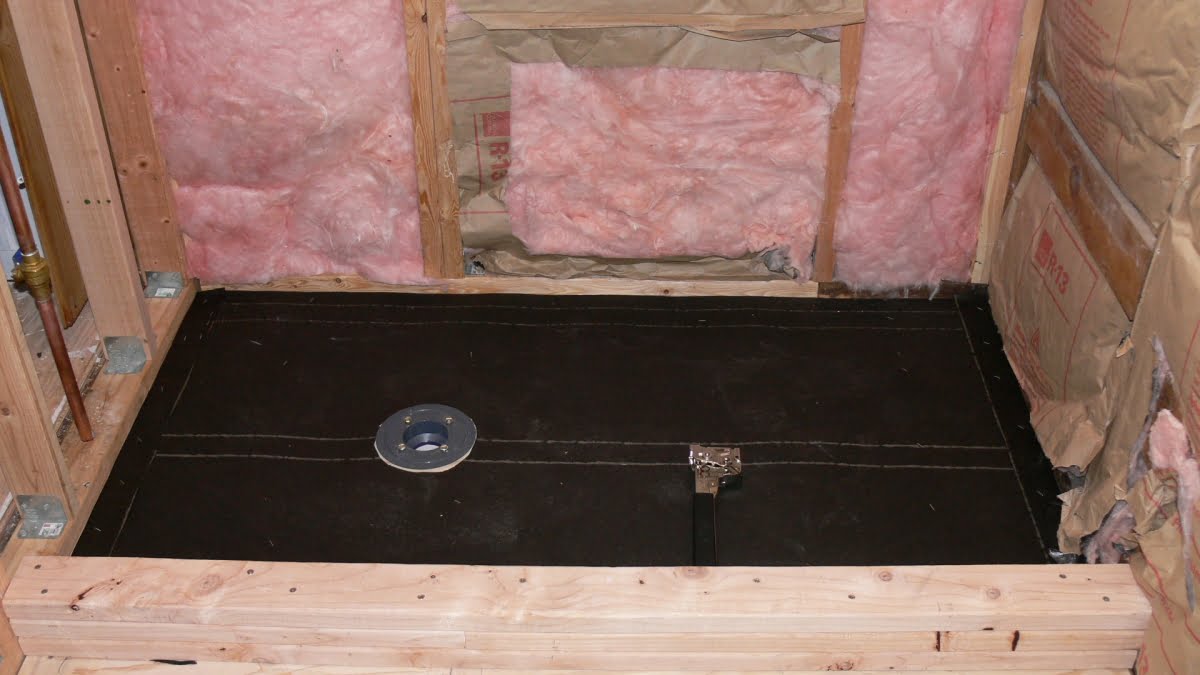
1) The first thing that you should do is measure the area where you want to install your own shower. You need to measure from all sides and take into account any obstacles that might be in the way of installing your own shower area.
2) After measuring, you then need to draw out your design on paper so that you can see what it will look like once finished and where everything needs to go before starting construction work on your own shower area or home improvement project. This will also help guide you with where drains should be placed as well as any other equipment needed for this particular job such
Building a shower pan is one of the most important steps in building a new shower. If you are building a house, this is the time to make sure that the plumbing lines and drain are in place. You need to have them there before laying down your pan because it will be easier to work with them when they are not covered with concrete.
In order to build a shower floor on plywood, you will need to have plywood cut into sheets that are at least 4 inches larger than the area that you intend to cover. This will allow for overhang around the perimeter of your pan, which will help make sure that it stays secure once it is installed. You can use either 1/4 inch or 3/8 inch plywood depending on how much weight you think your pan will have to support (1/4 inch should be fine if you only plan on having one person showering).
You should also consider using waterproof glue or silicone caulking between each layer of plywood as well as around all sides of your pan; this will help ensure that everything stays together properly and prevents any leaks from occurring in your shower floor over time. Simply apply glue or caulking wherever two pieces meet up, then let dry before proceeding with
The shower pan is the basin that contains the water. It can be built in a few different ways, depending on your budget and skills. The two most common ways are to build a shower pan on plywood or on concrete slabs.
The plywood method is very simple and fast, but it will eventually rot from exposure to moisture. The concrete slab method is more expensive and time-consuming, but it will last much longer because it’s completely waterproofed.
In either case, you’ll need to use a pan liner to prevent leaks within the shower pan itself. The liner should be installed before you pour the cement or set up the plywood shelf.
Shower pans are the bottom of your shower. They are generally made from plastic, fiberglass or porcelain. A shower pan is a shallow tray that sits on top of a waterproof material and is surrounded by walls, which prevent water from seeping into the drywall or subfloor.
The most common type of shower pan is made out of fiberglass, which can be purchased at any home improvement store.
In addition to building a shower pan on concrete, you will also need to install a drain and supply lines. The drain line runs from the shower floor to the main waste pipe in the basement. Supply lines (pipes) carry hot and cold water from the main supply line in the basement to each shower head and faucet.
To build a shower pan on concrete, start by marking and cutting out an area for the tub or shower basin. Use a circular saw with a carbide blade to cut through the concrete slab. Wear protective clothing, including goggles and hearing protection, when using power tools.
The next step is to pour a 1/2-inch layer of cement backer board over the exposed concrete slab. The backer board is used as a base for installing tile and other finishes on top of it.
After you have installed both layers of backer board, cut out an opening for your drain pipe using a jigsaw or reciprocating saw with carbide blades. The opening should be slightly larger than your drain pipe so there’s room for expansion when it gets hot inside your shower. Make sure not to let any water get into this hole during installation because it could weaken your subflooring and cause leaks later on down
Before you start building your shower pan, you need to make sure that the concrete slab is completely dry and cured. You should be able to walk on it without leaving footprints, and when you tap on it with a hammer, it should sound hollow.
Pre-fabricated shower bases are available at home centers and hardware stores. They come in a variety of shapes and sizes, so you can choose one that best fits your space. If using a pre-fabricated base, follow the instructions included with the product for installation.
If you’re going to build your own base from scratch, use these basic steps:
1. Prepare the floor by removing any debris or carpeting. Use a hammer drill and masonry bit to drill holes for anchors if necessary.
2. Cover the floor with 6-mil plastic sheeting up to the area where you’ll be working; this will prevent concrete dust from getting into other areas of your home or garage while you’re working on the shower pan.
3. Use a spirit level to ensure that the ground beneath your slab is level from end to end before pouring concrete over it
If you’re installing a new shower on a concrete slab, there are a few things you need to know before laying the first tile.
First, measure the room and take note of any obstructions that might interfere with your design. Then create a scale model of your shower, so you can see how everything will fit together.
If you’re building an enclosure around the tub area, make sure you leave enough space between the tub and wall for drainage pipes and the shower head. It’s also important to have at least an 18-inch gap between the wall and faucet body (if you’re going to install one).
Next, install floor drains in each corner of your shower area. These will drain water away from your walls during use. If your slab has a slope or curb, put in floor drains at different levels so water doesn’t pool against one wall or another. Make sure they slope away from the walls as well — otherwise water could seep into them over time and cause damage or mold growth.
After laying down waterproofing membranes over your subflooring (such as cement board or Durock brand cement backer board), build up boxes around all four sides of your shower using 2x4s or other framing
If you are building a new shower pan, it is important that it be done correctly. This will ensure your shower base will last for years to come.
If you have ever had a problem with a leaky shower pan, then you know how frustrating it can be. There are several steps you need to take before installing the shower base to ensure that your new shower pan does not leak.
The first step is to make sure everything is level and square before you start working on it. If there is any slope in the floor, then your new shower base will not sit right and could possibly leak. You can use a laser leveler or just use some string and pencils to mark where everything needs to be level. This is especially important if you have an uneven floor or slab underneath your bathroom flooring or subflooring.

The next thing you need to do is check for any plumbing lines that may need to be moved or rerouted if they are in the way of where your new shower will go. You may also want to move any electrical lines that may affect where your new shower will go too because they could cause damage if they get wet from water getting under them due to a bad leaky foundation wall in the basement below causing moisture buildup