When building a shower niche with tile, you’ll want to make sure everything is waterproof before you start tiling the walls. This includes making sure there are no cracks or holes in the shower niche before you tile. Because if there are holes or cracks in the niche, then water will seep through and make your new tiles wobbly! This can also ruin the mortar around your tiles as well. It can be difficult to assess the waterproof-ness of an area until you start tiling because tiles sit on top of mortar and cover up any holes for a few days after they’re placed. But once those few days pass, you know immediately if you’ve done the job correctly or not. So read on to find out how to waterproof a shower niche!
Mold removal is our forte. Let us handle your water damage cleanup and mold remediation project. We’ll turn your bathroom or basement shower back into a beautiful, usable space!
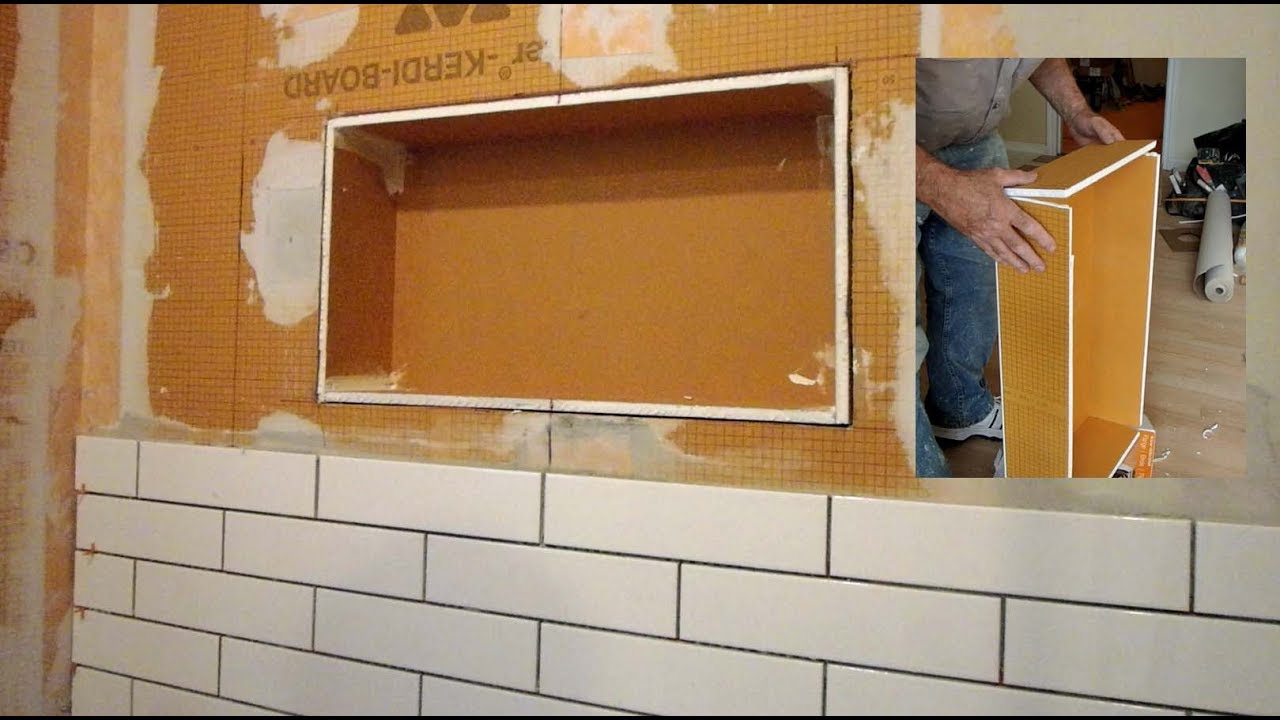
How to build a shower niche
The key to waterproofing a shower niche is to ensure that the waterproof membrane has been installed correctly. The membrane should be fixed to the walls and floor with a suitable adhesive. It is important that there are no gaps or holes in the membrane, as water can easily penetrate through these. If there is any damage to the membrane, it will need replacing before tiling can take place.
The other thing to consider when waterproofing a shower niche is whether or not you have access for drainage pipes. These pipes carry away excess water from your shower and down into the floor drain or sewer system. If you do not have access for drainage pipes, then you will need to install them before tiling can take place. This involves digging out an area of your floor and installing drainage pipes before backfilling with concrete and tiling over again.
A shower niche is a small alcove in the wall of your shower where you can store shampoo, soap and other bathroom necessities. A niche will make your bathroom look more stylish and functional. You can build a niche yourself using just a few tools and materials.
Step 1: Mark Your Niche
Measure the width, height and depth of the niche in your shower wall. Use a tape measure to get exact measurements for each dimension. Then use a pencil to mark these dimensions on the wall with masking tape. Make sure that you mark from top to bottom and from left to right so you don’t make a mistake when cutting out your niche.
Step 2: Cut Out Your Niche
Using an angle grinder fitted with a cut-off wheel, cut out the marked area on your shower wall until it’s about 3/4 inch deep inside the marks. This will allow plenty of room for tiles or mortar when you install them later on.
This article will show you how to build a shower niche. The first step is to create a rough sketch of the shower niche.
The second step is to cut the pieces of wood that will make up the frame of the niche. You can use any type of wood for this project, but it is recommended that you use pressure treated lumber for longevity and durability.
The third step is to secure the frame together with nails or screws. You can also use glue if you want your niche to be more permanent.
The fourth step is to secure your frame into place with concrete blocks or cement blocks on the bottom, sides and back of the niche so that they are flush with each other and hold it in place while it dries completely in place.
After that, fill up all gaps between these blocks with mortar or putty so that water cannot get through them, then paint over these blocks with waterproof paint so that they do not absorb moisture from inside or outside air humidity and weathering elements like rain.
The shower niche is a great way to add some style and extra storage to your bathroom. It can also double as a bench, which makes it perfect for small bathrooms. Here’s how to build a shower niche yourself.
Materials:
The first thing you need is the right supplies. Here are the main materials you’ll need:
Shower niche kit – You can get these kits at most home improvement stores. They include everything you need to build a shower niche, including the frame and shelf. You just have to cut out the hole for the tub faucet and install the drain components.
Framing lumber – You will need several pieces of framing lumber for this project. It should be at least 2x4s for stability, but if you have larger pieces around your house, those will work too!
Drywall screws – These are used to attach your framing lumber together when creating your enclosure box for the shower niche. You can also use regular screws if you don’t have drywall screws available on hand. Either way, make sure that whatever screws you use are long enough to penetrate through both sides of your framing lumber!
Drywall tape – This helps seal off any gaps between materials
A shower niche is a space to store shampoo, conditioner and other shower products. It’s a small area that you can build in to your shower wall that gives you convenient access to all of your essentials. Not only does it add storage space to your bathroom, but it also adds a little bit of style.
Here are five tips for building a shower niche:
1. Size Matters
The first step when planning your new shower niche is to measure the space in your bathroom. You’ll want to make sure you have enough room for everything you will be storing in the niche. For example, if you like to store your toothbrush and toothpaste in the niche then make sure it’s big enough for both!
2. Find Your Niche
Once you know how much space you have available, then it’s time to find out what kind of niche would fit best with your bathroom decor and design style. You don’t want something too small or too big; this will just take away from the look of your bathroom and make everything look out of place. The size should match well with other features in the room so that it doesn’t stand out too much from the rest of the design elements such as tiles or cabinets
The niche is the area of wall behind the shower door. It can be tiled, but it is difficult to keep water from leaking through the tiles and into the wall. The easiest way to waterproof a shower niche is to install a rubber membrane or sheeting that covers the niche and extends up onto the walls so that no water can penetrate it.
If you want to tile your niche, it’s important to use waterproof tile backer board like Hardibacker, which is made with cement and fiberglass in its core. Many types of tile backer board are not waterproof, so make sure you know what type you are using before beginning your project. The backer board should be installed directly over drywall using adhesive such as thinset mortar or mastic, then covered with grout.
When installing tiles in a niche, make sure they are installed directly on top of each other without any gaps between them or they will leak quickly because they lack drainage holes in their backside.
How to waterproof a shower niche
Before you start tiling, you need to make sure that the niche is completely waterproof and watertight. You can do this by applying a waterproofing membrane over the entire surface of the niche, followed by a layer of cement render. If your bathroom has a sloping floor, you will also have to apply a drainage layer at the bottom of the niche. The easiest way to do this is by using specialist shower tray adhesive and applying it between the tiles at the bottom of the niche.
If you’re planning on tiling over an existing shower tray, make sure it’s completely dry before you start work. This means waiting for it to dry out after having been washed down with water or having had any leaks repaired.
The shower niche is the space in your shower that houses the showerhead and faucet. This area is often an afterthought, but it can be one of the most important parts of your bathroom if you’re planning on installing tile.
If you want to tile your shower niche, you’ll need to waterproof it first. You can do this by applying a few layers of backer board or cement board to the sides, top and bottom of the niche. The boards will provide a strong surface for your tiles to stick to so they don’t fall off later on down the road.
Once you’ve waterproofed the niche, use mortar between each layer of tile before grouting them together with sanded grout.
How to waterproof a shower niche:
Step 1: Remove the shower tiles and drywall.
Step 2: Apply a waterproof membrane to the wall.
Step 3: Apply cement backer board to the wall.
Step 4: Apply tile adhesive to the back of each tile and set in place.
The shower niche is the area of the shower that is not tiled. It can be made of concrete or plastic, and it will collect water from the shower head and walls. The niche should be waterproofed before you tile it. If you don’t do this step, then moisture from the shower can seep into your drywall and cause mold growth.

Use a waterproofing compound to coat the niche with a layer of sealant. Choose an epoxy-based compound because it will last longer than silicone or acrylic products. You can find this product at any hardware store or home improvement center. It comes in two parts that you mix together in equal amounts according to the manufacturer’s instructions.
Coat both sides of your niche with the mixture using a paintbrush or roller applicator attached to an extension pole. Allow the sealant to dry for 24 hours before continuing with your project.