When it comes to shower construction there’s a lot to think about. Shower walls, the base, the plumbing and even mirror installation are some of things which requires your attention. Luckily though there are some tips and tricks you can use to make this process easier and maybe even learn something along the way.
If you’ve ever had to purchase or build a new shower, chances are you’re somewhat familiar with the frustrations of installing a custom enclosure. A custom-installed shower can be complicated and expensive and is something that should be left to a professional. Thankfully, there are other options for creating a shower where you can have peace of mind knowing that it’s installed properly.
How to build a shower
A shower base is a waterproof layer that sits on top of the floor and is the support for your shower walls. A shower pan must be installed before you begin building your shower walls, as it is part of their structural support.
The first step to installing a shower base is to prepare the subfloor by removing any debris and sanding down rough spots. Once ready, place a layer of cement backer board on top of the subfloor and secure it with screws every few inches. Let it dry overnight and then cover it with another layer of cement backer board and secure that one as well.
Next, place a layer of mortar on top of the two layers of backer board (about 1/2 inch thick) and spread it out until it’s level with the edges of your boards; then let it sit overnight so that the mortar dries completely. The next day, add another layer of mortar on top of this layer and smooth it out until it matches up with the previous layer; then let dry overnight again so that everything sets together properly.
Once all your mortar has dried thoroughly (about three days), you can install your pan liner into the tub area using silicone caulking around all four sides where they meet up with
A typical shower measures about 4 feet by 6 feet, with a ceiling height of 7 feet. The average cost to build a shower is $4,000 or more, depending on the materials and finish you choose.
Shower walls are typically made of tile or fiberglass panels that can be purchased at any hardware store. If you’re replacing an existing shower, you’ll need to remove the old walls and flooring before installing new ones.
The first step in building a new shower is to lay out your baseboards and studs for the walls and floor. If you’re starting from scratch, you should also install a subfloor prior to laying down your tiles or panels for your shower walls.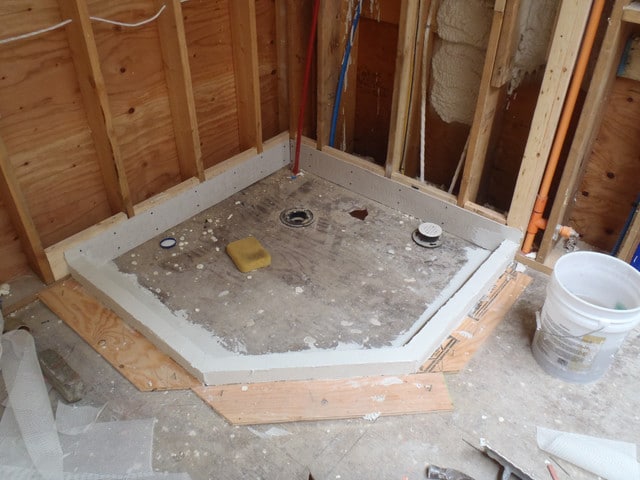
Once your baseboards are in place and leveled, it’s time to install your wall studs. Make sure that they’re level with one another by measuring their heights before nailing them into place. Next, attach plywood sheets over the top of each stud and nail them securely onto all four sides of each stud using galvanized nails or screws; this will form a solid surface for attaching your tile or paneling later on in the project (note: if you have access to a nail gun, use it here because it will speed up this process immensely).
If you’re planning to build a custom shower, it’s important to know the proper way to construct it. Your shower is an important part of your home, and it needs to be constructed properly so that it will last for years to come.
The first step in building a custom shower is choosing the materials. There are many different types of materials that can be used for your custom shower, including tile, glass and wood. Each material has its own advantages and disadvantages. For example, glass allows for easy cleaning but may be more susceptible to breakage than other materials. Tile is less expensive than glass but may require more maintenance if it becomes damaged or stained. Wood may be attractive but could require special care if it gets wet frequently (such as from steam).
The next step in building a custom shower is installing walls around the tub or shower base so that water does not leak out onto the floor or into other areas of your home through holes in the walls or ceiling above the shower area. You can also install walls around your new tub or shower base if you need extra privacy while taking a bath or shower at home. Walls can help prevent unwanted people from seeing you while bathing or showering in private areas of your
How to Build a Shower
Step 1: Assemble the Parts
To build your own shower, you’ll need some basic tools and materials. For example, you’ll need:
A drill with a hole cutter bit. You can use the same drill bit for drilling through both types of tile.
A tile saw or wet saw if you’re cutting the tiles yourself. If you’re having someone else make your cuts, then you don’t need this tool. However, it does speed up the process if you have one.
Tile nippers or shears for cutting tile with sharp edges that are flush with your surface (such as slate). These are optional if your tiles already have flat edges, but they make cutting easier in these cases since they allow you to use minimal force when cutting around corners and curves.
Grout sealer for sealing grout before grouting begins; this is optional but recommended so that grout doesn’t stain later on due to exposure to water over time.
When building a shower, it is important to ensure that your shower is built correctly in order to avoid any problems down the road. There are several steps involved in building a shower, and when done correctly, you will have a great looking and functional shower that you can use for years to come.
1. Choose Your Shower Enclosure
Showers are available in many different styles and sizes. You will need to choose the style of enclosure that works best with the space available in your bathroom. For example, if you have a small bathroom and want to install a walk-in shower, then you will need an open style enclosure such as an open corner or glass door style enclosure. If you have more room and want to install a standard size shower, then you will need an enclosed enclosure such as an acrylic or fiberglass surround with sliding doors or fixed panels and trim.
2. Install Your Drainage System
A drainage system allows water from showers to flow through pipes outside the house so that it does not flood basements or other areas of the home during heavy rainstorms or other periods of heavy water usage by occupants inside the home (excessive hot water use). This can be accomplished by installing underground pipes with perforated holes that allow water
How to Build a Shower Base
If you’re planning on building a new shower, you may be wondering how to build a shower base. There are several ways to go about it and the best way will depend on the size of your bathroom and the type of flooring that you want in your shower.
Here are some tips for building a custom shower base:
Measure your space and decide what type of materials you want to use. For example, if you have tile floors and walls, then you can build your shower using large tiles that match your existing tiles. If you don’t want to use tile all over, then consider using wood for the walls and concrete for the flooring instead.
Once you’ve decided on the style of your new shower, measure the area where it will be located and mark off where each piece must fit within that area. This ensures that everything fits together properly when construction is complete so nothing has to be taken apart or moved around once construction begins.
Build each section separately so they can be easily transported into place once they are built. For example, build two sides of your new shower walls first before moving on to assembling them together or building other sections like doors or benches inside your new shower walls
A shower pan is a type of base for your shower. It makes it easy to install the plumbing and drain lines, as well as the walls of your shower. The pan provides a waterproofing layer between your floor and the rest of your bathroom. This can help prevent leaks, which can be expensive to repair.
A shower pan is usually made from molded fiberglass or acrylic that is reinforced with aluminum or steel mesh.
The size of your shower will determine the size of your shower pan. Shower pans are available in many different sizes, so you should be able to find one that fits your bathroom perfectly.
Building a shower base is an easy DIY project that anyone can do at home with basic tools and materials. You’ll want to start by measuring the rough dimensions of your bathroom and making sure they fit within whatever space you have available in your home or apartment. If not, consider removing some wall space around where you plan on building the shower base so that you have enough room for everything that needs to go into it when it’s complete
The shower base is the part of your shower that sits on top of the floor. It’s usually made from a durable material such as ceramic tile, marble or granite. This type of bathroom remodel project can be completed by a professional, but it’s also possible to do it yourself with some patience and know-how.
A shower base is usually made from a durable material such as ceramic tile, marble or granite. It can be expensive to have this type of bathroom remodel done professionally so if you are looking to save money, consider doing it yourself with some patience and know-how.
The first step in building a shower base is to make sure that your current flooring can support the weight of the new structure. If you need to build up the subfloor, use plywood sheets attached to joists beneath them with nails or screws. Then add insulation between layers of plywood if necessary. Once this has been completed, lay out your base materials on top of it according to plan specifications provided by your local building department or contractor.
Once everything is lined up according to specifications, use construction adhesive or mortar cement between each layer of material for added strength and stability against water damage over time (from rain runoff). You should also use caulking around
When it comes to building a shower base, you have two options: cement or tile. The choice you make depends on your budget and the look you want. Cement is more affordable but takes longer to dry. Tiling is faster but more expensive.
You’ll need to build the walls first, then waterproof them with a sealant before installing the flooring. You can buy premade shower bases or use a cement board as your base. Then mount the walls on top of the cement board and line them with waterproofing membrane.
Here’s how:
Cut two sheets of cement board to fit inside your tub opening, overlapping each other by 3 inches (7.6 cm). Screw together one side of each sheet with 1-1/2 inch (3.8 cm) screws and then screw the other side directly over that side so there are no gaps between boards.
Lay out four pieces of flashing along the longest edge of each piece of cement board, then place a strip of self-adhesive flashing tape over each piece of flashing so all sides are covered except for one side, which will be on top when installed in your tub opening (see image above). Use utility knife or sharp scissors to cut through all layers at once
A shower base is a concrete slab that is placed on the floor of a room to support the weight of the walls, benches, and fixtures. It is usually larger than the area of the tile or stone flooring so that it can accommodate any expansion.
When building a shower base, first set up temporary supports around the perimeter of your room to hold up the walls while you pour the concrete into position. Once it has set enough that it won’t move under its own weight, remove these supports and begin tiling overtop.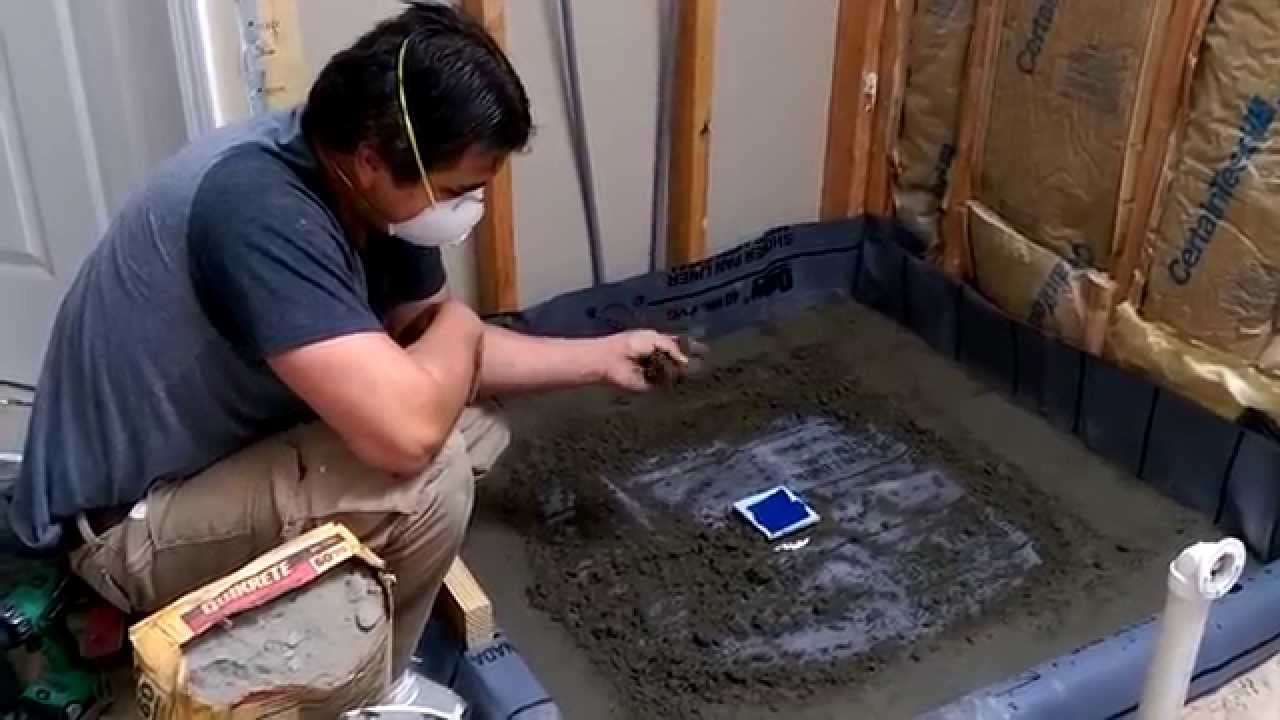
Shower bases are made using either fiberglass-reinforced plastic (FRP) or precast concrete slabs. FRP is lightweight and easy to install but needs to be sealed properly if used outdoors to prevent moisture from seeping through cracks in its surface. Precast concrete slabs are heavier but more durable and less likely to crack since they’re made from solid materials rather than hollow ones like FRP panels are.