Have you ever wondered how to build a shed roof? I have. As I look on Google for instructions and blueprints, I can’t help but notice that it seems like everyone, everywhere has a shed roof. Well, they do, except me. And I’m not proud of it.
If you’re using metal roofing, you might want to know how to build a shed roof. A metal roof is more durable and lasts longer than shingle roofs. It’s a perfect choice for a practical and safe construction on your home.

How to build a shed roof over a deck
There are many ways to build a shed roof. Whether you’re planning to install an overhang, dormer or other style of shed roof, this article will provide you with all the information you need.
In this guide we are going to look at how to build a shed roof with overhang. If you want to learn about different types of shed roofs then please read our guide on How to Build a Shed Roof.
How to Build a Shed Roof with Overhang:
The most common way to build a shed is with an overhang. This is where the boards come out from the wall by about 1 – 2 feet (30 – 60cm). This creates shade for your garden and also keeps out rainwater which can cause damage if it gets into your shed.
Building an Overhang:
To build an overhang you first need to cut your plywood sheets so that they fit snugly between the posts at the front and back of your shed. You may also want to add some extra pieces of wood around the base of each post so that they don’t push through when you screw them into place.
If you’re looking for a simple and inexpensive way to add an additional room or storage space to your home, building a shed roof is a great solution. While it may sound like something that only a professional contractor can do, it’s actually quite easy if you have the right tools and materials.
The first thing you’ll need is some basic carpentry skills and knowledge about how to cut, measure and assemble materials properly. The most common material used for modern sheds is plywood because it is cheap, lightweight and weather resistant.
With these instructions, you can build any type of shed roof design without having to hire someone else to do it for you.
Step 1 – Measure and cut the rafters
Your first step is going to be measuring the length of each side of your shed so that you know exactly how many rafters you will need to cut out from 2x4s (or whatever size lumber suits your needs). Then mark each rafter on all four sides with a pencil so that they are easy to match up when cutting them out later on in the process.
Step 2 – Measure and cut the floor joists
If you’re thinking about building a shed, you’ll need to know how to build a shed roof. A good shed roof will protect your belongings from the elements, keep critters out and look good doing it.
The best way to start is by building your frame correctly. Here’s how:
Step 1: Cut 2x4s into equal lengths for rafters and trusses (the parts that span across the top of the frame). Trim them so they’re all exactly 6 feet long.
Step 2: Lay two parallel rows of 2x4s on top of each other horizontally; then screw them together in every third space using 3-inch decking screws (they won’t stick out like roofing nails). Use two more 2x4s as cross members between each pair of vertical 2x4s; then nail these in place with at least three 16d nails per board (two nails on opposite sides).
Step 3: Nail plywood sheets onto the bottom side of your frame beneath where you’ll be nailing shingles later on (this will make it easier for you to get under there later on when installing shingles). Cover
How to Build a Shed Roof
If you want to build a shed roof, you will need to determine whether it needs to be framed, trusses or stick built.
Framing is the most common method for building roofs. The framing consists of rafters, joists and purlins. The rafters support the roof load and are usually spaced at 16 inches on center. The joists are attached between the rafters and provide lateral support for the walls or other vertical members. Purlins are used between parallel rafters to help distribute the load evenly over several rafters. In most cases, trusses are not used unless the roof has an unusual shape or span.
Stick built roofs use either plywood or OSB sheathing on top of 2 x 6 boards spaced 16 inches on center. A 2 x 4 frame is then attached between the rafters with metal straps every 24 inches or so along each side of the shed or barn with metal brackets called “fascia hangers.”
The best way to start building a shed roof is to use rafters. The rafters will be the main support for your shed and provide it with strength and rigidity. They also serve as the attachment point for your roofing material.
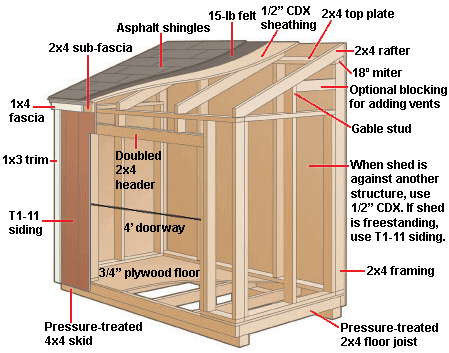
In order to build a shed roof, you will need:
Rafters – These are used as support beams in your shed’s frame. They connect all the walls together and give your shed its shape.
Collar ties – These are pieces of lumber that connect the rafters at their bottom ends. They prevent sagging in your roof by giving it stability across its length.
Trusses – Trusses are used when you have more than one layer of rafters on top of each other. This helps distribute weight evenly across the entire structure, making it stronger and durable too!
How to build a shed roof
Depending on the design, a shed can be built with the help of basic tools and materials. In this article, we will show how to build a shed roof with overhang, how to build a shed roof over a porch, how to build a shed roof with corrugated sheets, how to build a shed roof rafters, how to build a shed roof dormer, and other types of sheds.
Before starting work on the construction site, you need to make sure that all necessary permits are obtained.
Most often, when you need to create an outdoor space for storage or as an additional room for recreation or relaxation, then after reading this article you will know how to build a shed roof according to your needs and preferences.
How to build a shed roof over a porch
1. Use pressure-treated lumber, which is designed to last for decades in outdoor environments. You can also buy cedar or redwood, but these woods are more expensive than pressure-treated lumber.
2. Cut the rafters first and then cut the ridge board after you’ve already cut your rafters and put them together. You don’t want to cut your ridge board before you’ve put your rafters together because you won’t know how long it needs to be until you have them all assembled together.
3. After cutting your rafters and cutting out the ridge board, cut a hole in the center of the ridge board for your door frame opening (if applicable). The door frame opening should be at least 1 inch wider than your door frame so that when you fasten it down onto the ridge board, it will not be visible from underneath your newly installed shed roof structure.
How to build a shed roof
Building a shed roof that fits the style of your home can be an interesting project. The steps below will guide you through the process of building a shed roof.
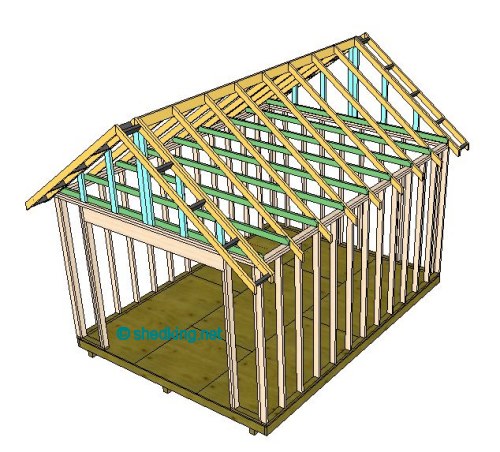
Step 1: Build the rafters
The first step in building your shed roof is to build rafters from 2x4s. Cut all the rafters to length using a miter saw (or jigsaw if you don’t have one) and then cut notches at each end. Use a circular saw with a carbide blade to make the notches, and then use tin snips or metal shears to cut off the excess wood. The key here is to make sure that both ends of each notch are parallel with each other and that they form right angles with each other (see diagram below).
Once you have cut all your rafters, you need to attach them together using metal brackets and metal screws (or nails). Attach two brackets on opposite sides of each rafter, so that they form an “X” shape with each other (see diagram below). Then attach two more brackets on opposite sides of each rafter, so that they form another “X” shape with
How to build a shed roof
This article will help you get started in building your own shed roof. You can make your own shed roof with a few simple tools, some plywood and the right materials.
The first thing you need to do is decide how big you want your shed to be and what shape you want it to be. If you are not sure of this step, take a look at some pictures of sheds online or in magazines and pick out what kind of design you like best. Once you have decided on this, then you can start building your shed roof.
You will need to frame out your shed first by cutting 2×4’s into the proper lengths for each side of the structure (make sure they are straight). After this step is finished, then attach these pieces together using 3″ deck screws so that they form an L-shaped frame around the entire structure (this will form the top and bottom of your shed). Once this is done properly, then cut out plywood sheets for both sides that are equal in width and length as one another but bigger than the actual size of your structure (one sheet should be bigger than both sides combined). Attach these sheets onto
1. Build your shed frame
2. Attach the rafters to the top of the frame
3. Install the fascia boards and sheathing
4. Create an overhang for your shed roof