How To Build A Balcony Without Posts. If you are renovating or building a new home then you should certainly consider installing a balcony. Especially if the place where you live doesn’t offer easy access to the outdoors. A balcony is basically a platform surrounding an outdoor area, usually at the same height as the windows of that area, offering a great view and more excitingly gives an opportunity for gardening and spreading plants to beautify the place. Building a balcony is not only attractive but also cost effective in terms of both time and money as it is often built with ready-made structural materials…
Building your own balcony used to be a challenge, but now it’s easier than ever before. Thanks to some new building techniques, you can build a well-designed balcony without having to spend too much time or money. In fact, you can probably build one in just a few hours on a weekend.
How to build a second floor balcony
Building an attached balcony, or deck, is a straightforward construction project. The most difficult part is finding the right location for your new balcony. If you live in an apartment building, check with your landlord before making any changes to the exterior of your home.
Floating balconies are easy to build and require fewer materials than other types of decks. They are also less expensive than other balconies because they do not require posts and beams on the side of the house. To build a floating balcony, you need plywood sheets, screws and brackets that snap into place. You can also use wood glue to hold them together if you prefer not to use nails or screws.
Building a floating balcony does not require any special tools or equipment other than a drill and screwdriver set. It does require some basic carpentry skills and knowledge about how to work with wood but can be done by anyone who has experience with this type of project.
How to Build a Second Floor Balcony
Most second-floor balconies are built on top of the first floor, but that doesn’t mean you can’t build one without posts. Here’s how to create a floating balcony that’s not attached to the house.
You’ll need:
A level surface for your decking material
2x4s for joists (12 total)
4×4 treated posts (3 total)
2x10s for decking material (6 total)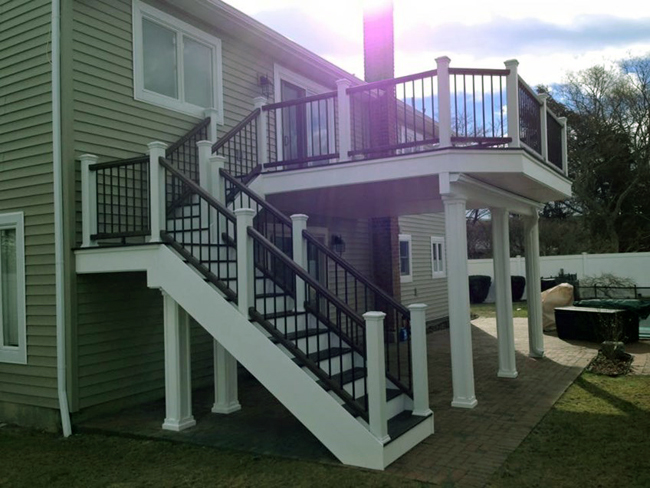
A balcony is a lovely addition to any home. It can be used for entertaining, relaxing or just enjoying the view from above.
But building a balcony can be challenging for many homeowners. A lot of people don’t know where to start when it comes to framing a balcony and installing it properly.
So, here are some tips on how to build a second floor balcony without posts:
1. Get Permission From Your Local Building Department
Before you get started on your project, make sure that you have permission from your local building department. In most cases, they will tell you what kind of materials you can use and how far away from the edge of the house the structure needs to be built.
2. Frame The Structure With 2x4s And Plywood Sheathing
The framing process starts with framing out the structure with 2x4s and plywood sheathing material around it. This will help keep everything straight and square while building it up higher than ground level so that your handrails are safe for anyone walking on them later on down the road when they’re installed into place properly by professionals like us here at B&B Fence Company!
3. Install A Concrete Pad Underneath The Entire
A balcony is a great addition to any home. It adds both functionality and value to the property, as well as an opportunity to enjoy the outdoors. Balconies can be built in several different ways, including traditional framing, post and beam framing or floating construction.
Traditional Framing
This is the most common way to build a balcony. The railing and balusters are attached to the posts, which are then connected with joists. This method requires a lot of labor but can be customized for any size home.
The biggest advantage of this method is that it allows for customization of size and shape, so you can have a small balcony or large one depending on what you need it for. The disadvantages include cost and time required for installation as well as increased weight on your house’s structure if there are large balconies throughout the house.
Post and Beam Framing
Post-and-beam framing uses wood posts that rest on concrete footings instead of being attached directly into the foundation walls (as with traditional framing). This allows for more creative shapes in your design but does require additional engineering expertise since there are no connections between posts except at the bottom where they rest on footings.
Building a balcony is an easy DIY project that can add value to your home.
The dimensions for the wood, metal and lattice are based on 16-inch-by-16-inch framing. The exact size of your balcony will depend on the width of your house, but you can use the same basic instructions to build a larger or smaller balcony.
1. Cut the 1×8 boards according to the measurements in Step 2. For example, if you’re building a 10-foot by 6-foot balcony, cut eight 1x8s at 10 feet long and two at 6 feet long. The shorter boards will be used as short headers between posts (see below).
2. Cut the 2x4s according to these measurements:
3. Assemble the posts with 3-inch exterior screws and nails (if you’re using pressure-treated lumber). Use 16d galvanized nails and drill pilot holes first if they’re not pre-drilled. This step isn’t necessary if your posts are already cut to length at 16 inches (as shown above).
4. Cut four 2x6s into 9-foot lengths for joists and lay them out on top of the posts as shown above
The floating balcony is the perfect solution for a small backyard. It’s a great way to get extra space without having to worry about building it into your house or building right on top of your existing patio.
The floating balcony can be built with just two beams and some accessories, but there are some things you should consider before beginning construction.
Beams and Supports
The first step in building a floating balcony is deciding how you want to support it. You could use posts, as shown in the photo below, or you could use crossbeams at each corner of your balcony.
Posts will create more space between each beam than crossbeams, but they also take up more room. If you have enough room for posts, then go for it! Otherwise, crossbeams might be better suited for your project.
For either option, we recommend using pressure-treated lumber so that the wood won’t rot away over time (pressure-treated wood will last longer than untreated wood). Pressure-treated wood is made with chemicals that prevent rot from occurring when exposed to moisture (such as rainwater or snow).
A floating balcony is one that is not attached to the building. Instead, it is supported by columns or posts that are anchored into the ground. These balconies can be built in a variety of ways, but here we’ll look at a basic method that uses wood and metal.
Build Your Structure
The first step is to build your support structure. The size and shape will vary depending on your balcony design, but for this example we will use 4×4 posts for every stud wall of your house. The length of each post will vary depending on how far apart you want your studs to be (generally 8′-0″ or 8′-6″). To determine how many posts you will need total, multiply the length of your house by 2 (plus two for every corner).
Once you have determined how many posts you need, you can begin assembling them. First, lay out all the pieces on the ground so they are easy to access when necessary. You should also mark each piece with its corresponding letter so they are easier to identify later in construction: A=A, B=B etc…
Next, stand up all of your 4x4s and attach them together using lag screws or bolts through pre-drilled holes with washers
Floating decks are great because they don’t require any posts to support the deck. This makes them great for areas where there is not enough room for a post hole or if you want to create some privacy. They are also easy to build and can be made in any size or shape.
Here’s how to build a floating balcony:
Step 1: Measure the area where you want to install your floating deck. For this project, we’re going to use a 10-foot by 10-foot space so that it will be large enough for seating but small enough that it can be completed in one weekend.
Step 2: Use chalk or spray paint to mark off where each board will be placed by using a chalk line as a guide or by placing marks on each board with tape or paint so that it shows up clearly when installed. You can also use an online calculator, such as this one from Builddirect, to help determine how many boards you’ll need based on your desired size and depth of your deck.
Step 3: Cut all of your boards with a circular saw so they are slightly longer than what is needed due to the fact that they will shrink after being cut and dried out (about 1/16 inch). Also make sure that all edges are straight before
Floating balconies are popular additions to many homes, but they can also be used as a way to increase space without adding more square footage. The floating balcony is a type of deck that sits above the ground and is supported by posts or other structures. The posts are often made from pressure-treated lumber and the decking material is usually cedar, pine or redwood.
A floating balcony can be constructed with a variety of materials and designs. The simplest design involves attaching the posts directly to the house wall, which allows for easy access to the interior of your home. However, this design does not provide much privacy for those who want to sit outside and enjoy their yard or garden.
The more traditional design requires installing posts in concrete blocks at least 8 inches below ground level. The posts are attached to a ledger board that runs along the length of each side of your house wall. You can then attach 2x6s or 2x8s boards between the ledger board and wall studs on either side of your home using metal brackets or wood screws.
Another option is to attach 2x6s or 2x8s boards directly to your house walls using metal brackets or wood screws (see image). This will provide better support for your balcony but may require some

Floating balconies are an excellent way to expand your outdoor living space without having to worry about building a new deck or roof. They can be made from wood, or pre-cast concrete slabs. The floating balcony is attached to the house with steel brackets that are bolted into the exterior walls. This allows you to create a balcony that is completely separate from the main floor of the home.
Floating balconies can be used for many different things including:
· A place for relaxing outside at night
· A space for entertaining friends and family
· A place to enjoy your morning coffee or tea while enjoying the fresh air and sunshine