Ever wonder how trusses work? These tutorials on building a 412 pitch roof truss, building a truss for a shed and more should help you understand the science of trusses and what’s involved in the process.
Use this calculator to find out how many trusses you require for your roof. We’ve used our extensive experience to add as many options as possible so you can get the most accurate calculation.
How to build a roof truss calculator
Learn how to build your own trusses for your shed. This video shows you how to build a simple and easy to use truss calculator. You can use this formula to calculate the lengths of all your beams. The following pages will take you through the process of building your own shed using these trusses, step-by-step instructions are included with pictures throughout each step.
The basics of building with timber framing have remained consistent through the ages. The materials used have changed over time with advances in woodworking technology, but the basics remain unchanged. To understand how timber framing works and why it is still so popular today, we need to look at its history:
Timber framing is an ancient method of construction that dates back thousands of years. It was used by Egyptians and Greeks as early as 4000 BC when they began building temples and tombs with stone walls and wooden beams inside them. Builders would use large trees from nearby forests as their main source of raw materials for building these structures because there were no other resources available at that time (no metal).
The roof truss calculator is a free tool that helps you calculate the size of your roof trusses. It is an easy to use web application that will make it easier for you to figure out what size of truss you need for your shed.
The calculator takes into account some factors such as the pitch of your roof, the span length and the material used for the trusses.
The calculator also provides you with different designs for different size trusses. It is important that you know how to build a 412 pitch roof truss if you want to get the most out of this tool.
It is important to note that this tool only works for sheds with a pitch of 12/12 or higher. The calculator has been designed with this in mind so that it can provide accurate results when calculating the size of your shed’s roof trusses.
Building a truss is not as hard as you might think. All you need is the right information and some basic tools. This article will give you all the information that you need to build your own roof trusses.
Building a 412 pitch roof truss
A 412 pitch roof has 12 inches of rise for every foot of run. The pitch is equal to the rise divided by the run, so in this case, 12 divided by 1 equals 12.
To build this type of roof truss, follow these steps:
1. Cut two pieces of lumber 12 feet long using a circular saw or jigsaw with a fine-tooth blade (the length depends on what size brackets you’re using). You’ll also need two shorter pieces that are 10 feet long (again, depending on bracket size) and four shorter pieces that are 8 feet long (again, depending on bracket size).
2. Measure and mark 7 inches from each end of each long piece of lumber with a tape measure or marking tool; use masking tape to mark off these measurements so they’re easy to see later on when you’re working with them on site. Then measure and mark 5 inches from each end of each short piece of lumber
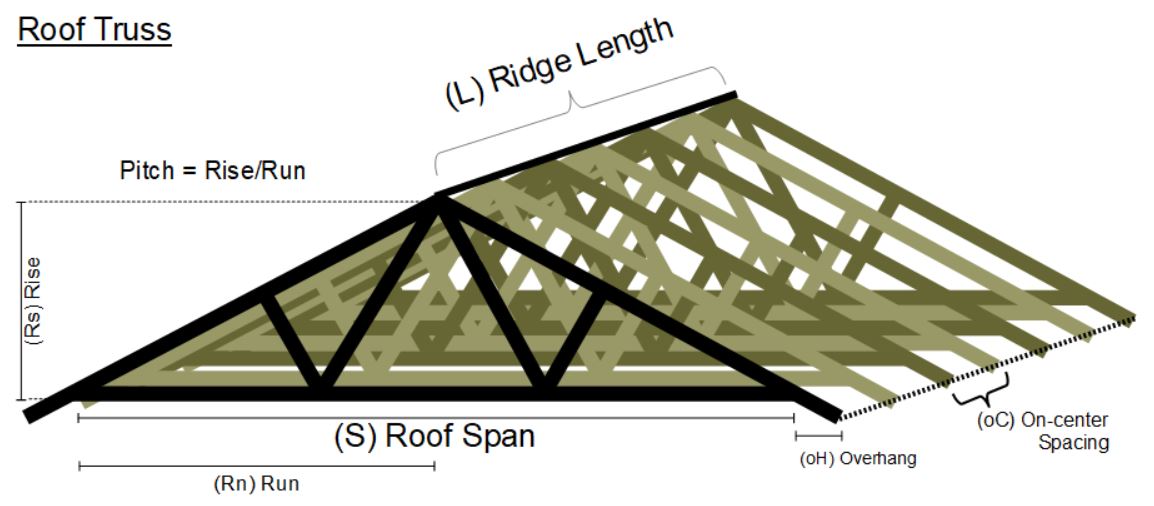
A roof truss is a structure used in building construction to support the weight of the roof and ceiling above. The simplest form of a truss is in the shape of an “X”, with chords and webbing that are connected at each intersection. A roof truss can also be configured as a “T,” with a single vertical post in the center and horizontal members on either side. The most common type of roof truss is the parallel chord truss, which is used in residential homes and commercial buildings.
Step 1: Calculate pitch
The first step when planning to build your own roof trusses is to calculate the pitch of your roof. Pitch refers to how steeply sloped your roof will be, expressed as inches per foot (or inches per meter). For example, if you have an 8/12 pitch, it means that for every 12 inches (30 cm) of horizontal distance traveled along your rooftop, there will be 8 inches (20 cm) of vertical rise.
Step 2: Calculate length
Next you’ll need to calculate the length of each member piece required for each truss. This will help you determine how many pieces are needed for each individual truss and how much material will
The first step in building a roof truss is to decide what pitch you want, and then calculate the length of the rafters.
A common pitch is 6/12, which means that for every foot of rise, the roof has six inches of run. If you want a 12/12 pitch, you would have 12 inches of rise for each foot of run. This is often referred to as a ‘double-pitch’ roof.
The most common pitches are 6/12, 8/12 and 10/12 – these pitches are also called ‘quarter-pitch’, ‘half-pitch’ and ‘three-quarter-pitch’. You can use an online calculator to find out what your roof’s pitch should be if you don’t already know it. A calculator will also tell you how long your rafters need to be – just enter in the measurements for each side of your building and find out how tall it will be once complete.
how to build a shed truss
How to Build Trusses for Sheds. Trusses are the most efficient way to create a stable structure when you’re building your own shed. Learn how to build trusses in this free shed construction guide.
Trusses are used in place of traditional framing methods like studs and rafters because they are more efficient and allow for easier assembly and disassembly. Trusses are also easier to build than traditional framing methods, but they can be difficult to visualize until you get the hang of them. Here’s how you can use this guide to build your own trusses for your next shed project:
1) Calculate Your Truss Layout
2) Cut Your Truss Pieces
3) Assemble Your Trusses
The first step to building a shed is to measure the area that you wish to build the shed on. You will be using this information to determine how many roof trusses you need, as well as where they should be placed.
If you have a shed with a pitched roof, then it is important that you know how to build it properly. This article will show you how to build a 412 pitch roof truss, which is one of the most common pitches used when building these structures.
Step 1 – Cut The Rafters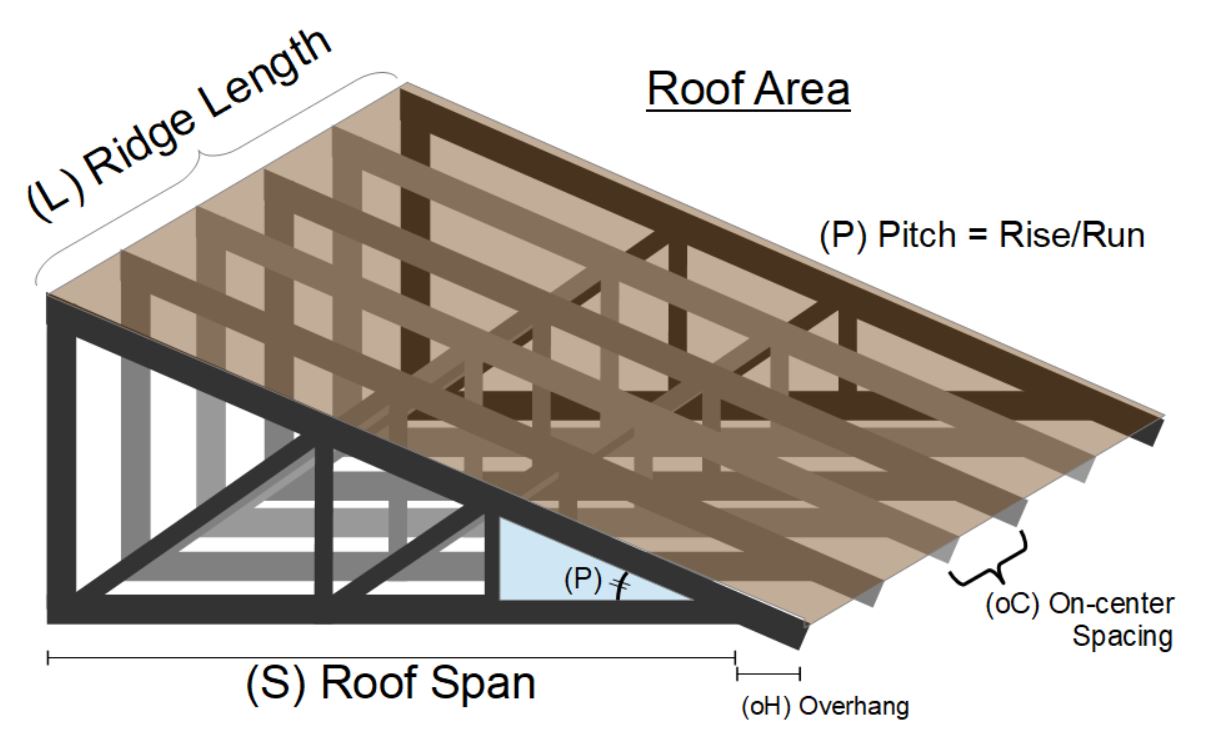
Once you have determined where your trusses are going to go, you can then cut them out of 2x4s so that they are all the same size and shape. Make sure that you cut enough rafters for each side of your shed so that when they are put together they will form an equilateral triangle shape with each leg of equal length.
Step 2 – Make Your Trusses Lighter
Once you have cut out all of your rafters, the next step is to make them lighter by drilling holes in them every couple inches or so along each side. Use a drill bit that is slightly smaller than a pencil so that it does not go through both sides of the wood
How to Build a Truss for a Shed
Trusses are the most common type of roof framing for homes, and they can also be used for sheds. The trusses are made of wood and give you an option to build a shed with a gable roof or a flat roof. In this article, we will discuss how to build a truss for a shed.
Step 1: Determine Roof Pitch
The first step is to determine the pitch of your roof. You will need this information when buying the lumber for your project. The pitch determines how steeply your roof slopes from one end to another end. If you want an easy way to measure pitch, use an inclinometer or slope gauge tool that determines pitch by measuring angles (see photo). To find out more about measuring pitches and angles, read How To Measure Roof Pitch & Angles With A Slope Gauge Tool Or Inclinometer in How To Measure Angles & Pitch? Part 2: Roof Pitch & Angles.
Step 2: Determine Roof Length
Next, determine the length of your trusses by multiplying the width of each truss by its length (see photo). For example, if each
The first thing you need to do is decide how many trusses you want. This can be decided by the size of your shed, as well as how much space you want between them. The next step is to figure out what pitch you want on your roof. This is basically how steep or shallow it will be. There are various factors that go into this decision, but for a shed I would recommend about 10-12 degrees for a taller shed and 6-8 degrees for a smaller one.
Now that you have the pitch decided, it’s time to build your trusses. It’s best if you make them yourself so they fit perfectly together and don’t fall apart later on due to poor craftsmanship or quality materials. If this sounds like too much work then buy some pre-made ones from any hardware store.
Once you have all your materials ready, lay out your plans for where each piece needs to go so that all of your pieces line up properly with each other when finished and there are no gaps in between them (this will look terrible when finished). Then start building! It should look something like this:
Trusses are simply beams that span the distance between the walls of a building. They have a triangular shape, with each end resting on one wall and the apex of the triangle resting on the other.
When you’re building your own shed, you can use trusses to support a roof. It’s important to choose the right pitch for your trusses as this will affect how much headroom you have inside your shed.
The pitch of your trusses refers to how steeply they slope. The higher the pitch, the more space there is under them for storage or working in your shed.