Bloggers and homeowners are always looking for tips and guide about how to build a shed. We have a list of tutorials and videos that will help you make your own shed.
Learn to build a doghouse, gazebo, or shed with plans and instructions provided here. Sheds.com — the largest online directory of quality shed plans and blueprints.
How to build a roof shed
The shed shown here has a 12 x 16-foot footprint, which is about the size of a two-car garage. The sides are built with 2x4s on 24-inch centers. This allows for both structural stability and plenty of headroom inside. (For more information on how to calculate rafter sizes, see “Shed Roof Framing”.)
The basic shed framing is fairly straightforward: The front and back walls are built with 2x6s, and the side walls are made with 2x4s spaced at 24 inches on center. Along the top plates of each wall, nail 2×6 blocking on 16-inch centers perpendicular to each other (Figure A). On top of these blocking pieces, install 1×6 trim boards that match the siding material you’ll be using on the outside of your shed (Figure B).
To create an overhang at the front and back doors, cut 2x6s into three pieces using a circular saw or miter saw: one 8-foot piece for each door opening plus one 6-foot piece for each side. Nail these pieces together so that they form an L shape that fits into each opening (Figure C). When you attach them to the framing
DIY Shed Plans – How To Build A Shed: Step-By-Step Instructions
Sheds are a great way to store all your equipment and tools, as well as provide you with extra space for entertaining guests.
If you’re thinking about building a shed, but don’t know where to start, we’ve got everything you need right here! With our easy to follow shed plans and detailed instructions, anyone can build their own shed.
Building Your Own Shed:
Step 1 – Determine Where You Want The Shed To Go:
Before you start building your new shed there are a few things you need to consider. First, decide where exactly on your property you want your new structure located. Second, measure the area where the shed will be built and make sure there is enough space for it. Thirdly, check if there are any restrictions or regulations regarding building structures on your lot; this may include obtaining permits from local authorities before starting construction work (this is especially important if you live in an area prone to harsh weather conditions). Also note that some municipalities have minimum distance requirements when building sheds close to property lines (usually between 10-15 feet); consult with local planning departments before proceeding with construction of your new
Building your own shed is a great way to save money on the cost of building materials. Sheds are easy to build and they can be customized to fit your needs.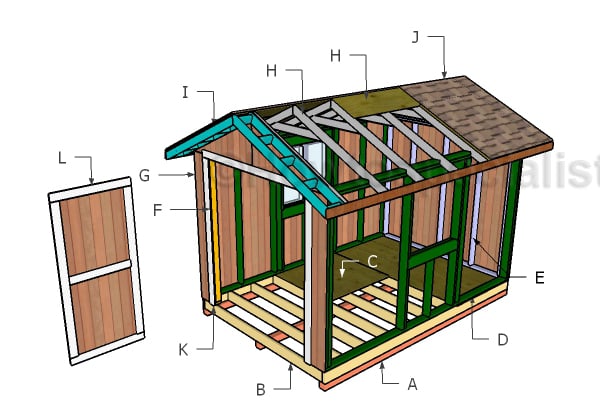
Building a shed is also a great way to get some hands-on experience in construction, which might help you decide if you want to pursue a career as a contractor or builder.
Building your own shed doesn’t have to be difficult or intimidating. With the right tools and materials, it can be a fun weekend project that will leave you with a new storage space for all your stuff.
In this guide we’ll go over everything you need to know about building your own shed from start to finish:
Step 1: Choose Your Location
Step 2: Prepare for Construction
Step 3: Install Your Foundation
Step 4: Frame Your Walls
Step 5: Install Your Roof Trusses or Rafters
Step 6: Install Your Roof Shingles or Sheeting
This article will show you how to build a shed.
The first step is to determine whether you need a permit, and if so, where to get one. In many places, including most cities in California, sheds are considered accessory structures and do not require a permit. However, if your shed is attached to your house or is over a certain size, it may be considered part of the house and require permits.
Step 1: Determine whether you need a permit
To determine if you need a permit, you’ll need to check with your local building department or planning commission. If they say yes, then follow their requirements carefully. If they say no, then read on!
Step 2: Measure your space
For this project I’m using an 8-foot by 10-foot base kit from Sheds USA (available at Home Depot). For my particular situation I needed to remove some trees and bushes in order for the shed to fit properly into my yard. After removing these obstacles I was able to install the base kit without any problems whatsoever!
A shed is a building for storage or shelter. The word most often refers to a structure that is intended to be used for storage rather than residential purposes.
Building a shed can be an enjoyable and rewarding experience, but it does require some time and effort. The first step in the process is to decide what type of shed you want to build. There are many different types of sheds, including gable, gambrel, and barn sheds. You will need to determine how much space you want your shed to take up on your property and how much money you want to spend on materials before choosing which type of shed is right for you.
The next step is choosing the right location for your new shed. Sufficient room should be left around it so that you can comfortably reach all sides when working on it without fear of damaging anything else nearby.
Once you have decided on a suitable location, dig out the ground where your new shed will be built so that there is at least 6″ (15 cm) of depth below ground level all around it. This will allow water runoff from rainstorms or snow melt-off to drain away from beneath your shed’s foundation base instead of pooling there and causing damage over time by rotting out wooden components such as floor joists
How to build a shed
How to build a shed: The most common way to build a shed is out of 2×4’s or 2×6’s. This is fine for smaller sheds, but if you want to build a big shed, you may need more support. You can use metal studs instead of wood studs. You will also need to use metal joists instead of wood joists. Metal studs and joists are more expensive than wood studs and joists, but they are stronger and they last longer. If your shed has an area that gets wet frequently, then you should use pressure treated lumber so it will last longer in those conditions.
How to build a gable roof: Gable roofs are very popular for sheds because they look nice and provide good ventilation for the space inside the shed. A gable roof consists of two triangular shaped pieces of wood called rafters that run from one end of the shed wall to the other end of the shed wall where they meet at an apex point on top of the wall at right angles to each other forming an angle between them (the angle formed by these two pieces)
Step 1: Build the Base
The first step is to build the base, which should be made from pressure-treated lumber. Use a hammer and nails to attach the floor joists to the base, then add 2×6 joists every 16 inches on center for the rest of the shed walls. The bottom of the shed should be at least 6 inches above ground level.
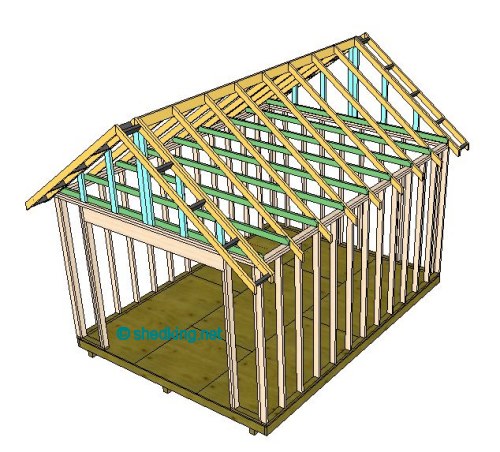
Step 2: Add Rafters
Once your base is complete, it’s time to add rafters (or ridge beams). Use 2×12 lumber for this step and measure out 17 inches from where your walls meet at each corner. Cut 12-foot long boards into approximately 5 foot 4 inch lengths (this will vary depending on what size you are building). Place one end of each rafter on top of a wall plate and then nail through both pieces into the plate below with 16d nails. This should leave about 1 inch space between each board when it is placed perpendicularly against its neighbor. Repeat this process for each remaining wall intersection so that all four walls have their own set of rafters.
The most common way to build a shed is to frame it using 2x4s. This method works well for small sheds, but larger ones may require more support.
Step 1: Build the Base
For this example, we’ll assume that you’re building a 12-foot by 12-foot shed with an 8-foot-high ceiling. Start by marking off these dimensions on the ground, using stakes and string lines. Then dig two trenches at each corner of your shed — one for each post — just deep enough so that they don’t show above the ground when they are in place. Next, dig holes for the concrete blocks that will support each corner post, making sure that they’re level with each other and with the ground around them. Finally, mix some concrete and pour it into these holes until they’re full.
Step 2: Lay Out Rafters
The next step is to lay out the rafters for your shed’s roof. You’ll need at least three rafters per side of your shed: two long ones running parallel with each other and a third running perpendicular across them at one end (see photo). Cut these rafters from 2x4s using either a circular saw or jigsaw (the latter works better if you have lots of
The rafters are the beams that span the length of your shed. They’re what hold up the roof, so it’s important to build them correctly and get them into place before you start working on your roof.
If you’re building a gable-end shed, follow these steps:
Step 1: Measure and mark the rafter locations on both sides of the shed with your framing square. The ridge board will be located between two sets of rafters. Use a chalk line to mark where you will cut notches for the ridge board in each pair of rafters.
Step 2: Cut notches for the ridge board out of each pair of rafters using a circular saw or jigsaw. Make sure to cut on the waste side of your lines! Cutting into a notch too far can cause problems later when attaching joists over it, so err on the side of caution if you aren’t sure where exactly to cut.
Step 3: Attach each pair of rafters together using metal brackets or screws through their ends and into one another. This helps hold them together while you put them up in place, and keeps them from twisting out of alignment while they’re being installed (which can happen if they’re just resting against one another).
Step 1: Decide on the size and shape of your shed.
Step 2: Mark the locations of your rafters on the top plate, using a framing square or combination square.
Step 3: Cut two rafters to length, using a circular saw or table saw. Use a framing square to make sure they’re perpendicular to the top plate.
Step 4: Lay one of the long rafters down on its side and clamp it to the end of a shorter piece (called a “header”). Use a speed square to draw a line across both pieces at 24 inches from each end (or whatever height you chose). Use a jigsaw or handsaw to cut along this line. This will be one corner of your shed, so mark two lines like this for each corner of your shed.
Step 5: Position two more rafters along this same line at 12 inches from each end, then measure down from their tops 18 inches and make another mark across all three pieces at that point. This will create an X in each corner that represents where your gable ends will go (see Photo 1 below).