Roof deck is an essential element to a school bus. It’s its top floor, and it is built to last over time. There are many factors that contribute to the effectiveness of such a structure. Sometimes, building a roof deck isn’t easy at all, but of course you will benefit from it during the process.
As children’s minds grow and expand, so should your imagination. Structuring supports for a playground is a great way to give out-of-the-box learning opportunities and allow kids to learn about the world around them.
How to build a roof for a deck
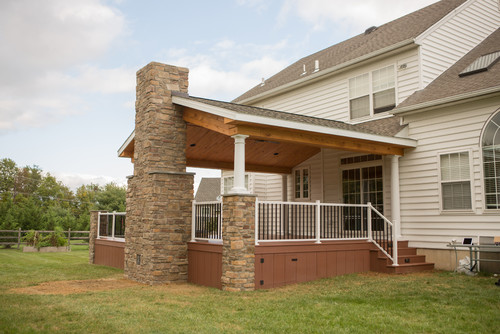
Building a roof for your deck is an easy and inexpensive way to create extra space that can be used for entertaining or relaxing. You can use a variety of materials and techniques to create a roof, but the framing will be similar regardless of the material you choose.
If you are looking to build a flat roofed deck, there are several ways to do it. One method involves using wood framing and attaching plywood sheets to the frame. Another method involves using lattice as the deck covering and then attaching plywood sheets to that material. Finally, you can use solid lumber for your deck structure and then cover it with shingles or another type of roofing material.
Installing a Roof on Your Garage by Hand; Installing a Roof on Your Garage by Hand; How to Build and Install a Metal Roof on Your House; How to Build and Install a Metal Roof on Your House;
You may find that a flat roof is the best choice for your deck. The process is simple and only requires a few tools and materials.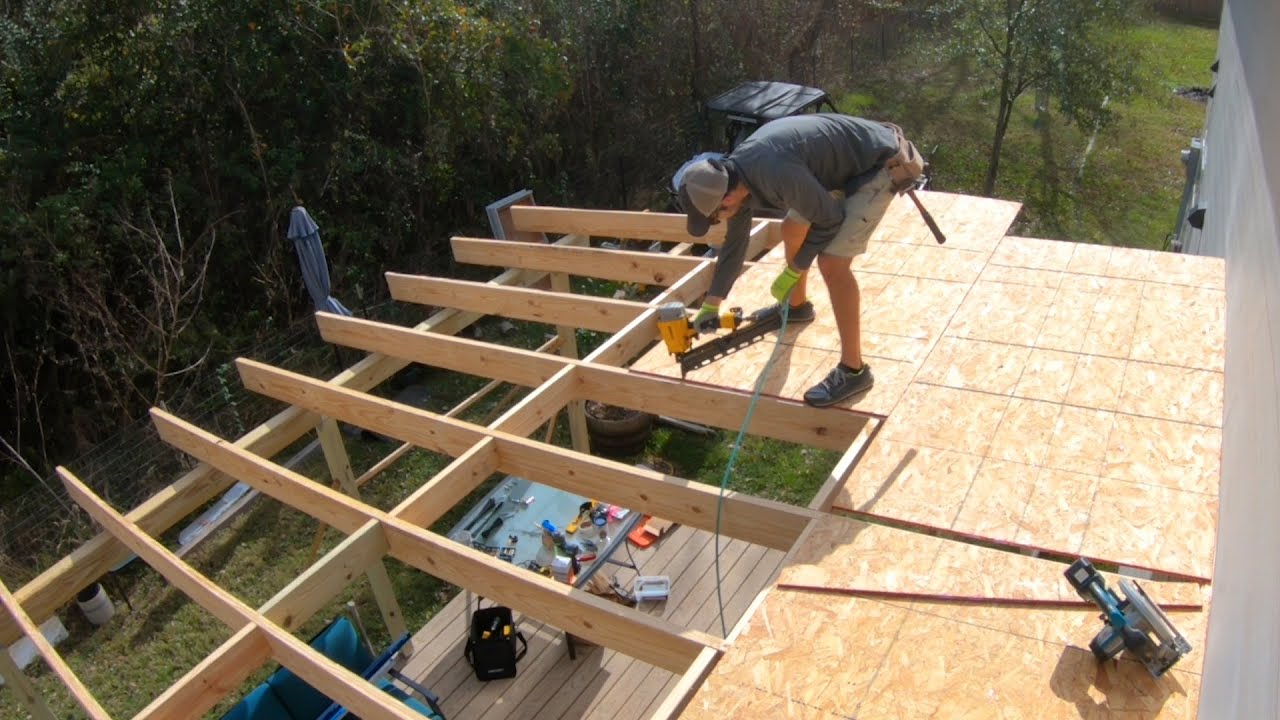
Building a flat roof on your deck is easy, but it does require some planning and preparation. You’ll need to plan the size of your roof based on how much standing water it will hold. You should also try to avoid slopes greater than 3 inches per foot because they can be difficult to keep clear of snow or leaves in the winter.
The first step in building a flat roof is to mark out the area where you want the roof to be. You’ll want to make sure that there’s enough room for all of your materials as well as any insulation that you plan on installing. When you’ve drawn out your lines, use them as a guide when cutting plywood sheets down into smaller pieces that fit in between each joist or rafter on top of your deck flooring boards (see Resources).
Next, lay out all of the pieces so that they fit together perfectly with no gaps between them — this will give you an idea of which way they should go when you’re ready to secure them in place with screws or nails through predrilled holes in each piece of plywood (see Resources). If you’re using
If you are building a roof for a deck, you will need to make sure that it is strong enough to hold the weight of the structure. A flat roof is a good option as it is easy to build and provides good clearance from the ground, but there are other types of roofs that can be used.
Selecting the Right Materials
When choosing materials for your deck roof, make sure that they are durable enough to withstand the elements. A lot of people prefer using cedar shakes or other natural products because they look attractive and last longer than synthetic materials. However, if you live in an area where there is little snowfall, then you may want to go with something less expensive such as fiberglass shingles.
Flat Roofs
A flat roof is one of the most common types of roof design and can be made using either metal or tile shingles. It is relatively easy to construct and offers good ventilation around the edges which helps prevent dampness forming inside the structure. Flat roofs are also suitable for smaller decks where there isn’t room for anything else and will keep out most rainwater without having to be cleaned out regularly like gutter systems do. They also provide plenty of headroom beneath them so you
The first thing you need to do is build a platform for the roof. The platform should be about 2 feet lower than the top of your deck. If you don’t have a building permit, you can use treated lumber as long as it’s pressure-treated and not painted. If you’re using cedar or redwood, it needs to be pressure-treated wood.
Use four 2x4s to construct a rectangle that’s roughly 6 feet by 8 feet. Make sure the corners are square. Attach the corners together with short pieces of 2x4s and nails or screws.
Next, attach 2x4s across the top of your rectangle to create rafters for your roof. Space them evenly so there’s about 3 inches between each one on all sides of the rectangle. Attach each rafter with nails or screws through both pieces of wood into each end of the rafter above it and below it on all four sides of the rectangle.
Your next step is to attach plywood sheets to make up the roof itself. The best way to do this is with screws that are longer than 1/2 inch so they go through both layers of plywood easily without splitting them when you tighten them down with a screwdriver or drill.[1]
Roofing is not only the most important part of any deck, but also one of the most difficult parts to build. If you’re planning on adding a roof to your deck, it’s important to plan ahead and have a good understanding of what you’re getting into.
The first step in building a roof for your deck is choosing the type of roofing material that best suits your needs. There are many different types of roofing materials available for decks, including shingles, tiles and metal roofs. While each has its own advantages and disadvantages, we’ll focus on wood shingles because they are by far the most popular option for DIYers.
Materials Needed:
Wooden framing lumber (2x4s work well)
8 foot long 2x4s (cut into 4 foot lengths)
8 foot long 1x3s (cut into 4 foot lengths)
How to Build a Roof Deck for a School Bus
The most common type of roof deck is a flat roof. It is easy to build and can be installed on virtually any vehicle. A flat roof is also the easiest to patch, repair and waterproof. However, you need to have enough headroom under the roof so that you can crawl underneath it without bumping your head or scraping your back on the underside of the roof.
To install a flat roof, follow these steps:
Step 1 – Prepare Your Vehicle
Before you begin installing your roof deck, you need to prepare your vehicle for the project. First, remove all loose items from inside the bus and store them safely away from where you will be working. This includes items such as tools, food and clothing. You also want to make sure that there are no sharp edges protruding through holes in the floor or wall panels that might cause injury while working under the roof.
Step 2 – Mark Your Measurements
Using a chalk line or tape measure, mark off where each edge of your new deck will be located on top of the existing structure. Make sure that these measurements allow enough room for insulation and ventilation pipes if necessary. The size of your new deck will depend on what type of vehicles you intend
How To Build A Roof Deck For A School Bus
Building a roof deck can be challenging, but with a few basic steps, you can create an area to enjoy. First of all, you need to make sure that the roof is in good condition. If it is not secure, you could end up falling through the roof and injuring yourself. Furthermore, if your roof has any leaks or holes, you should have them repaired before proceeding with this project.
Once you have made sure that the roof is sound and safe, the next step is to prepare it for construction. This means making sure that you remove any debris or other items that may be on top of the roof. You may also want to go ahead and remove any insulation from within the bus as well if there is any present so that you can get a better idea of how much room there will be for building your deck.
The first thing that you have to do is to make sure that your roof deck surface is level and plumb. The best way to achieve this is by using a laser level. It’s also important that your roof deck beams are parallel to each other and perpendicular to the ground.
Once your deck beams are level and plumb, it’s time to install the joist hangers on them. Make sure that they’re evenly spaced apart so the joists can be aligned properly. After that, install the metal clips on top of them using a hammer drill or an impact driver. This will allow you to secure the joists later on in the process.
Now it’s time to attach metal clips on top of each joist as well as metal cross braces between them before installing plywood sheets onto them with 2-inch screws through their bottoms into the clips at both ends of each board (they should overlap slightly). You should also make sure that there are no gaps between boards by using scraps of wood or shims if needed before screwing everything together tightly. Then cover everything with tar paper and tape over it with
How to Build a Flat Roof for a Deck
Building a flat roof for a deck is not as difficult as you might think. The first step is to build the frame for your roof. This can be done with pressure treated 2 x 6s that are 16 inches on center. The 2 x 6s will be placed on top of the roof framing and nailed in place using galvanized nails.
Next, you will need to attach plywood sheets to the frame with screws and galvanized nails. Make sure that you don’t use too many nails or they will poke through the wood and potentially damage someone below your deck. Use at least three sheets, but no more than five sheets of plywood per layer. If you want to make your flat roof more attractive or sturdy, consider using OSB plywood instead of normal plywood since it is stronger and less likely to bend or dent upon impact.
Once your sheets are in place, secure them with screws so that they don’t come loose over time due to wind or weather conditions such as rain or snowfall.
The first step in building a flat roof is to measure the area you want to cover. A standard size for a flat roof deck is 12 feet by 8 feet. The next step is to use the measurements to calculate the amount of plywood needed to cover your deck. You will need two sheets of 4-by-8-foot plywood for an area measuring 12 feet by 8 feet, for example.
The next step is to cut the plywood into smaller pieces that fit the shape of your deck. A circular saw can be used for this task. When cutting the plywood, make sure that all of your cuts are straight and true so that they fit together perfectly later on when you put them together into one large sheet of plywood.
Once all of your pieces have been cut out, it’s time to lay them out on top of each other on top of the ground or any other flat surface where they won’t get dirty or damaged while you work on them over time. First, place two pieces together so that they touch at every edge and then use an air stapler gun or a hammer tacker (if available) with thin nails or staples in order to secure these two pieces together using as few nails as possible