This article is about how to build a remote control car from scratch. There are so many kinds of RCC that some models look like real car. They can be radio-control vehicles, electric vehicles, gas and hybrid vehicles, even solar-powered ones. Building a remote control car with carton is also possible.
In this easy to follow guide I’m going to show you how to build a remote control car from scratch. You’ll find everything you need to know about all the parts & materials required, and a step by step guide on how to build the car in your home for less than $30. Plus at the end of the article, I’ll share with you my secret drag racing technique that can help you improve your car’s acceleration by more than 30%.

How to build a remote control car
The first step to building a remote control car is to gather all of the parts. You will need an engine, wheels, axles and frame. A remote control unit is also needed to allow you to control the speed and direction of your vehicle.
Once you have all of these parts, you can begin building your remote control car. The first step is to attach the wheels to the axles using nuts and bolts. Next, attach one end of each axle to either side of your remote control unit. The motor should be placed on one side while the battery box goes on the other side. This ensures that both sides are evenly balanced when driving and steering.
The next step is attaching the steering system to your remote control car. This usually consists of two rods connected by two joints at each end that allow for 360-degree rotation in either direction. Connecting these pieces together will allow you to steer your car left or right by moving one rod up or down while keeping it straight by pulling on both ends simultaneously or pushing both ends down simultaneously depending on which way you want it to go
How to build a remote control car from scratch
If you want to build a remote control car from scratch, you will need the following materials:
-A wooden frame. This can be made by using a saw and hammer. Make sure that it is strong enough to support your weight and withstand collisions with other objects.
-A motor. You can find these in any hardware store or online store such as Amazon.com. The type of motor that you need depends on the type of car you are building. The most common types are brushed DC motors and brushless DC motors.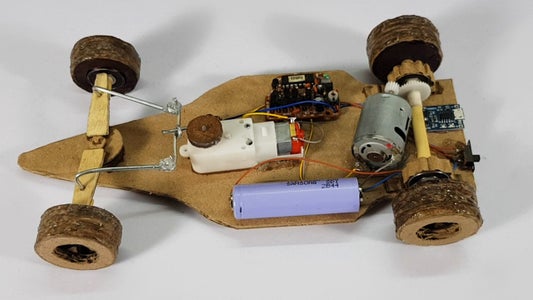
Build Your Own Remote Control Cars
Building your own remote control car can be a fun project for the whole family, and the best part is that you don’t need any special tools or skills. Here are some ideas to get you started:
1. A simple remote control car can be made from an old toy car and a small electric motor. These motors usually come with a gearbox attached, so all you need to do is attach it to your existing toy car with some glue and stick on some wheels!
2. If you want to go further than this, try building your own remote control car from scratch using cardboard or wood. This way you’ll be able to design it exactly how you want it and see how much fun it is to drive!
There are many different types of remote control cars out there, and you can even buy them ready-made. But if you’re looking for a project that will give you some satisfaction, then building your own RC car can be a great way to spend some time. Here’s how to build a remote control car from scratch.
Parts:
You’ll need several parts to build your own RC car:
1. Transmitter – This is the device that sends signals to the receiver on the car so that it knows what to do. There are two types of transmitters: analog and digital. Analog transmitters send signals by varying the voltage over time, while digital transmitters send signals by encoding them with pulses of light. Digital transmitters tend to be more expensive than analog ones and require more complex circuitry, but they are also more powerful, easier to program and have longer range than analog devices. If you want to build your own RC vehicle as cheaply as possible, get an analog transmitter; otherwise get a digital one.
2. Receiver – The receiver receives signals from the transmitter and uses them to control various functions on the vehicle such as steering or throttle speed
1. Get the parts for your car. There are many different models of cars, but most of them use the same basic parts. The parts you need to build a car include:
A. Motor – This is the part that makes your car go. It’s usually powered by batteries and has two wires coming out of it – one is positive and one is negative. If you touch these wires together with your other hand, you will feel a sharp shock! That’s how powerful they are!
B. Transmission – The transmission controls how fast your car goes forward or backward by controlling how fast the motor spins around. Your car probably has a 2-speed transmission so that it can go faster than normal when you want it to (like when racing another RC car). The transmission has gears inside that connect to the motor’s shaft and spin it around at different speeds depending on what gear you put on there (low gear=fast speed).
C. Differential – The differential allows for both wheels on each side of the car to spin at different speeds when turning corners so that both tires don’t have to turn at exactly the same time (this would cause friction between them). The differential simply
The first step to building your own remote control car is deciding which type of car you want. Once you have decided, there are many different ways to build a remote control car. The most common way is with a kit that you can buy online or at a hobby store. These kits contain all the parts needed for building a car and include instructions on how to put it together.
Another option is to buy an assembled car and disassemble it so you can put in your own parts. This can cut down on costs but requires some knowledge about electronics and mechanics, as well as time and patience. If you do decide to go this route, make sure you know what kind of battery pack, motor and other parts are needed so that they match up with your old ones or those included in the kit.
The last option is to build your own remote control car from scratch using cardboard boxes, tape and glue. This method requires very little skill but produces a less expensive result than buying a kit or buying an assembled car that’s been taken apart by someone else.
You can build a remote control car from scratch. It will require patience, time and some mechanical skills. This article will guide you through the process of building a remote control car from scratch.
Step 1: Make the Body
The body of the remote control car is made up of a large rectangular piece of cardboard. The size of this piece depends on the size of your vehicle. You should make sure that it is big enough to accommodate all the other components as well.
The next step is to cut out a hole for mounting the wheels. You can use a utility knife or an electric saw for this purpose. Once you have completed this task, it is time to make holes where the battery holder and receiver will be placed later on in this project.
Once these holes are made, it is time to attach them together using glue or tape. You can also use pins or staples if required but make sure that they are not too long as they might puncture through the other side of your vehicle’s body when you begin driving it around!
If you’d like to make your own remote control car, you can use some cardboard and some other materials.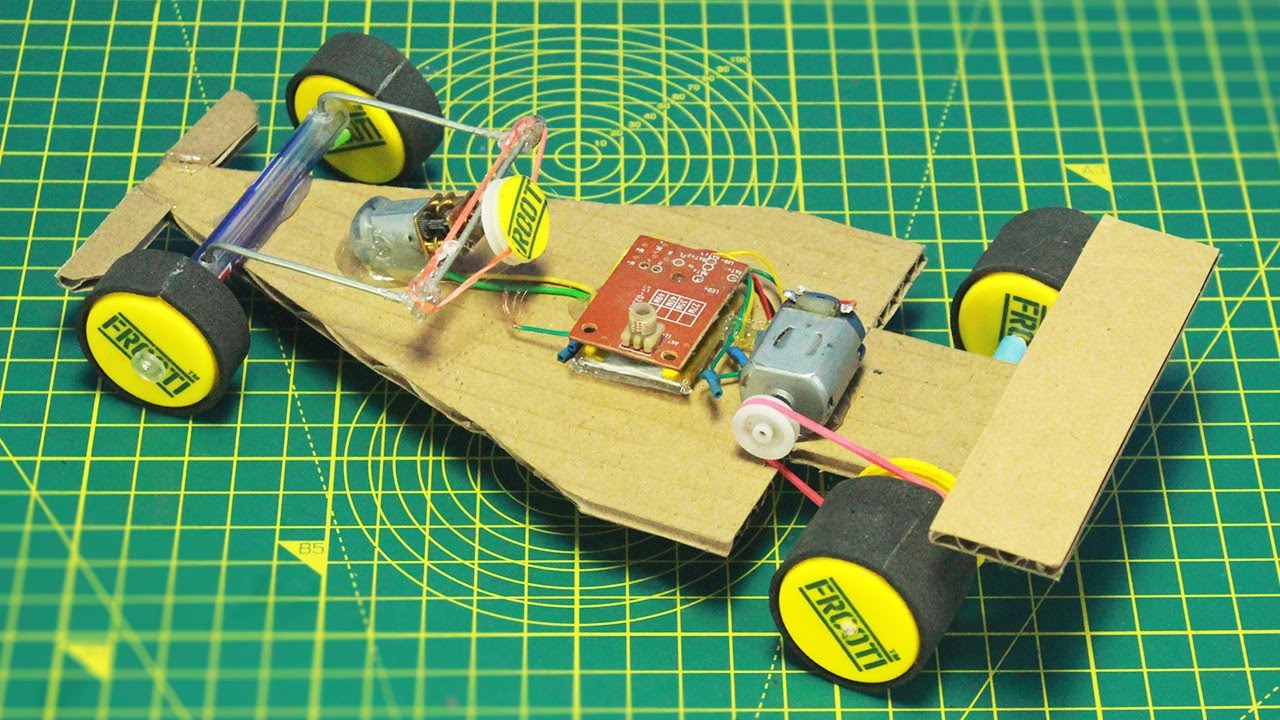
The first thing you need to do is find a big piece of cardboard. The size depends on how big or small you want your car to be. You also need an old remote control car (or one that no longer works) and scissors.
Cut out the shape of your car with the piece of cardboard. If you have a box cutter or other sharp tool, you can use it instead of scissors. If you want to make more than one car, cut out several pieces at once so they’re all exactly the same size and shape.
Decide where on each piece of cardboard you want to put buttons for controls, such as forward and backward motion and turning right or left. Use pencil marks so they don’t fade away in time.
Cut holes in different places around your car for buttons, such as one for each direction and another for turning on/off both motors together (or separately). Some people also add lights or sound effects to their cars by putting them through holes in the bodywork too!
Put batteries into both motors from an old remote control car (or buy new ones if needed). Make sure
If you are looking to build a remote control car from scratch, then this article will show you how to do it. This is by far the most popular project that I have ever posted on my website. If you are interested in building your own RC car, then you have come to the right place.
The basic components needed include:
1) A chassis (a base)
2) A motor (the power source)
3) A battery pack (the energy storage device)
4) A speed controller (the brain of the system which regulates power output based on user input)
5) Wheels and tires (for driving and steering)
The remote control car is a toy car that can be remotely controlled by an operator. The operator usually uses a hand-held device to send signals to the car. The signals are used to control such functions as turning, acceleration and braking.
Remote control cars are available in a variety of sizes and styles, each intended for different purposes and different age groups of children. They can be powered by batteries or gasoline, and some may run on both types of fuel.
The first remote control cars were developed in the late 1920s by Nikola Tesla who was trying to create an electric tractor for use on farms. This concept was abandoned when he found that it would be too expensive to build such a device. In 1935, the Radio Control Toy Company invented the first fully functional radio controlled car, which they called “Little Red Wagon”.