Building a ramp on your shed is actually something you can do yourself. The variety of tools and materials needed for the ramp are easily available and can make construction fast and economical.
Building a ramp on a shed is a simple yet challenging project, on paper. You’ll need to collect the correct tools, find the time and save money for the project. All of it can seem a little overwhelming. This article will break down your project into manageable steps;how to build a ramp on a shed,how to build a ramp for a shed on uneven ground,making a ramp for a shed and how to build a ramp to a storage shed.

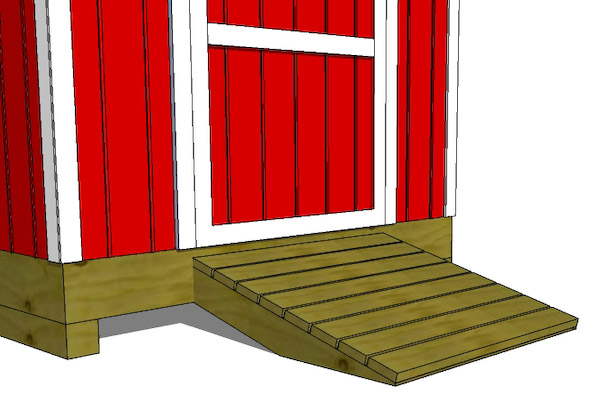
How to build a ramp on a shed
The first step in building a ramp for your shed is to determine the angle of the rise. You can do this with a level or a carpenter’s level. Try to make it as flat as possible, but be sure that the rise is not so steep that it could cause injury to anyone using it.
The next step is to build the frame of your ramp. Use pressure-treated lumber for best results and make sure that you follow all safety guidelines when cutting these boards with a circular saw.
Once you have built your frame, attach it to the ground with concrete blocks and framing anchors so that it can’t move around while people are using it.
Next, lay down some plastic sheeting (this will catch any debris from falling off the sides) and cover this with gravel or crushed rock for traction. If you don’t have crushed rock available, use sand instead; however, sand may not be as safe for people with mobility issues because they may slip on it more easily than on gravel or crushed rock).
You may also want to put down some kind of padding underneath your ramp if you think there might be moisture underneath where your ramp meets the ground.

how to build a ramp for a shed on uneven ground
If you’re storing items in your shed, you probably want to make it as easy as possible for people to get inside. That’s where a ramp comes in. A ramp can be built from various materials, including wood and metal. In this article, we’ll go over how to build a ramp for a shed on uneven ground.
Step 1: Build the Frame
The first step is to build the frame for the ramp. You can use any type of wood for this part (we used pressure-treated lumber). It should be constructed using 2x4s or 2x6s depending on how steep the slope is that your ramp will be going up and down.
If your slope isn’t too severe (less than 10 degrees) then you can use pressure treated lumber without having to worry about it rotting or splitting under pressure. If it’s more extreme than this then you may want to consider using cedar instead of pressure treated lumber (which tends to split easier).
If you have access to heavier duty brackets that can support larger loads then you might want to consider using those instead of just standard brackets if you have them available.
making a ramp for a shed
The most common type of ramp for a shed is the one that is made from wood. While it may seem like the easiest option due to the fact that you can use screws and nails, it actually requires more work than other options.
A wooden ramp requires plywood or wooden decking to be placed on top of the ground. The problem with this type is that it will wear down over time and may need to be replaced sooner than later.
Another problem with wooden ramps is that they are not very strong, which means that they cannot hold much weight at all. If you add too much weight to them, they will break and fall apart quickly.
Concrete Ramps
Concrete ramps are one of the best options available because they can withstand heavy loads without any problems at all. They also last much longer than wood or metal ramps, so they don’t need replacing as often as other types do.
Concrete ramps are great for sheds with uneven ground because they don’t slip or slide anywhere when there is moisture on them after rainstorms or snowfall has occurred during winter months in your area. Concrete also lasts longer than other types of materials used for ramps because it doesn’t degrade over time.

how to build a ramp to a storage shed
A shed ramp helps you get your lawnmower or other tools in and out of the shed, and it makes it easier to move heavy items like bags of sand or fertilizer. The ramp is also useful if you have a lawn mower that uses a pull start instead of an electric starter. The slope on the ramp allows you to start the mower from near the ground, instead of having to bend over to start it from behind the shed.
Step 1 – Plan Your Ramp
Before starting construction, sketch out your plans for a shed ramp on paper. Decide how steep the incline will be and how wide it needs to be for safe use. Measure the distance from the center of your door opening all the way down to where you want your ramp to begin, then add another 3 feet for each side. This will ensure that you have enough room for maneuvering when using your mower or other equipment.
Step 2 – Prepare Your Site
Before building anything, make sure that you have leveled ground where you want your shed and its accompanying ramp built. Use stakes pounded into the ground at various points around your proposed site as reference points while leveling with long wooden boards placed across.
A shed ramp is a simple addition that can make your life much easier. Whether you’re moving heavy items or just want to get in and out of the shed more easily, this project will be done in no time at all, and you’ll be grateful for it every time you use it.
First, take measurements from the ground to the top of your door. Then measure from one side of your door to the other and subtract half of that measurement from the first one. This will give you your length for both sides of your ramp. For example, if your door is 4 feet high, subtract 2 feet from 4 feet to get 2 feet for each side of your ramp.
Next, measure across and add half of your total length to each side measurement (remembering to subtract 1 foot if you’re building on uneven ground). This will give you how wide each side should be. In our example above, we have a total length of 8 feet (2 ft + 6 ft) which means we want to build ramps that are 6 feet wide on each side. Now measure up from each corner along each wall at least 1 foot and mark where our first post should go (see illustration).