In this project we are going to explore building a popsicle stick bridge that can hold more than 20 pounds using an easy-to-follow design. The following is a list of what you will need:
Have you ever built a popsicle stick bridge outside? I had some time over my Spring Break and decided to build a popsicle stick bridge. Most people probably wouldn’t think this would be that much of a challenge but when the stakes are high — how deep is that pool and how much dip do I need to dunk like the world’s greatest frog — making it structurally sound is much harder than you think!
How to build a popsicle stick bridge that can hold 200 pounds
The “Popsicle Stick Bridge Challenge” is a test of engineering skills that was created by an elementary school teacher and his students. It involves building a bridge out of Popsicle sticks that can hold the weight of an adult without collapsing.
The challenge is to build a bridge with popsicle sticks, without using glue or other adhesives, that can hold at least 900 pounds (408 kg) before breaking. The test is not just about how many Popsicle sticks you use but also how you place them together to form the structure.
This is a very popular challenge among engineering students because it allows them to show off their skills in design and construction while having fun at the same time. The test has become popular among teachers who give it as an assignment to their students so they can see what they have learned from class and apply it in real life situations.
Here’s how to build a popsicle stick bridge that can hold up to 200 pounds. The challenge is to build a bridge using only 18 popsicle sticks and some glue, without using any other materials.
Build the base of your bridge by connecting three sticks together at one end, then laying them out on the table as shown in the diagram above. Next, take three more sticks and connect them at one end so that they fit into the holes between the first set of three sticks. You should now have two sets of four sticks connected together at each end (see diagram).
Add another three sticks to each side so that there are now five sets of four sticks connected together at each end. Add another layer of three sticks to each side so that there are now six sets of four sticks connected together at each end. Finally, add one more layer of three sticks on each side and connect them together with glue or tape.
Your bridge should look like this:
The popsicle stick bridge challenge is a fun way to learn about engineering and physics. In this activity, students must build a bridge using only popsicle sticks and masking tape. The goal is to make a sturdy structure that can support as much weight as possible without breaking.
The first step in this activity is to gather materials. You will need:
Popsicle sticks (you can get these from any craft store)
Masking tape (or something similar like painter’s tape)
A flat surface or table top
Once you have gathered all of your materials, you are ready to begin constructing your bridge! To start, lay out your popsicle sticks in two rows directly on top of each other so that they form a rectangle shape. Make sure that there are no gaps between the rows. Next, take four more popsicle sticks and lay them across the top of the first row so that they are perpendicular to it. These will act as support beams for our bridge. Finally, take another four popsicle sticks and lay them across both rows at right angles (like an “X”) so that they connect with both support beams at once. This creates a truss system which will hold up our bridge!
Materials:
100 popsicle sticks (or more)
Tools:
saw, ruler, tape measure
To make this project you will need to download and print the PDF template. The template will show you exactly where to cut your wood.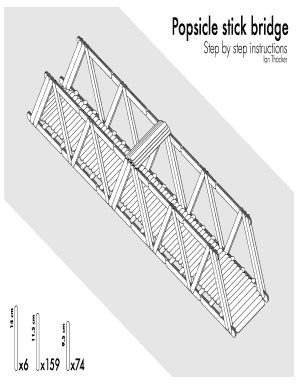
Step 1 – Cut all of your wood down so that it is about 5 inches long. You should have about 100 pieces total when you are done cutting. All of these pieces should be the same size and shape. If they aren’t then use some sandpaper or a file to make them all smooth and round. If they are still too rough then use some sandpaper or a file to make them all smooth and round. Once they are all smooth take a piece of sandpaper or a file and round off the ends of each side so that they look like little pyramids. Then take your ruler and mark off 1 inch from the bottom edge of each piece of wood so that there is about ¼ inch of space between each pyramid shaped piece.
Step 2 – Now take your ruler and measure out 4½ inches from one end of each piece of wood and make another mark on both
The bridge should be at least 10 inches long and have at least one foot of clearance on each side. The bridge should be able to support at least 100 pounds.
The bridge must be built without glue or tape, and it must break when a weight is placed on it.
If you are planning to build a permanent bridge, then you should also be prepared to take measurements and design a scale drawing of your completed project.