When we think about paths, the mind usually conjure up a horizontal or vertical line. However, the reality is that a path can be almost any shape and can be even curved. No, I’m not talking about circles (which are actually ellipses), but an S-shaped curve or a wave-like, undulating line can both be regarded as a Path.
How to build a path on a slope One of a key elements of an outdoor landscape is the path. Pathways made of stone, flagstone, asphalt or concrete can add a touch of class and elegance to any lawn or garden area. Determination and planning will lead you to successfully designing new pathways for your garden or yard.
How to build a path on a slope
It’s not easy to build a path on a sloping area. The slope makes it difficult to get the right height and grade, but with some planning and preparation, you can build a walkway that’s safe and attractive.
The first step is to decide whether you want a gravel path or a concrete walkway. Gravel paths are less expensive than concrete ones, but concrete is more durable and easier to maintain over time.
Gravel Paths
If you’re building a gravel path, start by laying out the stones in rows with enough room for them to settle into place without being disturbed by foot traffic or rainwater runoff. This means leaving at least 2 inches between rows. You also need enough space between rows so that people can pass each other without tripping over rocks or stepping on them accidentally while they’re walking down the slope. The best way to figure out how much space you need is to simply try walking on loose gravel in your yard until it feels comfortable for everyone who wants to use the path regularly.
When you have your rows laid out and separated by enough space, it’s time to start filling in the gaps between them with more gravel until everything is level enough for foot traffic again (see Reference 1).
When it comes to building a path on a slope, there are many options available to you. The most common walkways are made from concrete and brick, but these can be expensive and difficult to install.
The most popular choices for walkway materials are:
Wood – Wood is easy to work with and is relatively inexpensive. Because it is prone to rotting, wood needs regular maintenance.
Stone – Stone is another popular choice because of its durability. It’s also fairly easy to install, although it can be quite expensive if you want something that will last a long time.
Gravel – Gravel is an affordable option for creating access paths in your yard or garden. It’s also very easy to install and maintain, but it won’t last as long as other surfaces would.
A sloped walkway can be built using a number of materials, including concrete, stone or pavers. The choice of material depends on your budget and the look you want to achieve.
1) Concrete Sloped Walkway
A concrete path on a slope is ideal for areas that are subject to heavy traffic, such as parks and playgrounds. Concrete paths are also easy to clean and maintain. If you plan to build a concrete path on a slope, make sure the surface is level before pouring the concrete. You can make it level by laying out bricks or stones along the path before pouring the concrete.
2) Wooden Sloped Walkway
Wooden walkways are also known as wooden boardwalks or boardwalks. These types of paths usually consist of wooden planks placed side by side with gaps between each plank so that people can see through them while they are walking. This type of walkway is ideal for landscaped areas where people are expected to walk through grass or other plants because it lets them see through it without damaging the plants underneath it
If you’re looking to build a path that leads from one level to another, you’re probably thinking of a flat or slightly sloped area. But what if your yard is on a hill? Don’t worry — you don’t have to abandon your dream of a beautiful walkway just because the ground isn’t level!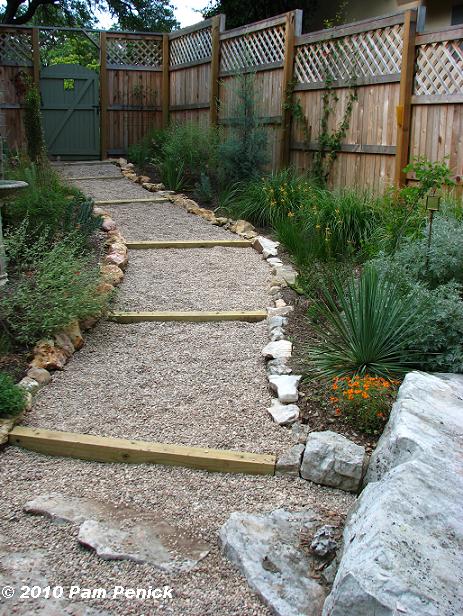
Here are some tips for building paths on hills:
1. Start with a plan. Before you start digging and building, draw up plans for your path so that it will be built on a slope. This can help prevent slumping and cracking in the future by keeping the slope of the path consistent throughout.
2. Use materials with good drainage properties. If you want to avoid creating mud holes, use materials with good drainage properties like crushed stone or gravel that won’t hold water after rainstorms or snow melts.
3. Lay down 1-foot-wide boards at intervals along the length of your path. These will provide support for your gravel while also making sure it doesn’t slide too far down in between them during rainstorms or heavy winds (which can cause erosion). You’ll need about 10 boards per 100 square feet of path — so if
There are several ways to build a path on a steep slope. The first thing you need to do is determine the amount of slope you have. This will help you decide how much soil you will need and where it needs to be placed.

The next step is deciding how wide you want your walkway to be, as well as how long it will be. If you’re building a straight section of path that leads into a garden or around the side of your house, this is fairly easy to do. However, if you want to add curves or corners into your design, there are some things that you’ll need to keep in mind.
First, remember that any curve will have an inside radius and an outside radius. For example, if you wanted a 180-degree turn at the end of your walkway, then both sides would have an equal radius (90 degrees) with respect to each other (see diagram).
Second, when deciding what size radius you want for curves or corners in your design, keep in mind that the wider they are, the more difficult they will be to build and maintain over time. You may also need additional support beams if the curve gets too wide and could collapse under its own weight due