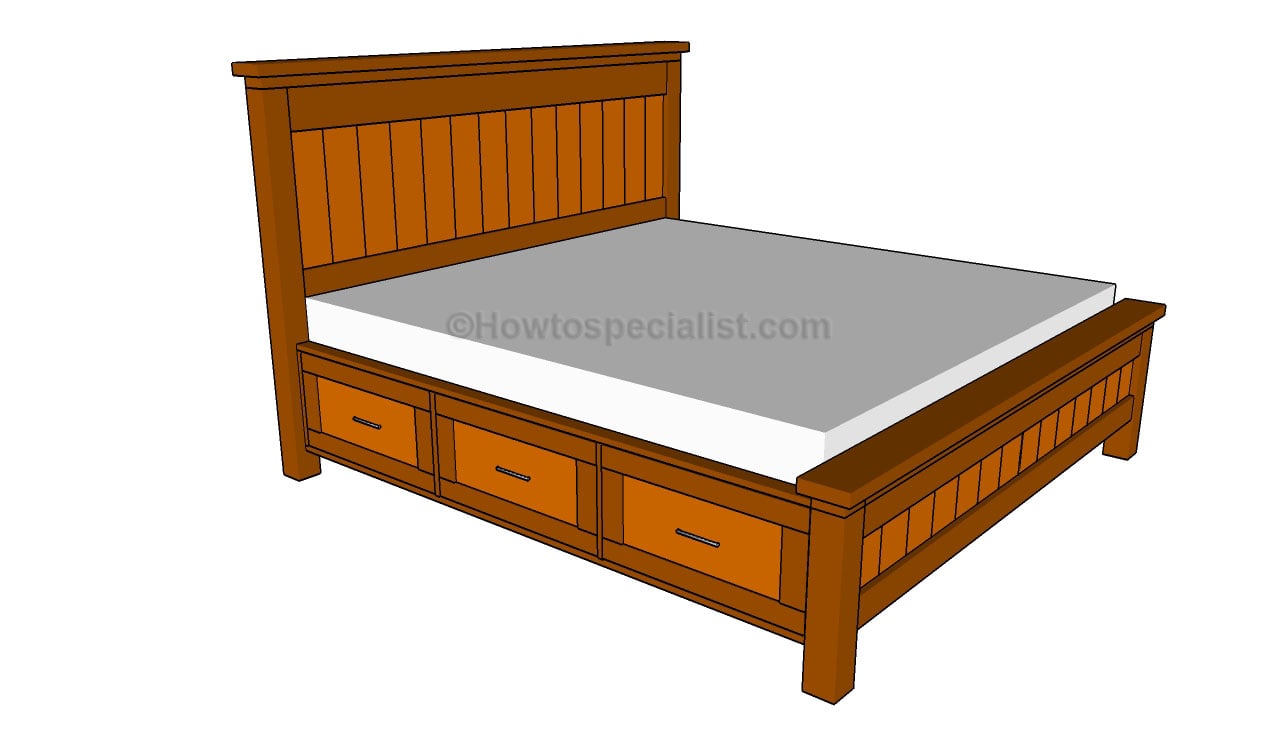
I am going to show you how to make a DIY deck platform bed with drawers. This is an easy weekend project that could also be used for storage or kids playhouse. You will have a unique place to sleep, read, and store your stuff. This is a DIY project that will look professionally done and is perfect for any home.
Unlike a traditional boat, which has a keel and rudder that assist the vessel in maintaining its position while moored, a houseboat is free to move about on the water. Aside from providing space for sleeping and basic maintenance, houseboats can also be equipped with modern amenities.
how to build a full size platform deck with drawers
Searching for a cheap diy platform deck? Here is the right place. Find out how to make a full size platform deck with drawers, how to build a platform deck with storage, and how to build a platform deck frame with storage.
I have been thinking about building one of those cheap diy platform decks for some time now. It would be really convenient if I could store my tools and other items on it, so that I don’t always have to keep them inside the house.
I also wanted something that would look nice in our backyard. This DIY project turned out great! My husband did most of the work himself (he is quite handy), but I helped out as well with some small tasks like sanding and painting.
Here are some photos from our finished product:
The platform deck with drawers is a great idea for a large deck. The deck can be built with a carpenter’s level or laser level to ensure it is straight and square. This will make the deck last longer, look better and reduce the amount of maintenance required.
One of the biggest benefits of this type of deck is that it takes up less space than other types of decks. You won’t need any railings or posts because there are no stairs involved. This can save you money on materials and labor costs too.
To build your own platform deck with storage, follow these steps:
1) Secure your platform frame to the ground using concrete blocks or cinderblocks. Make sure that you have enough blocks for each leg of the frame so that they are solid and cannot move around when stepped on.
2) Measure where your drawers will go and mark each spot with pencil so that you know where to drill holes for their installation later on in the project.
3) Install your drawers into place once they arrive at your house via UPS or FedEx delivery service (if using pre-built drawers).
DIY Platform Deck with Drawers
This is a great project for anyone who wants to add some storage to their deck while also adding privacy. Building this deck was fairly simple and I was able to finish it in a couple of days. The hardest part was cutting the boards to length and making sure they were level with each other. If you don’t have a table saw, you can use a circular saw or miter saw (or even an old fashioned handsaw). The planks are pressure treated wood so they should last for many years without rotting away in the weather.
Step 1: Materials Needed for DIY Platform Deck
Materials Needed:
2x4s – 10′ long (milled lumber) – 11 pieces total (6 will be cut into 2x2s)
1×6 – 8′ long (milled lumber) – 7 pieces total (6 will be cut into 1x2s)
1×3 – 8′ long (milled lumber) – 6 pieces total (6 will be cut into 1x1s)
1×4 – 8′ long (milled lumber) – 3 pieces total (2 will be cut into 1x2s)
With a little planning and creativity, you can build a deck platform with storage. The key to building this type of deck is to use pressure-treated lumber, which will last longer than other types of wood. The frame of the deck should be made from 2x6s and 2x8s, while the top should be made from 2x4s.
Cut the Top Frame
The first step in building this type of deck is to cut the 4×4 posts down so that they are 4 feet long. Attach them together using a post jack and nails or screws, then attach them to the 4×6 joist hangers on top of the ledger board. The joist hangers allow you to secure the joists to the ledger board without having to drill into it.
Measure and mark where your top beams will go on each side of your ledger board. They should extend down from each end about 5 inches below where your joists will be connected; this will give you a place for attaching your joists later on when you’re ready for them. Cut two more tops out of 4×4 posts, measuring as needed so that they fit between your existing tops without touching them or any other part of the structure
How to Build a Platform Deck: A DIY Guide
The platform deck is a great choice for any garden, deck or patio. It’s easy to build, affordable and can be customized to suit your needs.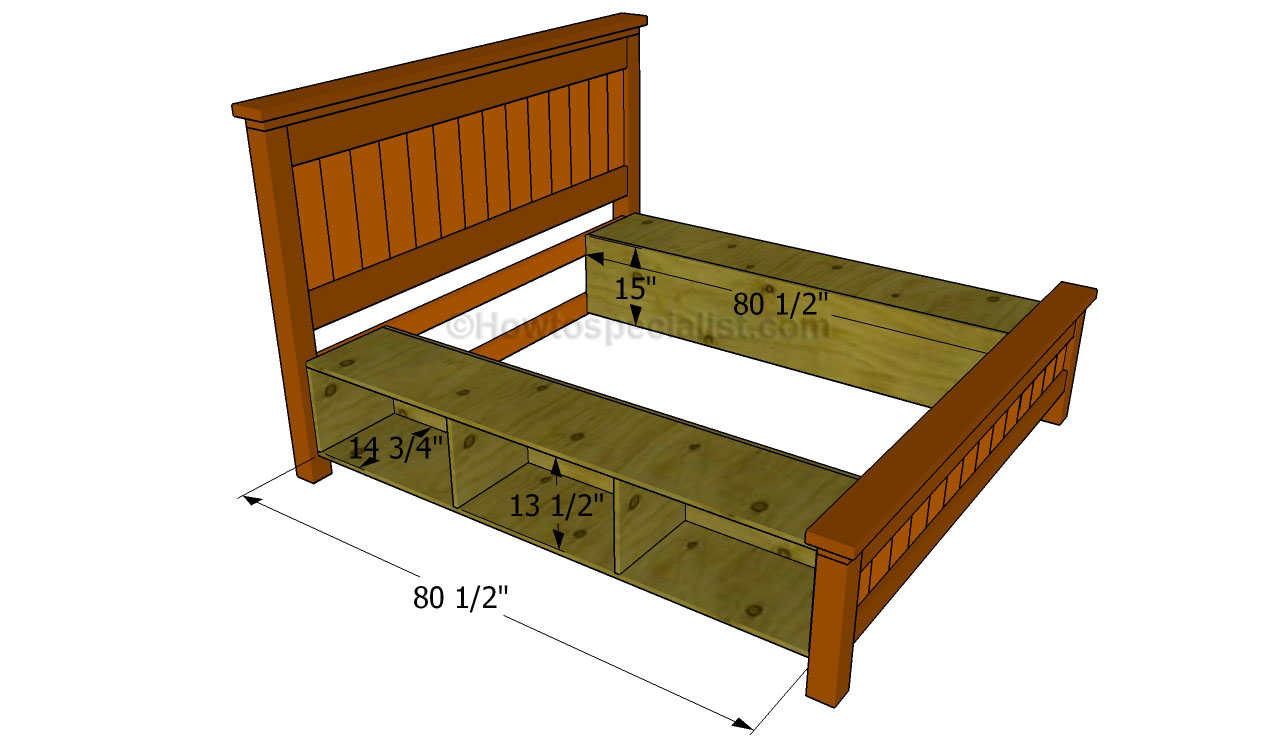
Start by laying out your deck plans on the ground. Be sure to check with your local building department for any requirements or limitations on size or placement of your deck before you begin construction.
If you’re building in an area with high winds, you may need to install cross bracing at intervals along the length of the joists. This will help stabilize them against swaying forces from wind gusts. If you’re building in an area prone to earthquakes or other seismic activity, you’ll also want to consider installing post-to-beam connections so that each post supports two beams instead of just one (for more information on this type of connection see How to Install Post-to-Beam Connections).
Next, position your treated 2×6 joists across the width of your deck area between posts according to your plan layout (see Measure Your Di