This project is about building a freestanding loft bed. The blog is part of the To Build a Loft Bed series that guides you through all stages of project: planning, measuring, shopping, and building a loft bed.
Are you one of those parents that have tried to convert a conventional bed into a loft-bed? The kind where you just lift up the mattresses instead of building anything else underneath? In my experience, I’ve found this required improvising on my part. I’ve actually assembled a freestanding loft bed using no additional frames or supports. It’s like a half-loft bed in some sense — and it feels extremely sturdy. No jostling around when your child jumps onto it!
how to build a freestanding loft bed
Loft beds are a great way to add storage and space to your home. They can also be used as a guest bed or even as an area for kids to play and read.
Here are five easy DIY loft bed ideas that you can make at home:
Loft Bed With Staircase
This loft bed with staircase is the perfect solution if you have a small room but need extra storage space. The stairs make it easy for kids to get up in the morning and go right back down when they’re done — no climbing over the side railings required!
Loft Bed With Pull-Out Desk
If you have a teen who needs their own space, this pull-out desk is ideal. It provides ample storage underneath, making it easy for them to keep their room clean. You can also add a desk lamp so they’ll have plenty of light when studying late at night!
Lofts are great for small spaces because they can be built to fit anywhere. The key is to build one that’s sturdy and safe. Here’s how to do it.
How to Build a Loft Bed With Stairs
If you want your loft bed to have stairs, here’s how to make sure they’re sturdy enough for climbing.
Step 1: Make Your Bed Frame
The first thing you’ll need is a bed frame that can support both the mattress and the weight of anyone climbing up or down the ladder. The easiest way to do this is by using a metal frame that has crossbars at each corner for attaching rails for extra support. You can also purchase an extra set of legs for your existing platform bed if you want a sturdier structure overall — this will make it easier to attach stair parts later on.
Step 2: Attach Crossbars To The Frame
Cut two pieces of 2×4 lumber into lengths equal to half the length of each crossbar on your frame (so they’ll fit between them). Use wood glue and nails or screws to secure them in place so they’ll be able to hold up plenty of weight while still allowing room for movement up or down the ladder. You may also want
Building a loft bed is a great way to make the most of a small room. It can be useful for homes with kids, dorms and even offices. They’re also easy to build, even if you haven’t done any woodworking before.
Step 1: Plan Your Bed Size
The first step in building your loft bed is deciding on the size. The ideal height for a loft bed is between 6 and 10 feet high, but you can go as high as 12 feet if needed. The length will depend on how much space you have available in your bedroom or office. You can easily use the plans provided here as a guide for your own design.
Step 2: Make Your Frame
The next step is making the frame for your loft bed from 2x4s or 2x6s. These are inexpensive woods that are easy to work with and will hold up well over time without becoming too heavy for the structure of your bed. Cut all of your boards at 3 inches wide so that they fit together snugly when placed next to one another in an alternating fashion (like bricks).
Step 3: Attach Your Ladder
Find where you want your ladder to go and mark out where it will be attached onto either
If you’re looking for a way to give your kids a cool place to hang out, then a loft bed is the perfect solution. It’s also a great space-saver that can give you more room in your home’s interior.
With some basic carpentry skills and know-how, you can build your own loft bed for your kids or yourself (depending on the size). This article will help you get started with all the steps involved in making one yourself.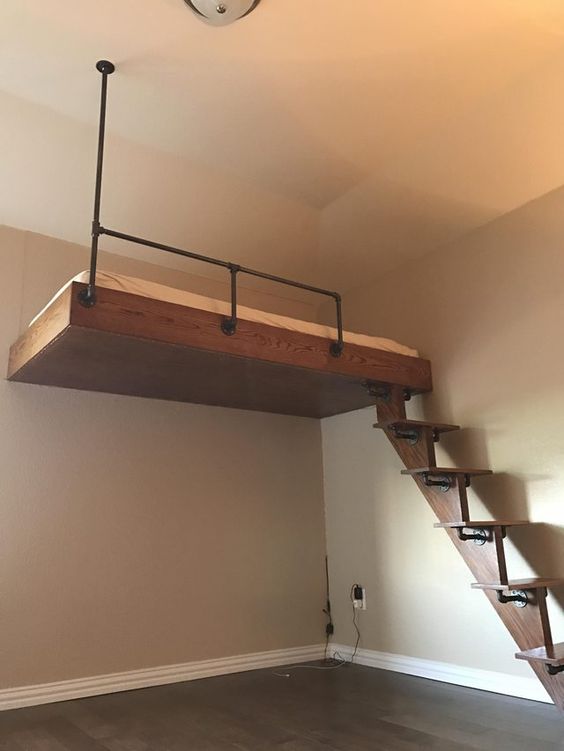
Building A Freestanding Loft Bed
A freestanding loft bed is one that doesn’t need to be attached to any wall. These beds usually have either stairs or ladder steps that allow access to the top bunk from below.
A freestanding loft bed is similar to an ordinary bunk bed but without the legs at the bottom or side rails to support it. Instead, it uses wall mounts as its base — this makes it possible for it to stand upright without leaning against anything else.
If you’re looking for a cool space-saving bed for your child’s room, then a loft bed is the perfect solution. It can be used as a space saver, as well as a place for your children to play and sleep at night.
Here are some simple steps to follow when building your own loft bed:
1. Determine the size of your loft bed frame and design how high you want it to be.
2. Use plywood or particleboard for the base of your loft bed and cut it out to match the size of your mattress. Attach legs to each corner of this piece of plywood so that they can support the weight of the mattress and other items placed on top of it (such as pillows).
3. Make sure that your mattress fits inside this frame by placing it on top of it and measuring its width, length, and thickness with a tape measure or ruler (or both). Also make sure that there is enough space between the edge of the mattress and any posts or rails in order for them not to interfere with each other when you’re trying to climb up into bed at night!
4. Build supports for the upper part of your lofted bed by attaching 2x4s onto each