A freestanding patio can be a wonderful addition to your home. Installing one gives you more living space to entertain friends and family, as well as enjoy quiet time alone. But there are many options to choose from and finding the patio that’s right for you can seem overwhelming.
Have you ever wanted to add more outdoor living space to your home? Covered patios are a great way to do this and can be used as an outdoor kitchen, wine cellar, how to build a patio cover step by step how to build an a frame patio cover how to build a freestanding patio cover with a corrugated metal roof game room and even a place where you can grow your own herbs and vegetables.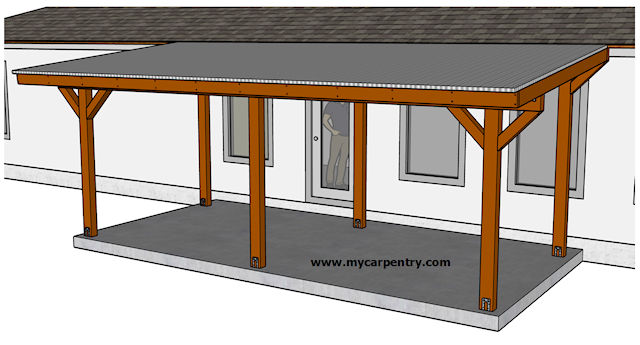
how to build a freestanding covered patio
This is a guide about building a freestanding patio cover with a corrugated metal roof. A freestanding patio cover is a great way to add extra living space to your home. It can also provide an attractive sheltered area for entertaining or relaxing.
The basic structure of the patio cover is a simple A-frame shape, but you can make it more attractive by adding decorative trim and making sure that all joints are tight and weatherproof.
A freestanding patio cover can be built almost anywhere on your property, even if there are no trees nearby. It’s also easy to move if you decide to relocate it later.
Materials needed:
6-foot 2x4s (2)
8-foot 2x4s (2)
12-foot 2x4s (4)
4-foot 2x4s (4)
3/4″-thick plywood sheets (3)
A freestanding patio cover can be a great addition to your home. You might want to build one for additional living space, or to provide shade and shelter from the elements.
While there are many different ways to build a patio cover, the easiest way is to start with an A-frame design. This type of structure is fairly simple to build and requires minimal materials.
This guide will show you how to build a freestanding covered patio using an A-frame design.
Before You Build Your Patio Cover
Before you start construction, make sure that you have all of the necessary tools and materials on hand. You’ll also need some basic information about the area where you plan on building your patio cover. This includes:
The square footage of the area where you plan on building your patio cover (and any trees or other obstructions nearby)
The height at which you want your overhang (usually 12 inches or so)
The distance between posts (usually 6 feet apart)
This article will give you the information you need to build a freestanding patio cover. You can use this to create an attractive outdoor space that’s perfect for entertaining.
Step 1: Materials
The first thing you’ll need is your materials list. This will include all of the lumber, screws, nails and other hardware you’ll need to build the structure. You’ll also need concrete blocks or cinder blocks for the foundation of your patio cover.
Step 2: Measure and Mark Your Foundation
Use a measuring tape to measure out how far apart each of your concrete blocks should be placed. Then use chalk or a pencil to mark where each block should go. Make sure you have enough room for drainage so make sure that there isn’t any standing water around your patio cover when it rains!
Step 3: Digging for Foundations
Once you’ve measured out where each block should go, it’s time to dig holes for them! Using a shovel, dig deep enough so that there is about 4 inches (10 centimeters) between the ground level and where the block will sit in its hole. Make sure that the hole is big enough for both sides of the block to fit in without overlapping on top of one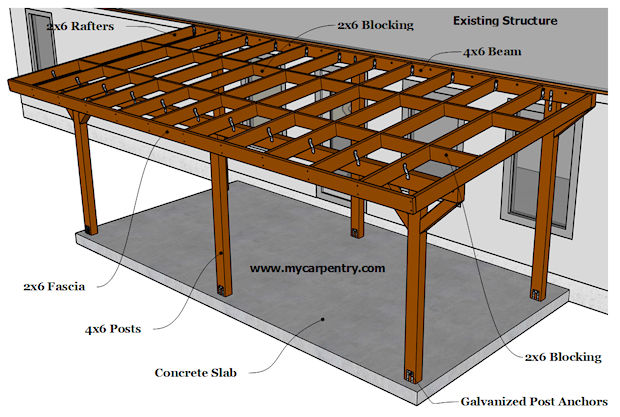
Building a freestanding patio cover is a great way to extend your outdoor living space. The space can be used as a quiet reading area, a spot for morning coffee or afternoon cocktails, and it’s also an ideal spot for entertaining guests. If you have a small patio, consider building a freestanding covered patio attached to the house.
Building a freestanding covered patio requires some basic carpentry skills and some additional tools. If you want to build this type of structure, start by measuring your patio area and determine how much material will be needed. Then gather all the materials and tools you will need to complete the project before starting construction.
Step 1: Assemble Materials
Measure the dimensions of your desired structure and add at least 2 inches around all sides for additional support. Cut two 4×4 posts that are at least 6 feet long (or longer if desired). Cut two 4x4s into 8-foot lengths for the sides of the structure; these pieces should be cut from 2×6 lumber if available instead of using standard 4x4s. Cut another 8-foot piece from 2×6 lumber for the top rail on one side; cut another piece from 2×4 lumber for the top rail on the other side (this piece does
How to Build a Freestanding Covered Patio
A freestanding covered patio can be built in an afternoon with basic carpentry tools. It’s a great way to extend your living space and add more shade and protection from the elements.
1 Build the frame of your patio cover using 2x4s or 2x6s, depending on the size of your patio cover. The frame should be no less than 4 feet wide, so you will need at least eight 2x4s or two 2x6s for each side of your patio cover. To create a square patio cover, use four 2x4s or two 2x6s for each corner post.
2 Nail one end of each board into each post at the outside edge of the post. Make sure that all boards are level with each other before nailing in place. If any boards are uneven after nailing in place, use a hammer and chisel to knock off excess wood until they’re level with one another again.
3 Place two more boards across the top edge of each corner post so that they meet in the middle without overlapping (see Resources). Then nail them into place using nails every 16 inches along both sides of the boards so you have something solid to