
Building a form in excel is easy. All you need to do is add fields where you want them, collect input from your users, send that data to an email address, and then download the entries as CSV for analysis, or directly upload data into a spreadsheet. A lot of people use forms, because it’s the most convenient way to capture information and communicate with your leads. Forms also save you time, because you can capture quotes right within your account instead of having to manually type or copy/paste it into an email or spreadsheet.
Have you ever tried finding information on how to build a form in excel, how to create a calculation form in excel, how do i create an automated form in excel, You know what I mean — with drop down boxes and check boxes and text fields that can be hidden or shown based on user response. Have you been searching for hours? If so, let me save you some time. In this quick article, I’ll walk you through building a simple contact form in excel.
How to build a form in excel
You can use Excel’s built-in tools to create simple forms. If you want to build a more complex form, or if you need to use data from other sources, you’ll need to use a third-party application. Here’s how to create a basic form in Excel:
Create a new worksheet and select the cell where you want the form to appear. You can also add rows and columns as necessary.
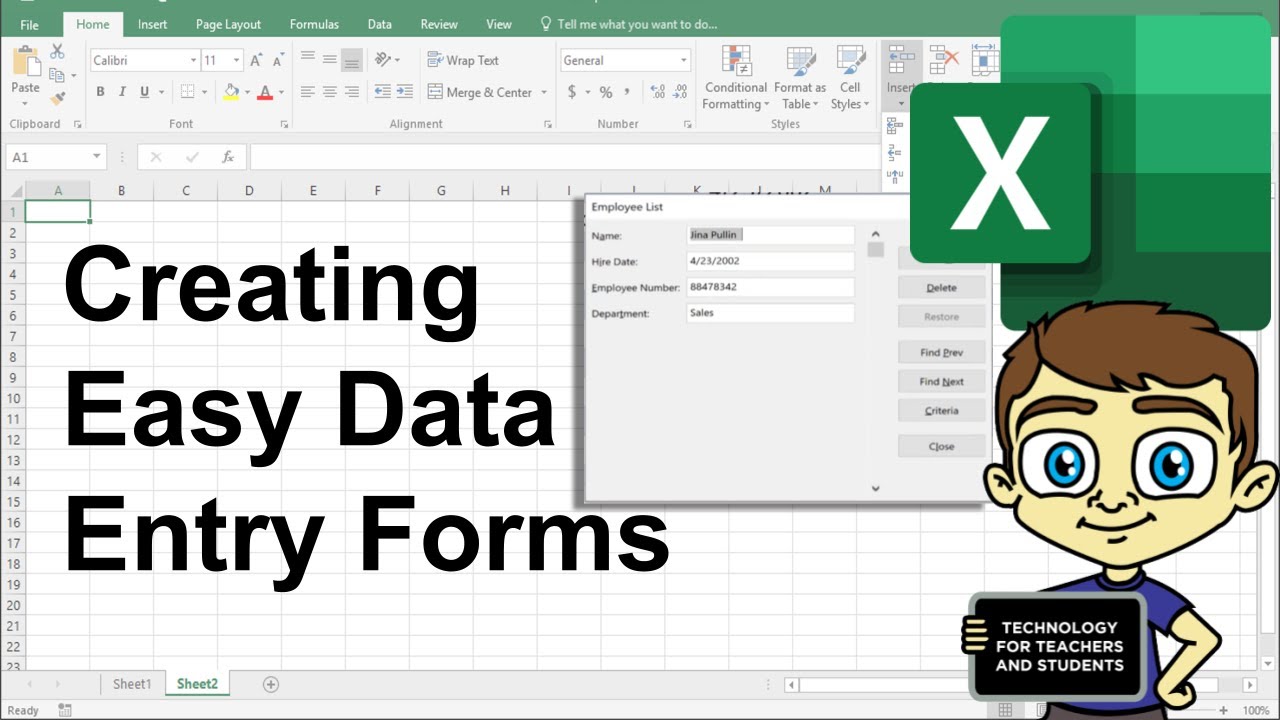
In the right-hand sidebar of your screen, select Insert > Form. This will open the Form dialog box.
Enter information into the appropriate fields, such as Name and Address. You should also enter instructions for users in this area so they know what information they need to enter and where it needs to go on the form (you can also include an example).
When you’re done entering information, click OK. Your form will appear on your worksheet with placeholder text indicating where each field should go
How to build a form in Excel
The first step in building a form is to create a blank spreadsheet and add the controls you need. This can be done by adding a new worksheet or by copying and pasting an existing worksheet. The next step is to add your controls to the spreadsheet.
Excel offers various types of control that you can use in your form, including text boxes, check boxes, drop-down lists and so on. To add a control to your form, simply select it from the Insert tab under ActiveX Controls.
Once you have added your controls to the sheet, you can set their properties using the Properties window or by double-clicking on each individual control. For example, if you want to change the color of a text box, simply double-click on it and then change its BackColor property from within the Properties window.
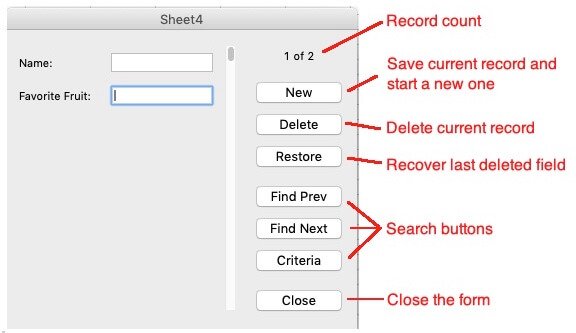
There are two ways to create an input form. The first is to use the Form feature in Excel and the second is to use VBA code.
The Form feature allows you to define a custom dialog box and can be used when you need a more complex interface than what is available in the input box. For example, if you want to enable users to enter data into multiple cells at once, or if you want them to enter data into text boxes instead of just cells on a worksheet.
The VBA code option will allow you to create a basic input form without using the Form feature at all. This can be useful if you only need to collect one piece of information from the user at a time, or if you’re using a third-party add-in that doesn’t support the Form feature.
In this article I’ll show you how to create both types of forms using both methods.
How to create a form in Excel
The following steps will guide you through creating a simple form in Microsoft Excel.
1. First, create a blank workbook and insert all necessary sheets. Then select the tab “Forms” and click “New”.
2. In the opened window choose “Form Wizard” option and click “Next”.
3. Choose “Blank Form” option and press “Next” button again.
4. Specify your data as it is shown in the picture below:
5. Click on “Finish” to end this process. Now you have created a simple form with two text boxes – one for first name and one for last name! That’s all!
A form is a great way to collect information from your users. The form can be as simple as a single text box or as complex as an entire survey.
In this tutorial, we will show you how to create a basic form in Excel. In order to do this, we need to first set up our spreadsheet and then add the fields that we want displayed in the form.
Step 1: Create your spreadsheet
First, open Excel and create a blank workbook. This example uses Excel 2013 for Windows. You can download a free trial here if you don’t have it already: www.microsoft.com/office/tryout/2013/.
You may choose to copy the file below or create your own blank spreadsheet with one row and two columns (one for data entry and one for calculations). If you choose to copy this file, remember that it only works in Excel 2003-2013 versions!
how do i create an automated form in excel,
To create a survey or questionnaire in excel, start by creating a new spreadsheet. This is the most basic format for the survey and it is recommended that you use this format because it can easily be copied into other spreadsheets if needed. Once the spreadsheet is open, begin by creating your first question. This can be done by typing the question into cell A1 and then clicking on “Data” from the menu bar. The next step is to add labels to each of the cells that will be used as answers for each question. For example, if you wanted to know how many sisters a person had, you would type “How many sisters do you have?” into cell A1 and then click on “Data.” You would then add labels to each of these cells by clicking on them individually and selecting “Label.” This will allow you to see what they are once they have been typed into their respective cells. You can continue this process until all of your questions have been created and labeled properly. Then simply click on “Analyze” from the menu bar and select “Descriptive Statistics.” This will allow
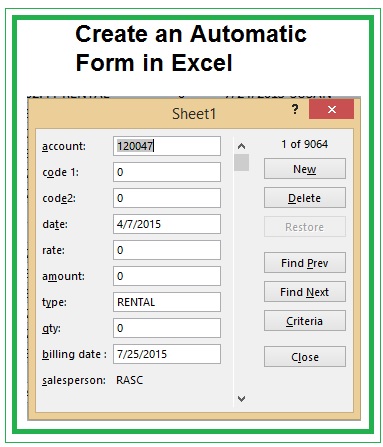
This is a guide to creating an automated Excel form. The steps are:
How to create a calculation form in excel
In this article, we will show you how to create an automated form using Excel’s conditional formatting feature. We will also show you how to make your own forms with the help of conditional formatting.
When you see a lot of data on your screen, it becomes difficult to track down any particular value or data point. However, if you can visualize all the data in your mind’s eye, then it becomes easy to sort out individual values and record them in separate columns or rows. You can use conditional formatting rules to do just that!
To create an automated form, start by creating a table of data. Then, you can use Excel’s built-in form tools to create a custom interface for your data.
You can also use conditional formatting to highlight the important parts of your data.
In addition to these methods, there are some free tools available that make it easy to create forms in Excel.
You can use conditional formatting to highlight certain cells and ranges of cells. This is useful if you want your users to pay particular attention to certain cells or ranges of cells when entering data into an Excel spreadsheet. For example, if you sell products at different prices based on size or weight, you could highlight those cells and ranges with conditional formatting so that users know which ones will be most expensive and should be entered accordingly.
You can create an automated form by using the VBA code. You need to follow these steps:
1. Create a new spreadsheet file, and then select the cell that you want to be the starting point for your data entry form.
2. In this case, we’re going to start with cell A1 because this is where we want our data entry fields to begin appearing.
3. Next, click on the Developer tab at the top of your screen if it’s not already selected (it will have a little gear icon next to it), then click on Visual Basic on the left-hand side menu under Code. This will open up the Visual Basic window where we can enter some basic code to make our spreadsheet work like an automated form!
4. Once you’ve done that, type in “Private Sub Worksheet_Change(ByVal Target As Range)”. This is where we’ll put all of our code for creating our spreadsheet automation process! The next step is adding some variables which are just simple placeholders for any data that we want included in our automation process, such as “Target”and “Source”. The
How to Create Automated Forms in Excel
You can use Excel to create automated forms, which are forms designed to collect information from users. The form you create will automatically update based on the data entered by the user. In this guide, we’ll show you how to create an automated form in Excel, so that you can start collecting data without having to enter any formulas or write any code.
Make sure you have a clean workbook with no existing data (or at least a section of empty cells). You can use any version of Excel, but we’ll be using the latest version (Excel 2019).
Click on “Data” in the top left corner of the screen and select “Excel Data Model.”
Click on “Add New Data Source,” then choose “Excel Worksheet” from the drop-down menu (shown below).
Enter your data into your spreadsheet as needed. You’ll notice that each row has a column for each field in your database table. For example, if I’m creating a database table for my contacts I might include fields like First Name, Last Name, Email Address and Phone Number