A floor to ceiling cabinet is an eye-catcher, but this furniture piece is also very useful. If you are planning to build a kitchen island or home office, a floor to ceiling cabinet can be a great alternative for deep cabinets. Build a floor to ceiling cabinet from scratch and you will get lots of space for storing food, clothes, toys or office supplies. There are plenty of ideas on the Internet for building your own custom cabinets and here you’ll find the best ones with step-by-step tutorials and templates whether you are a beginning carpenter or experienced furniture maker.

How to build a floor to ceiling cabinet
Floor to ceiling cabinets are a great way to add additional storage and space in the kitchen. They can be built using either stock cabinets or custom cabinetry. Building your own floor to ceiling cabinets will allow you to design the look you want without having to spend thousands of dollars.
The first step is to determine what size of cabinet you need. If you have an existing wall that you want to incorporate into your floor-to-ceiling cabinet, measure it to determine its width and height, then add about two inches for each side for the frame. If there’s no wall available, measure from the floor up to where you want the top of your cabinet to be and double that measurement for each side of your frame.
Once you have determined how large your frame should be, cut two pieces of wood that size with a jigsaw or circular saw. These will serve as the front and back panels for your cabinet. Cut two more pieces about one inch smaller than the inside dimensions of your frame; these will serve as side panels for your cabinet. You should also cut four pieces that are as wide as your frame but only half as long; these will serve as shelves in your cabinet
If you are looking to build a floor to ceiling cabinet, then you are in the right place. We will show you how to build a floor to ceiling cabinet in this article. This can be used as either an entertainment center or even a kitchen cabinet.
This is a great way to store your movies and games and have easy access. This will also make it easier for the kids when they are looking for something specific. You can build this yourself with just a little bit of knowledge on carpentry and tools that you may not have before.
We will show you how to build a floor to ceiling cabinet step by step so that it’s easy for anyone to follow along even if they have never built anything before!
Floor-to-ceiling cabinets are a great way to add storage to your kitchen or pantry. They’re also a great way to utilize unused space and make your kitchen look larger. Installing floor-to-ceiling cabinets is not as difficult as it may seem, especially if you have some experience with carpentry.
To build a floor-to-ceiling cabinet, start by measuring the area where the cabinet will go and taking into account how much space it will take up and how many shelves you want inside. Then cut two pieces of plywood that are at least 1/2 inch wider than the distance between the wall studs. The width of each piece should be about 1/4 inch less than the length of one side of your cabinet frame minus 1/8 inch for each edge of the plywood that will be exposed after installing it in place.
You’ll then need to cut out two holes in each piece of plywood so they can fit around any plumbing pipes or electrical wires in the wall (if applicable). Once all your pieces are cut out, use wood glue to attach them together with screws every 12 inches or so along both sides and top edges, then screw together two sides onto
How to build a floor to ceiling cabinet
Building your own floor-to-ceiling cabinets is a great way to save money and get more storage in your kitchen. You’ll need some basic carpentry skills, but the project is easy enough for anyone with basic tools and a willingness to learn.
1. Measure the height of the wall where you want to put the cabinet. Add 3/4 inch for each shelf plus 1/2 inch for each underlayment, then subtract 1/8 inch for each shim or backer board you’ll use (these are pieces of wood that act as spacers between shelves). Make sure to measure from the bottom of the shelf down to where it will rest on the floor or another shelf. For example, if you have three 12-inch deep shelves and one 8-inch deep shelf, your total height measurement would be 22 3/4 inches.
2. Calculate how much lumber you’ll need by multiplying the width by height plus 1 inch (for an overhang) times two (for both sides). This gives you how many square feet of plywood will fit in that space. The table below shows how much lumber is needed for different sizes of cabinets:
3 A
Building your own cabinets is a great way to save money and enjoy the satisfaction of creating something beautiful. But installing those big, heavy cabinets can be difficult—and dangerous. If you don’t have experience with construction work, it’s best to hire someone who does.
If you’re going to install them yourself, here are some tips for getting the job done safely and efficiently:
Plan ahead. Don’t rush into building cabinets without thinking things through first. You need to take accurate measurements of the space and plan where each cabinet will go before beginning construction.
Enlist help. Construction work is hard work and requires two people at times. One person can hold up a cabinet while another screws it into place. The best way to do this is by using a carpenter’s square to guide installation of each cabinet and making sure they’re level before drilling holes into the floor or wall.
Use brackets and supports whenever possible. Brackets are attached to the bottom of each panel with screws that go through predrilled holes in the flooring or baseboard trim around cabinets or countertops for added support when needed during installation. They also provide extra strength when cutting panels with a circular saw or jigsaw because they prevent kickback from damaging
Floor-to-ceiling cabinets are a great way to add storage to your kitchen. But they can be tricky to install, especially if you’re new at the DIY game. If you’ve never built cabinets before, you might be wondering how to build floor-to-ceiling cabinets. Don’t worry — it’s easier than it looks!
Here are some tips for building floor-to-ceiling cabinets that will help you get started:
Measure and mark the walls. Make sure your marks are high enough from the floor so when you stand up the cabinets, they won’t hit against the ceiling or any other obstacle in your kitchen.
Install a ledger board. This is the first step in installing floor-to-ceiling cabinets. You’ll need two 2x4s for each side of your cabinet (so eight total) and one 1×4 for each side of your cabinet (so four total). Attach them together using nails or screws and place them on top of your wall studs where you’ll be attaching your cabinet frames later on (usually every 16″). You can also use masonry anchors in place of traditional nails or screws if desired but make sure they’re holding firmly onto your wall studs before proceeding with the next steps
Floor to ceiling cabinets are a great way to add storage and style to your kitchen. They can be built from scratch or installed in existing cabinets. Here’s how to do both.
Build Your Own Floor-to-Ceiling Cabinets
These cabinets require some serious carpentry skills, but the end result is worth it. You’ll need a basic knowledge of woodworking and tools, including a table saw and miter saw. You’ll also need finish nails, wood glue, screws or dowels and sandpaper.
1 Measure the height of your cabinets (or where they will be). Divide that number by two to find out how high your cabinet should be when built on top of the existing cabinet. For example, if you want your cabinet to be 30 inches high, cut your 2×6 boards into two equal pieces at 15 inches each (30 divided by 2 = 15).
2 Cut six pieces of plywood at 15 inches x 21 inches each (the width is determined by the height of your base cabinet). Attach them together using two-inch screws along one edge only so that they can still pivot open like doors (see image above).
3 Build out from each side panel so that you have support for attaching other parts of the cabinet
How to Build Floor-to-Ceiling Cabinets
Whether you’re looking to build custom cabinets or just update your existing ones, here’s how to build floor-to-ceiling cabinets.
1. Measure the height of your space at the desired height of your cabinet. For example, if you want a cabinet that goes from floor to ceiling, measure from the top of your countertop all the way up to where you want the bottom of the cabinet to end.
2. Make sure that the measurements will work with what kind of cabinetry you have chosen (for example, if you have standard cabinets that go 24 inches deep then they need to be at least 36 inches tall). If they don’t fit then you need to find another option for building them or choose a different size for your cabinet (such as 36″ wide instead of 30″). Keep in mind that this measurement includes any baseboard trim or crown molding that may already be installed around your room as well as any additional trim pieces that are necessary in order for them to look good once installed (such as toe kick boards).
3. Decide whether you want drawers or doors on each side of your new cabinets and mark it
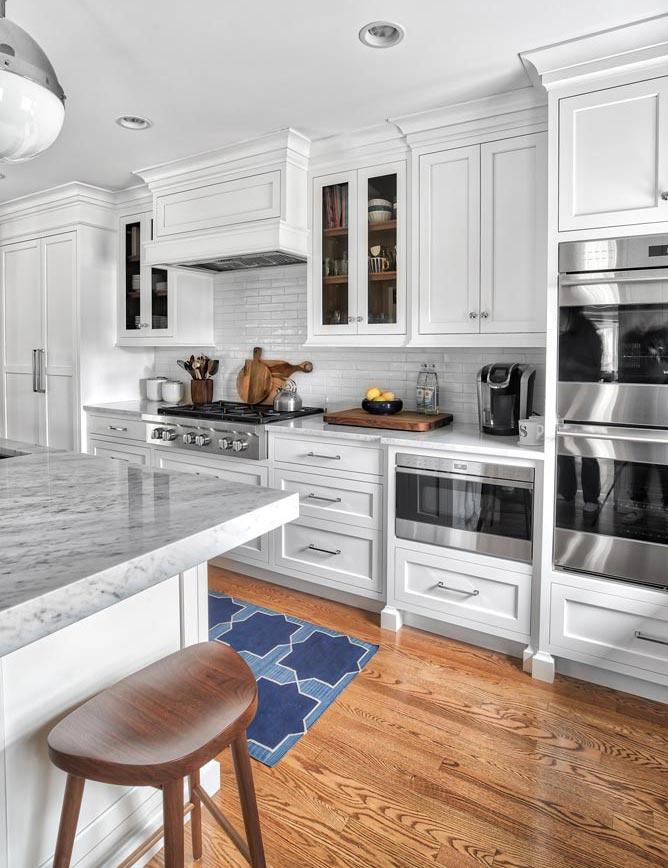
The floor-to-ceiling cabinets in this kitchen were built by the homeowner, who also did all of the cabinetry. His name is Richard and he’s a member of our Homebuilding & Renovating forum.
Here are some photos of his project:
As you can see, Richard designed and built these cabinets himself. He says it was a fun project, but one that required a lot of planning. In order to make sure everything fit together properly, he created drawings for each cabinet and then made scale models from them.
He says that there are two main challenges with this type of project: “First, getting everything level (and plumb) can be tricky with so many different pieces; second, it’s important to plan for additional support.”
If you prefer to save money on cabinet installation, you can build your own cabinets. This is easier than it sounds. In fact, even if you have never built anything before, you can complete this project with a little bit of help from your friends.
If you are not sure about the cost of hiring a professional for your cabinet installation, here are some reasons why building your own cabinets can be more economical:
It is cheaper than hiring a carpenter or cabinet maker to build them for you.
You will not have to pay extra charges for installing them or any other service charges like labor and materials used in construction. You only need to buy the materials but they will be enough if you know how to use them properly.
You do not need to worry about getting someone else to install the cabinets because they will all be installed by yourself or with an expert’s help if needed.