Building your own cabinet is not as hard as you think. You just need a few tools, the right plans and few hours of time and that’s it. Making a wooden cabinet is very rewarding, because you will have your piece of furniture and you will have learned something new. Enjoy this article with all details to build a basic cabinet and get inspired to build other more difficult projects.
The $46 million dollar Monte Carlo estate, the jaw dropping Rock and Roll, the ultra-exclusive all-black Maybach 62 with diamond-encrusted rims — for a lot of people, these are probably their dreams garage. But if you’re going to be realistic about it, you have to open up your mind to having your dream car and still being able to park it perfectly.

How to build a file cabinet
Building a wooden file cabinet is a great DIY project for the woodworker who wants to create something that will last for generations. As with any woodworking project, it’s important to carefully plan your design before you start cutting and assembling your parts. This article will explain how to build a wooden file cabinet from scratch.
Building a Wooden File Cabinet: Overview
A wooden file cabinet is a useful storage unit for many different types of documents and papers. The unit can be built in any size, but it’s best if you have an idea of what you need before you start building. For example, if you’re building a lateral file cabinet (one with drawers on both sides), consider how many drawers are needed and where they should be placed so that they can be opened easily. If you’re building an upright file cabinet with drawers on top, think about how many drawers would be most convenient for your needs.
Building your own file cabinets is a great way to save money and get exactly what you want. Here’s how to build a wooden file cabinet the right way, from selecting the materials to adding the finishing touches.
Before You Start: Planning Your File Cabinets
Step 1
Start with a plan. Before you buy any materials or start building, decide what size of cabinet you need and how many drawers you want to have in each one. Drawer sizes vary widely, so choose one that best fits your needs — for example, if you store large or bulky items, go for deeper drawers that can hold more material.
Step 2
Make sure your design will work in your space. File cabinets come in all shapes and sizes, but they’re usually designed to fit standard-size office spaces such as cubicles and offices (23 by 36 inches). If you have a small space or don’t want to block an entire wall with filing cabinets, consider using modular units that are no more than 23 inches deep but include several drawers for storage capacity (see Resources).
Step 3
Measure the available space where you want to place your file cabinets carefully before buying any materials or starting construction (see Resources). This will ensure that they fit well within
How to Build a File Cabinet in Two Hours
A file cabinet is a simple DIY project that can save you money and make your home office more efficient. You’ll need little more than some basic tools, lumber and plywood to build a functional cabinet that will help organize your documents and keep them safe from damage.
Here’s how to build a basic file cabinet that will fit on any desk or table in your house:
Step 1 – Cut the Pieces
The first thing you’ll need to do is cut all of the pieces for the cabinet. You’ll need two sides, two top pieces, two bottom pieces and two side “rails” for each drawer. You should be able to get all of these pieces out of one 4-by-8 sheet of plywood. Cut these pieces using your circular saw set at 45 degrees so that they match up with each other when assembled into the full frame.
Step 2 – Assemble the Boxes
Next, lay out all of the boxes on their sides so they’re ready to be put together into one large box. Attach them together by driving pocket screws through each joint from inside out (see photo). Once all four sides are attached together, flip the whole thing over so it looks like a square box
This is a great way to organize your files and reduce clutter. The lateral file cabinet was popularized by John F. Kennedy in the 1960s and is still a favorite for many offices today.
The best thing about this type of file cabinet is that it can be used in any room or office, unlike vertical ones which can only be used in one room. It’s also good if you have limited space since they take up less floor space than vertical cabinets.
Lateral cabinets are also easy to move around because they’re on wheels, so you can push them aside when not in use and pull them out when you need them again.
A file cabinet is a valuable tool in any home office or business. It helps keep all of your important documents organized and easy to access. However, if you don’t have the right tools and knowledge on how to build a file cabinet, it can be difficult to put together.
If you’re thinking about building your own file cabinet, here are some tips that will help you get started:
1. Buy the Right Materials
Before starting any project, make sure you have all the necessary supplies by checking off everything from your shopping list. Then compare prices at different stores and online before making a purchase.
2. Find Out How Much Time You Have
Building your own file cabinet isn’t something that should be rushed. Make sure you have enough time set aside for this project so that you can complete it without feeling stressed out or rushed for time. You should also consider whether or not there are other projects that need attention first before starting this one so that none of them fall through the cracks due to lack of planning or organization beforehand!
3. Read Instructions Carefully Before Starting
Before starting any project, always read instructions carefully so that you know what needs
How to Build a Wooden Lateral File Cabinet
A lateral file cabinet is a great way to store your files and paperwork. It’s also a great addition to any office space. These cabinets are usually used as stationary pieces, but they can also be mobile if you want them to be. The process of making one is fairly easy and doesn’t require much experience or skill. Here is how you make one:
Step 1 – Get Your Materials
For this project, you will need some basic materials:
Wooden boards (2) – You can use plywood or planks of wood for this step. Make sure that each board is longer than the desired height of the cabinet.
Two hinges (1) – You will need these for attaching the doors onto the cabinet. They should be about 2″ long with screws included in order for them to work properly.
Two handles (1) – These are used for opening and closing the doors of your cabinet. They come in various styles and designs, so make sure that they match up with your design preferences before purchasing them.*
If you’re looking to build a lateral file cabinet, you are in the right place. We’ve put together an easy-to-follow guide that will help you build a lateral file cabinet in no time.
Lateral file cabinets are very popular because they allow you to store large amounts of documents and paperwork in a small space. A lateral filing cabinet is essentially a filing drawer that opens from the side (as opposed to a vertical filing cabinet that opens from the front). It’s also known as a lateral file drawer or side filing cabinet.
So how do you build one? If you’re handy with tools, it shouldn’t take more than an hour or two to put one together. If you’ve never built anything before, don’t worry — this project is as simple as it gets!
A lateral file cabinet is a great solution for storing and organizing your files. You can build one yourself using basic woodworking skills and tools.
Build your own lateral file cabinet with this simple plan. The design is based on the popular Homesteader’s Lateral Filing Cabinet. Using pine or other inexpensive lumber, you can build this simple cabinet in a weekend. This project is simple enough for most beginning woodworkers.
The drawers are made from plywood panels that are attached to 1/2″ plywood box bottoms and sides. The box bottoms are rabbeted onto the drawer fronts and backs so they fit snugly into the case sides.
We used 1/2-in.-thick birch plywood for this project because it is strong yet lightweight, but any good quality plywood will work fine. If you don’t have access to a table saw, use 3/4-in.-thick material instead and make your dados by hand using a dado plane or router with a straight bit set at 3/4 in..
The lateral file cabinet is a great addition to any home or office. It’s a simple project and can be completed in a weekend. You’ll need basic carpentry skills and tools, including a table saw, miter saw and jigsaw.
The first step is to measure your space for the cabinet, then cut the sides and top pieces to fit. Next, cut the bottom piece with an angle on one end so it fits snugly into your corner. Attach the sides to the bottom with pocket screws, then attach the top right side up to the sides and bottom with pocket screws.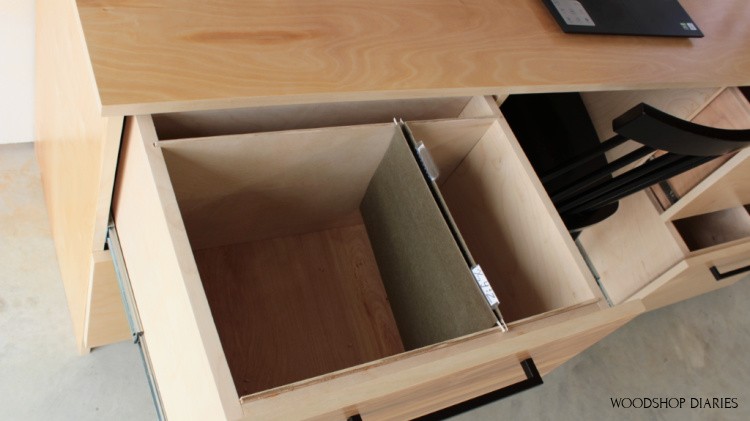
Next, attach the casters to their mounting plates with screws. Then flip over your new file cabinet and install drawer slides onto each drawer front face. Securely attach each drawer front face onto its corresponding drawer back plate with screws through both sides of each face plate into its back plate (see picture above). Attach each pair of drawers together by attaching them to their corresponding side panels at both ends using 1/4″ plywood gussets (see picture below). Make sure these gussets are flush with the inside edges of your drawers so they don’t interfere with sliding them fully open or closed (see picture below).
To build this file cabinet you need:
Wood of your choice (I used pine)
A table saw or circular saw
A jig saw or router with a circle cutting bit (or a hole saw)
A drill and drill bits
Sandpaper, belt sander and palm sander
Wood glue, screws and nails
A paintbrush