Building a dog ramp for your deck stairs is a quick and easy weekend project, but finding the right materials can be tricky.
A dog ramp is an ideal way to help senior dogs, injured dogs or handicapped dogs easily access elevated surfaces such as a deck in order to get to the yard.
How to build a deck ramp
Building a dog ramp for a deck is an ideal way to add extra safety and convenience to your pet’s home. A sturdy wooden ramp can help your dog navigate stairs and get into the car, while an aluminum model can be used as a ramp or even as stairs on its own.
Selecting the Right Material
Dog ramps are available in many different materials, including wood, aluminum and plastic. Wood is the most popular choice because it’s durable, stable and easy to work with. Plastic is also relatively strong but needs more maintenance than wood. Aluminum is lightweight and easy to carry but also expensive. Regardless of which material you choose, make sure it’s rated for use with pets — some ramps are made for humans only.

Here’s how to build a dog ramp for deck stairs:
Measure and cut lumber: Measure the distance from one step up onto the deck surface down to the next step and subtract 2 inches from this total length; this will provide enough room between each step so that dogs don’t feel like they’re stepping off into empty space when they go up or down steps on their own accord (in other words
If you’re looking for a way to help your dog get onto the deck, this project is for you. It is also a great option if you are looking to extend the life of your stairs or simply add a little extra style. This dog ramp can be built in just a few hours and costs less than $50 to build!
Step 1: Measure the Distance Between Your Deck and Stairs
The first step is to measure the distance between your deck and stairs. If you already have a set of stairs on your deck, this should be easy. If not, measure from where your dog would like to walk off the deck onto the ground and then from that point down to where they would like to walk up onto the deck again (i.e., if it is easier for them to go down one set of stairs then down another set). This will give you an idea of how long you want your ramp to be. You can always cut it shorter after it is built if needed but it’s harder (and more expensive) to make it longer than necessary!
Building a dog ramp for your deck is one of the best ways to make life easier for your pet. Not only will they be able to get up and down the stairs with ease, but it will also make them feel more secure in their environment.
Building a dog ramp for your deck is relatively easy, and can be done with just a few tools. If you’ve ever built a deck before, then you already know the basics of how to construct this type of project; if not, don’t worry — we’ll walk you through all of the steps.
Before You Begin Building Your Dog Ramp
Before you begin building, there are several things that you should consider first:
How high will the stairs be? The higher they are, the steeper they will be and therefore require more support at the top and bottom. You may need to install additional supports or use larger size lumber to build your deck ramp if they are very high.
What kind of wood do I need? Most people use pressure-treated lumber when building dog ramps because it’s resistant to rot and decay. However, if you prefer another type of wood (like cedar), you can use that instead — just make sure it has been treated with preservative so that it lasts
Do you have a dog that needs to get on the deck? If so, it’s important to make sure they can do so safely. There are several ways to build a ramp for your dog but this one is relatively easy and inexpensive. If you want to know how to build a dog ramp for your deck, keep reading.
Materials Needed:
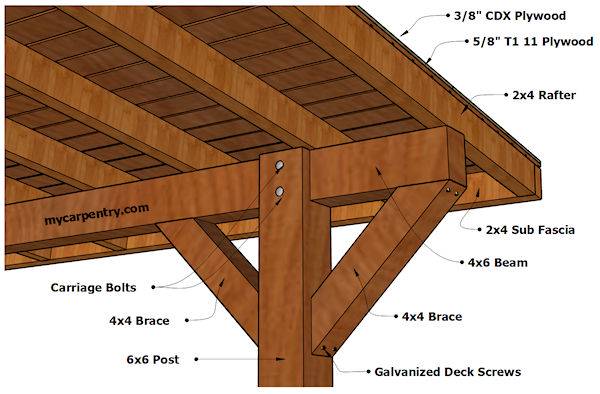
4×4 posts (4) – cut at 8 feet long for each post (cut 4)
2×6 boards (2) – cut at 6 feet long for each board (cut 2)
3/8″ plywood (1) – cut at 4 feet long for each piece (cut 1)
Dog ramps are the perfect solution to help your dog move easily between levels of your deck or home. The best part is that they are easy to build and can be made from inexpensive materials. In fact, you probably already have most of what you need in your garage or shed.
Here’s how to build a ramp for your dog:
Gather the Materials
Some of these items can be purchased at a hardware store, while others may require a trip to the lumberyard or home improvement center.
Lumber: You’ll need 2x6s for the main structure and 2x4s for the supports. A 4-foot length should suffice for each rung, but check with your local home improvement store for specific requirements based on the size and weight of your dog.
Screws: Use 5/8-inch screws to assemble the ramp. Make sure they’re long enough to penetrate all three layers of wood without breaking through into another layer (see photo). Also, buy plenty — there will be lots of screws involved!
Nails: You’ll also need nails — preferably galvanized ones — for attaching plywood pieces together. If you’re building a multi-level ramp like ours was, use nails instead of screws on these areas where there
How to Build a Dog Ramp for Deck Steps
How to Build a Dog Ramp for Deck Steps. Adding a wooden dog ramp can make it easier for your dog to get up and down from your porch or deck stairs. It’s simple to build and you don’t need any special tools.
1 Select the lumber. Choose pressure-treated lumber for its strength and durability, but avoid using cedar because it contains oils that can be harmful to dogs. If you’re using pine, use only exterior grade lumber and seal it before using it as a ramp so that it doesn’t absorb moisture from the ground below.
2 Cut 2-by-4s into two 4-foot lengths and two 3-foot lengths. These will be the sides of the ramp; their length will depend on the height of your deck stairway, which will vary depending on whether you want to build a dog ramp for concrete steps or wooden steps.
3 Cut 2-by-6s into two 6-foot lengths, two 5-foot lengths and two 4-foot lengths. These boards form the top frame of the ramp; they should be long enough so that they overhang each side by 6 inches at least; longer overhangs are better if they fit in with the look
How to build a dog ramp for a deck. This video will show you how to build a DIY dog ramp for your deck stairs or deck. This is the most common place that I have seen dogs with mobility issues have problems.
This is a very simple project and can be completed in less than an hour.
Materials Needed:
2x4x8 Deck Board (purchased at Lowes)
1x2x12 Pressure Treated Board (purchased at Lowes)
Stainable Wood Glue (purchased at Lowes)
Screws (purchased at Lowes)
How to build a dog ramp for a deck
Building a dog ramp for your deck can be one of the easiest things you ever do. All you need is some 2x4s and plywood, some screws and some paint. You don’t even have to be an expert woodworker or carpenter to make this work.
Here’s how we did it:
1. Take measurements of the stairs of your deck and add two inches to each measurement. This will give you room for the sides of your ramp and allow enough space for your pet to walk without feeling like they are walking up a steep hill.
2. Cut out the sides using 2x6s (or whatever width you want).
3. Cut out two pieces of plywood that are as long as your stairs but wide enough so that they go from one side of the 2×6 to the other side when placed on top of them (see photo). This will be where your pet will walk or sit when resting on their way up or down the stairs. Think about making this extra wide so that it can accommodate larger pets too!
4. Screw together all pieces using screws – no glue needed here!
Dog ramps are a great way to help your dog get into the car or onto their favorite chair. They are also useful for older or disabled dogs who may need help getting in and out of the house. If you want to build a dog ramp, here’s how:
Build the ramp frame and attach it to the deck. Use wood screws to secure the two 2x4s together at the top and bottom of each leg. Make sure your 2x4s are long enough that they will be able to span over the stairs when finished. You can make them longer, but then you’ll need more of them!
Cut two pieces of plywood for each side of the steps. Measure and cut one piece at 8 inches by 4 feet, then cut another piece at 8 inches by 3 feet 1/2 inch (or whatever height you want your ramp). Cut a third piece of plywood at 8 inches by 2 feet 1/2 inch (or whatever width you want). Attach these pieces to each other using nails or screws every 12 inches along all sides except for one side on which you will attach them using screws every 6 inches along all sides except for one side on which you will attach
Building your own dog ramp is easier than you might think, and the end result can be just as sturdy as the commercially-made ones.
To build a ramp, all you need is some 2x4s, plywood and a few screws. You can customize your ramp to fit whatever space or length of steps you have.
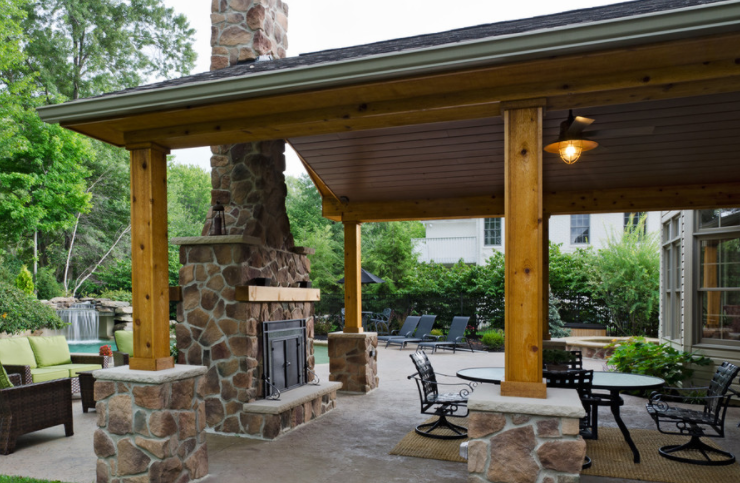
If you’re looking for a more permanent solution for your dog’s needs, we recommend building a wooden ramp with an attached deck on top that slides onto the back of your home’s existing deck stairs. This project takes some time and skill but will last for years and give your dog easy access to the yard.
A DIY wooden ramp can be made from either treated lumber or cedar wood. Both options are easy to work with but cedar wood is less expensive, weather resistant, rot resistant and termite proof — it also looks great!
The first step in building this kind of ramp is measuring out all of the dimensions of the steps and then cutting down the 2x4s accordingly so they fit perfectly between each step (the distance between each step should be at least 40 inches). Next take four pieces of 2x4s and screw them together end-to-end with two long screws on top and two