Decks are a popular outdoor living space for homeowners today. They’re a great way to add square footage and value to your home, but many people don’t know what to do with the deck once it’s been built. Should you simply buy your deck furniture and call it a day? Or is there something else you can do?
The idea of building a deck is exciting, but an even better idea, is building a deck that you can enjoy for years to come. Deck railing is an important part of your finished deck. It completes the look, provides safety and offers privacy. If you’re like most people, your time spent on the deck will always be limited. Make sure that you design for reliability as well as beauty. Especially if its a railing for stairs because if one board in the railing breaks or twists out of place, it can cause an accident and even lead to someone’s death.
How to build a deck handrail
Building a deck is a great way to get outside, enjoy the weather and relax with friends and family. You can build a deck yourself with just a few basic tools. However, many homeowners choose to hire a professional contractor for their deck building needs. A contractor will have the tools and knowledge needed to complete your project safely and efficiently. However, if you are interested in learning how to build a deck yourself, there are some tips that can help make it easier for you.
Cleaning Up Your Deck Before You Start Building
Before you start building your new deck, it is important that you clean up any debris or other materials left over from previous projects on your property. This includes removing all nails or screws that may have been left behind during previous projects by contractors or DIYers (do-it-yourselfers). If necessary, you should also fill in holes with wood putty before beginning work on the new project so they will not catch on clothing or equipment when working on your new home improvement project.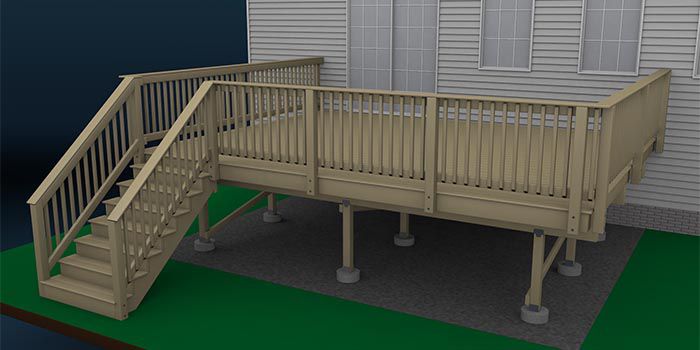
Making a deck railing is a relatively simple task. It can be done with basic tools and materials, and it requires only basic carpentry skills. If you have experience building fences or decks, you will find that making a deck railing is no different from those projects. However, if you are new to carpentry or don’t have much experience with using tools, you may want to consider hiring a professional contractor to build your deck railing for you.
Working with lumber
Most decks have wooden railings made from 4×4 lumber or 2×6 lumber. The size of the lumber depends on how wide your steps are and how high off the ground they are positioned. For example, if your steps are 6 inches wide and they’re positioned at 8 inches off of the ground, then you can use 4×4 lumber to build your railing because it’s strong enough to support an adult’s weight while still being relatively easy to cut down into smaller pieces.
In addition to these pieces of wood, you’ll also need some screws and nails in order to hold everything together properly. You will also need some paint or stain if you want your deck railing to look nice and last longer than just one season
Outdoor stair railings are a great way to add style and security to your deck or porch. Whether you want a straight railing or one that curves around the steps, there are many options for creating an outdoor stair railing that will enhance your home’s decor.

Stair Railings for Pools and Decks
Stair railings are an important aspect of any deck or pool installation. They provide safety for small children and pets; they also add a decorative touch that can be used to match your home’s exterior design. Some homeowners choose to install metal railings on the stairs leading up to the porch or balcony, while others prefer wood railings with wrought iron posts at each step. Whatever type of railings you choose, make sure they are sturdy enough to resist impact from falling objects like toys or balls. Stairway railings should also have non-slip treads so that people don’t slip on them when walking up or down the stairs.
If you’re building a deck or porch, you’ll need to install railings. The railing can be a basic wooden rail, or it can be fancier with brackets and balusters.
Build the post supports and attach them to the posts. Then attach the top and bottom rails to the post supports.
Cut the stringers to length and nail them to each side of the frame. Attach the stair treads to each stringer with 2-1/2-in.-long screws every 3 in.
Install any decorative trim, such as railings, spindles or balusters (see below).
Fill any gaps between boards with wood filler, then sand as needed until all surfaces are smooth.
Deck railings are a critical part of your deck’s safety features. They provide a barrier between the deck and any drops below, and they also keep children and pets from running off into the yard. Many decks are built with sturdy steel rails that are bolted directly to the posts, but other types of railing systems can be used as well.
The type of railing system you choose depends on the size and design of your deck, as well as your budget. Here are some common types of deck railings:
Railing system type: Wood composite rails with pickets attached to them. These come in many sizes, styles and colors. They’re easy to install, but may not be as durable as other types.
Railing system type: Aluminum or steel rails with vinyl posts that screw into wood posts or concrete piers. These rails are strong, weather resistant, long lasting and easy to install or replace if necessary. You can also paint them once they’re installed if you want a different color or texture than what comes standard with most manufacturers’ products.
Railing system type: Stainless steel or aluminum rails that attach directly to the underside of a deck ledger board (the horizontal beam that runs under each post) using lag screws
How to build deck stair railing
Measure and cut the top board. Use a circular saw or other power tool with a rip blade to cut the top board from 1-by-6-inch cedar lumber. Measure from the inside of the stair riser, down to where you want the top of your new deck railing to be. Make sure this measurement is at least 2 inches below the top of your new staircase. Cut the top board using a circular saw so that it’s even with this measurement.
Trim off any remaining material on each side of the board using a handsaw or reciprocating saw. Remove any splinters or rough edges with sandpaper or a wood file after trimming off excess wood.
Sand all sides of each stair railing top board using 100-grit sandpaper on an orbital sander, then use 220-grit sandpaper on an orbital sander to finish smoothing out any rough spots left by 100-grit sandpaper. Sand all sides until they’re smooth and free of splinters or rough edges.
Attach each stair railing top board to its own step using 6d galvanized nails driven through predrilled pilot holes in each end of each step and in each end of each rail post (if applicable).
Deck railing top board ideas
Deck railing top boards are the boards that you put on top of all your other decking boards. They can be made from a variety of materials and are often painted or stained to match the rest of the deck.
Deck railings come in a variety of styles, so there is something for everyone. You can choose from a number of different designs, including: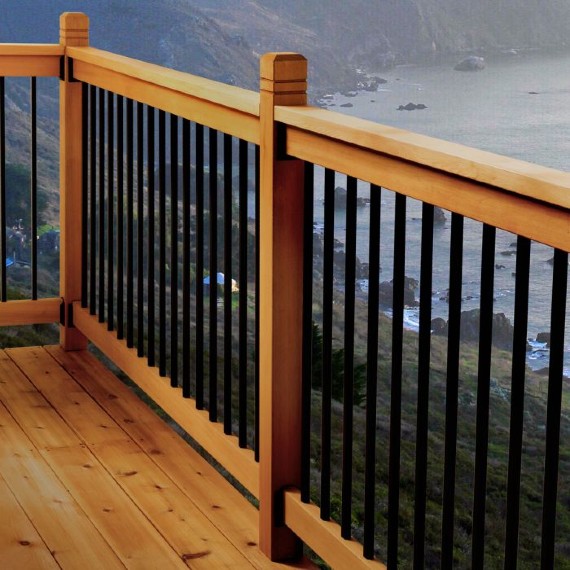
Slat-style railing – this type of railing consists of thin slats, which are commonly spaced 1″ or 2″ apart from each other. The slats can be made from wood or composite material.
Capped railings – capped railings are slightly thicker than slat-style railings and don’t have spaces between them like slat-style railings do. Instead, they’re solid pieces that go all around your deck railing system (including where they connect to posts). They’re often used with more traditional designs like Victorian homes or cottages because they offer a lot more privacy than slat-style railings do.
Corner post caps – corner post caps go around the corners where posts meet up with rails to form corners along your deck’s perimeter. These caps help prevent water damage by keeping rainwater away from the ends
A deck railing is a great way to add value and style to your home. It’s also the perfect way to keep your family safe when they’re out on the deck. But one of the most important parts of a deck railing is its top board. This board is what will hold up your entire railing system, so it’s important that you choose one that is durable, weather resistant and stylish.
Here are some ideas for choosing a top board for your deck railing:
Use pressure-treated lumber. Pressure treated lumber is made from wood that has been treated with chemicals that help prevent rot and decay. It’s a popular choice because it lasts longer than untreated lumber and can be used in wetter environments with less maintenance required over time.
Choose cedar or redwood if you want something more natural looking. Cedar or redwood boards are a good choice if you’re trying to create an aesthetic that fits with the look of your home or yard. These woods also have natural properties that make them weather resistant and sturdy enough for use as deck railings without any additional treatment needed on your part!
Consider using composite materials such as plastic or metal instead of wood if you want something more modern looking and won’t have to worry about maintenance
Building a stair railing is an easy task, and you can use the same techniques for both deck stairs and stairways in homes. These steps will help you make your own railing.
Measure the height of the step. Measure up from the tread to the top of the riser. Write this measurement down so you have it on hand when you go shopping for materials.
Measure how far apart the posts are. Use a tape measure to determine how far apart each post is from one another by using the post as a guide. Measure from one side post to another, taking care not to confuse the outside edge with the inside edge of each post.
Purchase 2×4 boards at least as long as your measurement from Step 1, plus 3-4 inches extra on each end to account for trimming later on. The best option is cedar or redwood because these woods are rot resistant, but pressure-treated pine works well too as long as it is not exposed directly to water for long periods of time (such as if left in standing water). If you have access to treated lumber that has been kiln dried, that will work well too since it won’t absorb moisture from rain or snow melt like regular treated lumber will
How to Build Deck Railings
A deck railing is a great way to increase the value of your home and add visual appeal. If you are looking to build a deck, then adding rails to it can make it look more attractive. However, there are many different designs and styles of railings that can be used for your deck. You want one that looks great but also protects you from falling off the deck. Here are some ideas for how to build deck railings:
– Use pressure treated lumber for your railing. This is because it is durable and long lasting. You can use pressure treated lumber for any type of railing project because it will last a long time and withstand any weather conditions such as rain or snow as well as being able to withstand any kind of abuse from kids playing on the deck.
https://www.youtube.com/watch?v=mGh-FglhWbA
– Make sure that all posts have been set into concrete before installing any type of railing system onto them because this will help ensure that they do not move around once installed onto the post itself which could cause further problems in the future with having stability issues with your entire deck itself if something like this happens so make sure that this has been done correctly before installing anything else onto