
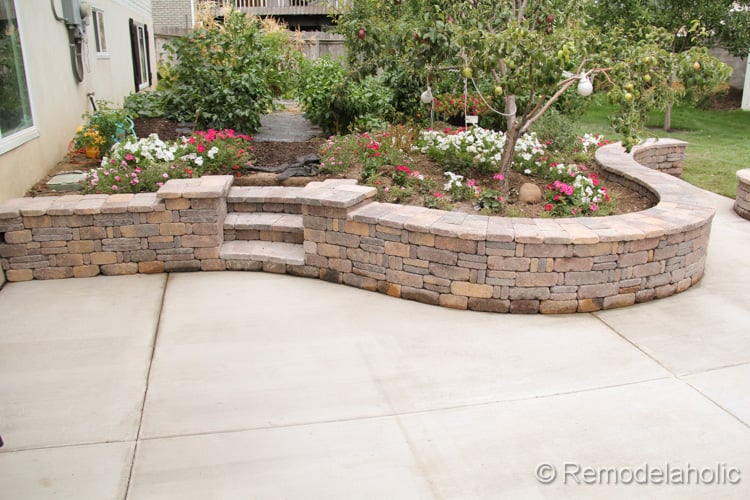
So you’re looking to build a curved brick garden wall, you’ve come to the right place! We’ll show you how to build a curved brick garden wall for your backyard and help guide you through all the needed steps. There are many reasons people choose to build curved brick walls, but it mainly boils down to aesthetics and practicality. They will help break up and add a visual interest in an open space, but also add privacy and block stray rays of sunlight from shining through mature trees.
There are three different methods for building curved walls: 1. Brick sleepers, 2. concrete sleepers and 3. concreting over a timber frame. Building a curved wall is an easy garden project and can quickly be made with the help of bricks or blocks, imported from China, Thailand or UK.

How to build a curved garden wall
Brick garden walls are made using bricks, cement and mortar. This is a guide about building a curved brick garden wall.
The first step is to mark the curve on the ground with string. Then dig out the inside of the curve, leaving only a thin layer of soil at the bottom. Next, make sure that your bricks are all in line with each other. Use long stakes to prop up the loose bricks so they don’t fall over when you lay them down. Then use your level or plumb line to make sure your rows are straight as well as level. Lay down mortar on the back side of each brick when ready to place it in place.
Building a curved brick garden wall can seem like a daunting task, but it’s actually pretty simple.
All you need is some creativity and a few building materials. Here’s how to build a curved brick garden wall for your backyard.
Building a curved garden wall can be a fun, creative project that will add visual interest and value to your property. It’s also a great way to use up leftover bricks from other projects during the winter months when you want to keep busy.
Building a curved brick garden wall is simple and straightforward, but there are a few tricks to getting it right. Here’s what you need to know: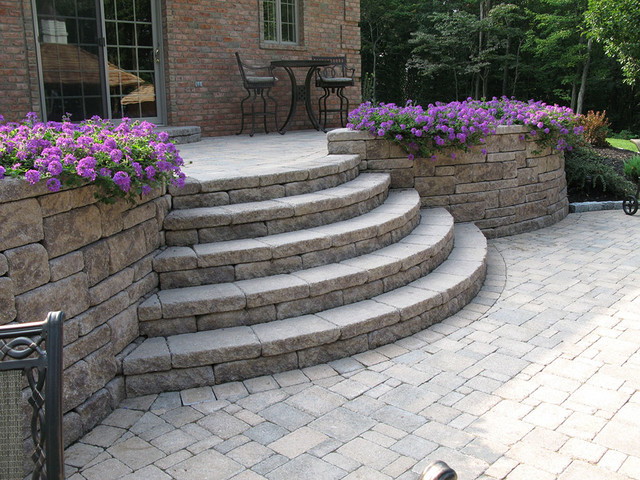
1. Choose the right mortar: You’ll need strong mortar to hold your brickwork together. Use masonry cement or concrete mortar in place of regular mortar, which will set much faster than bricklaying materials. Read our guide on choosing type of mortar for more information on this topic.
2. Prepare the ground: You’ll need to prepare the ground before laying down any foundations — even if your wall is going up against a fence or shed or along the edge of flowerbeds or lawns, so make sure that any vegetation has been removed and soil levels have been levelled out as much as possible before working starts.
3. Lay down foundations: The foundations for curved brick garden walls are usually laid directly onto soil rather than on top of concrete slabs like straight walls because the corners tend to be less stable
If you want your garden to be a little different from the rest, then adding curved bricks is the way to go. They are easy to install and can be done in an afternoon. This project will not need any special tools or training, as long as you have a few basic skills like using a drill and measuring.
The first thing you need is a plan for your curved wall. It doesn’t have to be exact, but it should give you an idea of what your final result will look like. The easiest way to do this is by using graph paper or tracing paper and drawing out the shape on paper first. Once you have created the design, transfer it onto wood or cardboard (or whatever material you have available) so that it is easier to work with when building the wall.
Once you have your design ready, start building your curved brick garden wall by digging holes for each brick at least 12 inches deep and 12 inches apart from each other until they reach ground level (if necessary).
Next place one brick into each hole and level them out using a spirit level or trowel if needed until everything looks even. If there are any gaps between the bricks after levelling them out then fill these with mortar mix which will help prevent water from getting into
When it comes to building a curved brick wall, there are two options: use pre-built concrete blocks or build your own curved bricks.
You can buy pre-made curved bricks in one- or two-foot sections at many home improvement stores. These come in either red or gray and can be used to create a variety of different shapes.
If you want something more unique, you can build your own curved brick walls from scratch by using standard rectangular blocks. This will allow you to create any shape you desire, including circular and even octagonal shapes.
Building a Curved Wall with Pre-Built Concrete Blocks
Most people who want a curved brick wall decide to use pre-built concrete blocks instead of making their own bricks. This allows them to save money on materials and still have flexibility when building the wall.
When using pre-built concrete blocks, make sure that they are designed for curves because standard blocks won’t work well with this kind of project. There are several types available online if you do not want to buy them at your local home improvement store.
The best place to start is by measuring the length of your garden bed and then adding about four inches for the width at each end (one inch per foot).
This is a great way to build a curved brick wall. The only tools you need are a level, a tape measure and a chalk line.
You will also need some blocks. I recommend using pre-cast concrete blocks for this project. They’re easy to get, affordable and come in lots of different sizes and colors.
To start with, you need to find the center point on both sides of the wall. This will be the point at which the two curves meet each other. Then measure out from that point 18″ in both directions and mark it with your level as shown below:
Next, use your tape measure to measure out from each mark 12″, 16″ and 20″. These marks will tell you where to place each block along the curve of your wall; they’re also known as keystones (they’re usually shaped like an inverted V with grooves cut into them). Check out the diagram below:
Now that we’ve figured out where our keystones should be, we can start building our curved garden wall!
Curved walls are a great way to add interest to your garden and can be built from bricks, blocks or stone. The first step is to decide how you want the curve to run and mark out the shape on the ground.
Once you’ve decided where to put your curved wall, you can build it by laying bricks or blocks in place along the line of the curve.
If you want your wall to be curved on both sides of the path, then you will need two bricklayers working together. Alternatively, if you only need one side of your wall curved, then it is possible for one person to do this alone.
When building a curved wall with blocks or bricks, it’s important that they are all straight and well-aligned otherwise they may give an uneven appearance when viewed from above.
How to Build a Curved Garden Wall
Building a curved garden wall is a fun and easy project that can be done by anyone. A curved garden wall can be the perfect addition to your landscape, but there are some things you need to know before you get started.
When building a curved brick garden wall, it’s important to remember that all bricks are not created equal. Some bricks are made specifically for use in curves, while others may crack under stress or warp over time. You’ll also need to consider the mortar that holds your bricks together — not all mortars work well for curved walls, so make sure you choose wisely before starting your project.
Building a curved brick garden wall is relatively simple if you follow these steps:
A curved wall can be a beautiful addition to your garden, but it’s important to know the right way to build one.
Building a curved brick wall is not as straightforward as building a straight wall. You need to consider how you’ll make the curve and which bricks will be used at each stage of construction.
The first thing to do is determine the radius of your curve in metres (or feet). This is the distance from the centre of one end of the wall to the centre of an adjacent brick on that side. If you’re using metric units, you’ll need to convert this figure into inches or feet first.
Next, decide whether you want your curve to be convex or concave – if it’s concave then it will turn outwards as it goes along; if it’s convex then it will turn inwards. Draw two lines on your plan, one for each type of curve, parallel with each other and perpendicular to the ends (or side) walls.
Finally, work out how many courses there are going to be along each line – including both sides but excluding any part where there isn’t enough brickwork – and where they will start and finish within those lines (for example ‘100 mm above ground level’).
Curved brick garden walls are a great way to add interest and character to your garden. They can be used as a feature wall or to create boundaries.
The bricks can be laid in a variety of patterns, from random to straight lines. The length of the wall will depend on how many bricks you have available, or how long you want it to be.
You’ll need:
Bricks (as many as you need)
Rubber mallet (for tapping down the mortar)
Drill (or bricklaying tools if you have them)