Building a backdrop wall for your studio is not difficult for anyone with a little time, some basic tools, and a solid plan. With some basic woodworking skills and a desire to learn, this project can be easily accomplished over the course of a weekend by one individual. This article will cover all of the information that you’ll need to get started with your own backdrop build.
Wallpaper used to be a staple of interior design. Before wallpaper was actually invented, walls were painted. King Louis XIV went as far as having a room in his palace painted twenty-five times so he would have the largest wallpaper in the world. But in the last century, it became less desirable and fell out of favor with home decor. I’m here to tell you that wallpaper is making a comeback, and for good reason. Over the next few months, we’ll discuss all that is great about wallpaper and why it’s wonderful for your home.

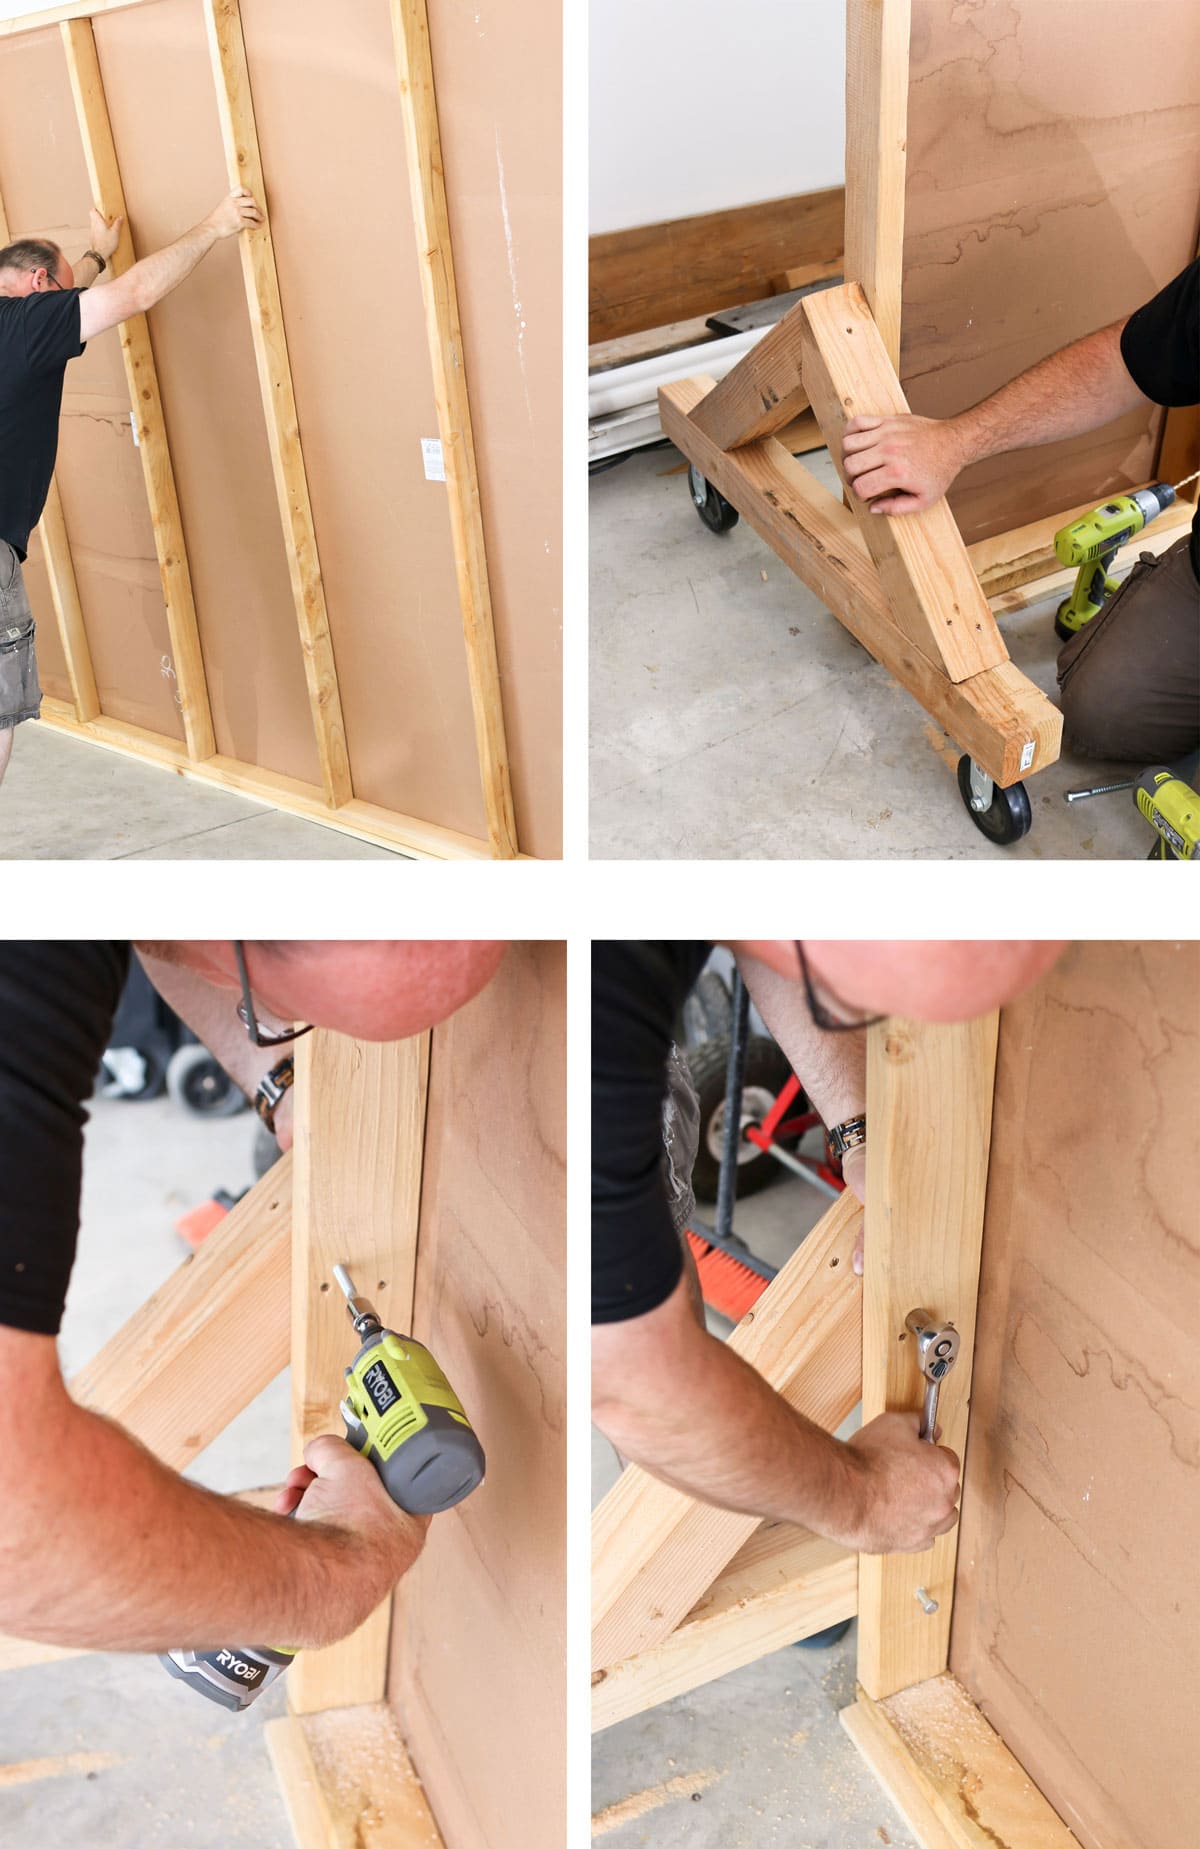
How to build a backdrop wall
This is a simple backdrop to make for your photography studio. The background is made from plywood and painted with a flat black paint. The pictures below show how to make one yourself.
The first step is to cut out the plywood into pieces that you need to build the backdrop wall. For example, if you plan on making the backdrop at least 4 feet high and 8 feet wide, then you will need 3 pieces of plywood cut into 4 foot by 8 foot sheets. If you want it taller or wider, simply adjust these measurements accordingly.
Once you have all the pieces cut out and ready, take a look at our article on how to make a photography studio backdrop. This will give you some ideas on how to put everything together so that it looks professional when finished.
If you have any questions about building this type of backdrop or any other type of project, feel free to contact us through our contact form or call us at 1-800-246-4846 (USA).
Plywood is the most common material for making a backdrop wall. The reason is simple: It’s cheap, easy to work with and can be painted or stained to match any color scheme. You can also paint on it with stencils or rollers.
Here’s how to build your own plywood backdrop:
1. Cut out your plywood pieces using a jigsaw and sand the edges smooth with 100-grit sandpaper.
2. Attach the panels together using 1/4-inch-thick plywood butt joints (these are wider than typical butt joints). Use construction glue and brad nails to secure each joint, then add screws if they’re available (use 1 1/8-inch screws).
3. Paint or stain the plywood panels before hanging them on the wall to create a seamless look, then use picture hooks to hang them up!
Backdrop walls are the perfect way to add some height and drama to your photos. They’re also a great way to get some privacy in your images.
In this tutorial, I’ll show you how to make a simple backdrop wall with plywood. This is a great project for beginners because it only takes a few hours, and you can use it again and again!

You’ll need:
Plywood – 1/4″ thick is enough for this project, but you can use thicker if you have access to it. I used 1/4″ birch plywood from Home Depot.
Stain – I used Rust-Oleum’s Dark Walnut stain because it goes well with my decor, but any dark stain will do fine here.
Wood glue – You’ll need something that dries clear so that it doesn’t change the look of your wood when it’s finished. I used Loctite’s All-Purpose Wood Glue here.
Tape – For attaching your paper or fabric to the plywood, I recommend using painters tape (the blue kind). It won’t leave any residue on your surface like masking tape might
A backdrop wall is a great way to add interest and dimension to any space. It’s also a simple way to add more storage space, especially if your home is lacking in that department. We’ll show you how to build a plywood backdrop (or shadow box), which will look beautiful in any room of your home.
Materials Needed:
– Plywood or MDF board for the frame (4′ x 8′)
– Wood or metal brackets for mounting the frame (optional)
– Stain or paint (optional)
Step 1: Get all your supplies together.
Step 2: Cut the plywood to the desired size.
Step 3: Screw the two pieces of plywood together at the top and bottom.
Step 4: Drill holes for the dowels, then screw them in place.
Step 5: Stain or paint the plywood to match your room’s color scheme.
Step 6: Attach Velcro strips (or other adhesive) to the back of your backdrop so it will stick onto a wall without having to nail anything into it.
I’ve included a few different types of backdrops in this tutorial so you can see how to make them all

Plywood Backdrop Wall Panels
You can build this plywood backdrop wall in a weekend and have it ready for your next photo shoot. The guide below will walk you through the steps.
If you need help with a plywood backdrop, this guide will help you learn how to make a backdrop wall that’s perfect for your photos.
The instructions below are for making a wooden plywood backdrop, but if you want to make a wood grain background, check out our post about the best ways to create wood grain effects with Photoshop.
Materials Needed:
Plywood
Wood glue or construction adhesive (optional)
Plywood Backdrop Wall
Plywood backdrop wall panels are a great way to add a professional look to any event or photo shoot. A plywood backdrop wall can be used to enhance a stage or background for performers or simply add some design interest to an area. Plywood is a common material used in home improvement projects and can be used for many different types of projects.
Plywood backdrop walls are relatively easy to make, but you will need some basic tools and supplies before you get started. First, gather the necessary materials including plywood sheets and paint in the desired color scheme. Then measure the area where you plan to place your plywood backdrop and cut it into panels that fit this space perfectly. You may also want to consider adding lighting fixtures or other accessories such as shelves or drawers if desired. Once all of your panels are cut, simply screw them together using wood screws or nails as needed until they form one solid sheet. Attach any additional accessories such as lighting fixtures or drawers using appropriate hardware during this step as well if desired.
Plywood Backdrop Wall
A backdrop wall is a great way to add depth and interest to your pictures. It can be as simple as a single panel or as complex as an entire wall.
It’s very easy to make one yourself, and it doesn’t cost very much. Here’s how to do it:
1. Cut your plywood into panels that are 2×3 feet each. If you have more than one panel, make them the same size so they will line up correctly when they are put together. You can measure the size of your camera or lens to determine this measurement if necessary.
2. Paint each panel with a color that complements your subject matter, being sure not to paint over any screw holes or other details on the back side of the panel (in case you want to hang it up later). You could also paint each panel in a different color scheme or pattern if desired (for example, my flower garden backdrop has flowers painted on one side and butterflies on another).
3. Once dry, put all your panels together with screws or nails into studs in the wall (or use brackets attached to studs). If you want your backdrop wall higher than about 6 feet tall, use two layers of panels and attach them together
1. Cut your plywood to the desired size.
2. Use wood glue to attach the boards together, making sure to line up the edges of each board. Using a clamp helps to keep them together as you glue them.
3. Once dry, sand down any rough edges and corners with an orbital sander or sandpaper.
4. Paint or stain your backdrop wall according to your preference!
This is an easy and inexpensive way to make a backdrop wall. A plywood backdrop wall can be used for all sorts of photography. If you are doing product photography, this is a great solution.
Plywood Backdrop Wall Supplies
1 sheet of 3/4″ plywood cut to size (16×20 or 20×24)
1 sheet of 1/4″ plywood cut to size (16×20 or 20×24)
1 roll of cork board (comes in 4′ x 20′ rolls)
2-3 cans of black spray paint (optional).