
What will you do when you move into your new house? You’re going to realize that there’s a great room or open concept layout that provides you with an opportunity to create a 75 gallon aquarium stand and fill it with fish.
What is the best way to build a 75 gallon aquarium stand? In this article, I’ll outline 4 ways you can build one. The first one is simple and uses minimal tools and skills. The second option requires more knowledge, but is sturdier. The third and fourth options are expensive, but they are solid as a rock and require a minimal amount of work to put together.
How to build a 75 gallon aquarium stand
Building a 75 gallon aquarium stand is not as hard as you might think.
Aquarium stands can be made from wood, metal or even plastic. The material you use will depend on the design that you want and the size of your tank.
Different types of aquariums require different types of stands. For example, if you have a 75 gallon tank, then you will need a stand that is strong enough to support the weight of water and fish but also light enough to move around easily.
Step 1: Measure Your Tank and Calculate How Much Space You Need
The first thing that you should do is measure your tank and calculate how much space will be needed for your stand. You can find out how much space by measuring the length, width and height of your tank including any accessories such as filters or heaters. Then multiply these figures together to get the total volume of water in gallons. For example, if your tank measures 30 inches long by 20 inches wide by 15 inches high (75 cm x 50 cm x 38 cm), then its volume would be 30 x 20 x 15 = 2,100 cubic inches or 62 gallons (227 L).
This means that if you put a 60-watt light bulb over your aquarium with no other equipment inside it
If you have a 75 gallon aquarium, you will need a strong stand to hold it. The best way to build a 75 gallon aquarium stand is with metal pipes. You can also use wood, but this may not be as durable as metal pipe. There are many different types of metal pipe that you can use to build your aquarium stand. Each type has its own advantages and disadvantages.
There are three main types of metal pipe that you can use to build your aquarium stand: steel, aluminum and copper. Steel is the most commonly used material for building aquarium stands because it is cheap and durable. Steel pipes will not corrode or rust over time like aluminum and copper do. Steel does not conduct heat as well as aluminum or copper does though, which means that the heat from your aquarium lights might cause the steel to warp or melt over time if it gets too hot. This can be avoided by keeping your lights away from the top of your aquarium by at least six inches (15 centimeters).
Aluminum pipes are less common than steel pipes because they cost more than steel pipes do per foot (meter). They do conduct heat better than steel pipes do though, so they are ideal for using in conjunction with high wattage light bulbs such as T8 fluorescent lamps or
Fish tanks come in a variety of sizes, but the most common is a 75-gallon tank. However, building a stand for this size aquarium can be difficult if you are not experienced with carpentry. The best way to avoid making mistakes is to get some help from someone who has built an aquarium stand before.
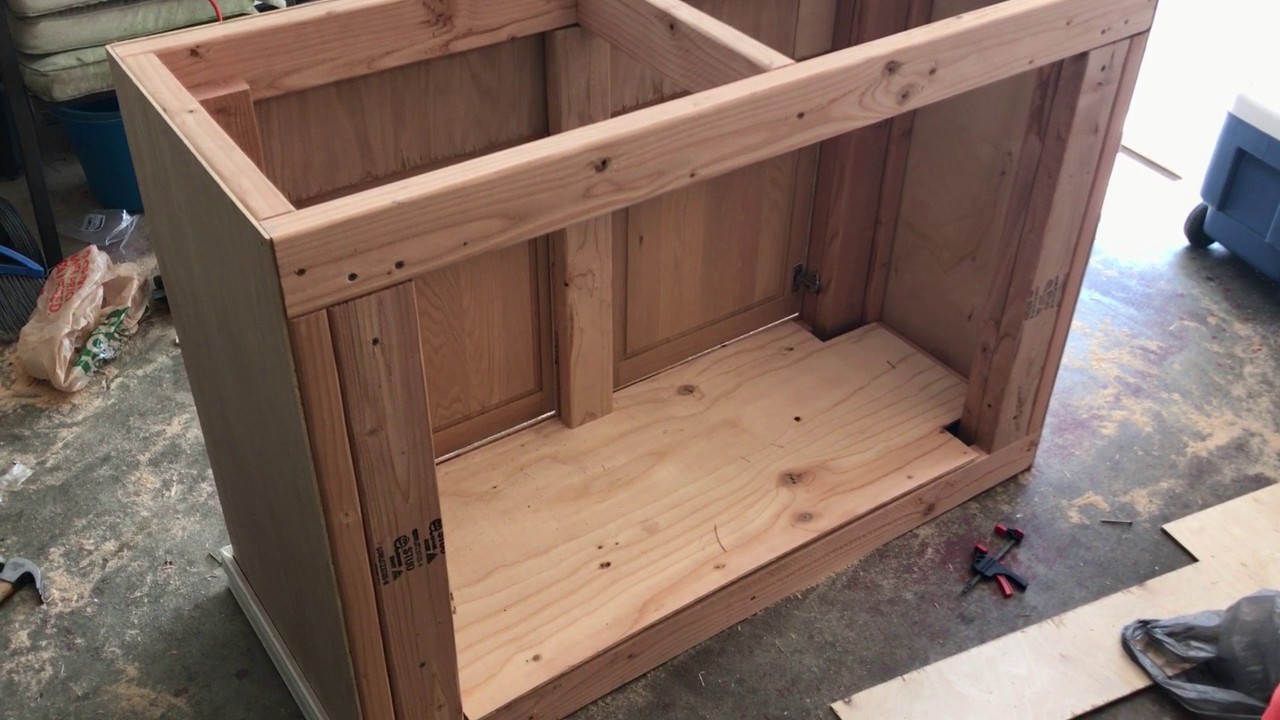
Aquarium stands are typically made from wood and require a lot of time and attention to detail in order to be functional and attractive. They can be built with simple tools and materials found at any major home improvement store.
Step 1
Measure your tank and determine how much space you need for your tank stand. The dimensions will vary depending on the type of aquarium you have, so make sure that you measure carefully before proceeding with this step.
Step 2
Purchase wood pieces from a local hardware store or lumberyard if you don’t have any in your garage or workshop already (or ask someone else if they do). Most home improvement stores sell standard sizes and lengths of wood that can be used as aquarium stands, but it’s always best to measure yourself before purchasing anything so that you know exactly what size pieces you need in order to build your own adjustable aquarium stand.
Aquarium stands are an essential part of any fish tank setup. They provide a stable base for your aquarium and create a nice display area for your aquatic pets. If you’ve never built one before, or if you’re looking for some tips on how to build the perfect stand for your 75 gallon aquarium, then this article is for you!

There are many different types of aquarium stands available on the market today. Some come pre-built in a kit form while others need to be assembled from scratch. Some come with a matching hood while others do not. Some have glass tops while others are made out of wood or metal. The choice is up to you as there are pros and cons to each type of stand available on the market today.
To help make sure that you get the right type of stand for your 75 gallon fish tank, we have compiled a list of several different types of aquarium stands below along with their pros and cons:
Wooden Aquarium Stand Pros: Wood is a natural material and looks great in any room in your house! It can also be stained or painted to match any color scheme and will last forever as long as it’s cared for properly. Cons: Wood can warp over time due to changes in temperature and humidity levels in the room where
A stand for your aquarium is an important part of the set up. It gives your tank a place to sit and it can also be used to store accessories and supplies. If you have a large tank, the stand will need to be able to support its weight. And while you might be able to build your own stand, if you don’t have carpentry skills or tools, then it may be best to purchase one instead.
There are many different styles of aquarium stands available on the market today, but most of them will fall into one of two categories: wood or metal. Metal stands are typically made from aluminum or steel, while wooden ones are made from hardwood or plywood. They both have advantages and disadvantages that are worth considering before making a choice.
Wooden stands tend to be cheaper than metal ones, but they’re also prone to warping with time and moisture damage from fish waste. They also tend not to last as long as their metal counterparts because they aren’t as sturdy or durable over time when subjected to frequent use and abuse by small children and pets alike! But if you’re looking for something that’s easy on the wallet then this might just be what you’re looking for!
Calculate the material needed. The size of your tank will determine the amount of material needed. A good rule of thumb is to allow 2 square feet of bedding per inch of fish. For example, a 125-gallon tank will use about 300 square feet of sand or gravel. To choose an appropriate substrate, consider what type your fish prefer and what is available in your local area. If you have an aquarium store nearby that carries gravel or sand in bulk sizes, this will save money on shipping costs. However, if shipping costs are not an issue or you don’t have access to an aquarium store with bulk sizes, then it is best to purchase smaller bags from online stores like Amazon or Petco.
Estimate the cost of building a stand using these simple steps:
1. Find out how much it costs per pound for wood at your local hardware store by weighing some pieces yourself (for example: “How much does one pound of pine cost?”). This way you can get a sense for how much wood it will cost for each project (i
75 Gallon Aquarium Stand Plans
Here is the plan for a 75 gallon aquarium stand. This design can be built from wood or metal. The aquarium and stand are made from glass and metal. There are many different ways to build this type of aquarium stand. You can use metal tubing or wood frames for the support columns, different types of fasteners and other materials such as plastic or epoxy.
The first step in building your own aquarium stand is to choose the correct size for your fish tank. You need to know how much space you have available for your aquarium and what size tank will fit into it before you start building anything. Many people make mistakes when they buy a large fish tank without enough room for it, so be sure that you measure everything correctly before buying anything!

If you want to build a custom aquarium stand yourself then there are some important things that you should consider before starting on any project like this one:
The size of your tank: If you have a smaller tank then it will be easier to find a place in which to keep it, but if you have a larger one then it might not fit anywhere easily! So make sure that whatever room you choose has enough space for both the fish tank itself
A 75 gallon aquarium is a great size for a beginner and it’s easy to find a place for it in your home. It’s also an excellent size for fish, especially if you have a smaller room.
Here are some things to consider when choosing an aquarium stand:
Size – The size of your aquarium stand depends on both the size of the tank and how much space you have available. If you’re planning on keeping lots of fish, then you’ll want at least three feet of space around the tank at all times so that they can move around freely. This will mean that you need to use more than one shelf in order to support the weight of your aquarium.
Materials – Most people choose wood as their material for making an aquarium stand because it’s inexpensive and looks nice. However, if you plan on moving your tank around regularly, then this may not be the best choice because wood is heavy and could break under pressure from time to time. Metal stands are a better option because they won’t bend or break easily and can hold up against even large tanks without any problems whatsoever.
How To Build A Stand For Your Aquarium. Building your own aquarium stand can be a lot of fun and save you quite a bit of money. The best thing about making your own is that you get to choose the design and materials that go into it.
You can make it as simple or as elaborate as you like. If you are going to make your own, here are some tips to help you get started:
1) Start by deciding on what kind of an aquarium stand you want. One option is to follow the design of store bought ones and make one yourself from scratch; another option is to use an existing piece of furniture and convert it into an aquarium stand. There are several pieces of furniture that work well with this idea including bookcases, desks or dressers. You could also use lumber or plywood to create a simple frame for attaching your tank to.
2) Once you have decided on what type of aquarium stand you want to build, take measurements so that everything fits correctly together when finished. Measurements should include width, depth and height; these will vary depending on.
75 gallon aquarium stand dimensions
a great location for the stand is close to a wall or other large flat surface. This will help to reduce any potential vibrations from the aquarium’s filter system and pump. If you have the room, try placing your stand on a rug or carpeted floor to help reduce vibration as well.
The best way to ensure that your aquarium stands are securely attached is by using lag bolts, which are designed specifically for this purpose. You can buy these at any local hardware store or home improvement store.
You’ll want to purchase enough lag bolts so that each leg is secured twice – once on each side of the board with at least two lag bolts per leg (and preferably three). This will help prevent movement of your stand under heavy loads and provide additional support for long-term use.
How to Build a 125 Gallon Aquarium Stand
What You’ll Need:
1/2″ Plywood, cut to desired dimensions.
2×4’s cut to desired dimensions.
Wood Glue – or some other adhesive of your choice.
Stain/Paint – I used Minwax Jacobean which matched the color of my stand perfectly. If you want something different, just use whatever you think looks good.
Saw – I used a table saw but you could use a circular saw or even a hand saw if you have the patience and don’t mind spending hours on end making straight cuts in plywood!
If you’re looking for a sturdy, durable aquarium stand that will last for years to come, then you’ll want to build your own.
Here are some things to consider when building your own aquarium stand:
Materials: Wood is the most common material used by hobbyists when building their own aquarium stands because it’s easy to work with and readily available at most hardware stores. You can also use metal or plastic if you prefer those materials over wood. Just be sure to use materials that are strong enough to support the weight of your tank and accessories.
Size: The size of an aquarium stand depends on how big your tank is. For example, if you have a 45-gallon tank, then a 45-gallon aquarium stand will be sufficient. However, if you have a 75-gallon tank, then you’ll need a 75-gallon aquarium stand so there is enough room for everything including lights and filters that hang off the back of the tank (these items will all add up in total weight).
Safety measures: It is important to keep safety in mind when building an aquarium stand from scratch because any sharp edges or corners could injure someone who comes near them such as children or pets
Here’s a simple tutorial on how to build an aquarium stand for a 75 gallon tank. The stand is made of 2x4s and plywood, and it can be built in about an hour.
1) Cut the wood to size. I used a table saw for this, but it could be done with a circular saw or hand saw as well.
2) Screw the cross braces together using 1 1/2″ screws. Make sure they are square and level before you move on to the next step!
3) Screw one leg into each corner of the bottom shelf. Make sure they’re level with each other and with the cross braces. This is what gives your stand strength and stability, so take your time here!
4) Screw one leg into each corner of the top shelf (these will be secured later). Again, make sure they’re level with each other and with the cross braces.
5) Secure the top shelf to the legs by screwing them through pre-drilled holes in both pieces. You’ll want to use at least two screws per hole–one on each side–to make sure everything stays put!